Craft Your Dream Ebike Ride: The Ultimate Guide to Building a Custom Cockpit
Imagine cruising down the road on your e-bike, the wind whipping through your hair. But what if your hands start to ache after just a few miles, or your neck feels strained from hunching over uncomfortable handlebars? A poorly designed e-bike cockpit can quickly turn your dream ride into a frustrating experience.
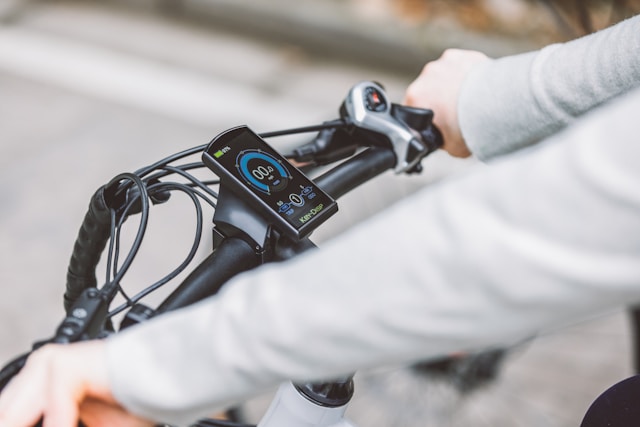
That’s where building a custom e-bike cockpit comes in. By carefully selecting and arranging the components that make up your control center, you can create a setup that’s not just functional, but also maximizes comfort, safety, and ultimately, your enjoyment on every ride. This post will guide you through the process of building a custom e-bike cockpit that perfectly suits your individual needs, whether you’re a daily commuter looking for a pain-free ride or a weekend adventurer seeking optimal control on the trails. We’ll delve into topics like choosing the right handlebars and stem for improved ergonomics (think “comfortable ebike cockpit” and “optimizing ebike ergonomics for long rides”), integrating essential accessories like phone mounts and mirrors, and creating a clean and organized control center for a truly personalized e-bike experience. So, ditch the generic setup and get ready to build the perfect e-bike cockpit for you!
Key Takeaways
- Foundation Matters: Choose the right handlebars and stem based on your riding style (swept vs flat bars), material considerations (weight vs comfort), and size (wider for stability, narrower for maneuverability). An adjustable stem allows for fine-tuning your posture for optimal comfort and control.
- Comfort is King: Select ergonomic grips (gel, foam) that suit your needs and explore different shapes for optimal hand positioning. Consider shifter and brake lever placement for easy access and control. Utilize internal cable routing or handlebar bags to maintain a clean and organized cockpit for a clutter-free ride.
- Stay Connected, Ride Informed: Choose a phone mount that prioritizes clear visibility and secure mounting (handlebar, stem, waterproof options). Explore mirror options (traditional vs aero) based on your riding style and safety needs. Consider blind-spot mirrors for added awareness in traffic.
- Optimize Ergonomics for Long Rides: Understand the concept of “saddle to bar drop” and its impact on posture. Aim for a smaller drop for a more upright and comfortable position on extended rides. Experiment with handlebar extensions and padded saddles for additional ergonomic comfort.
- Embrace the Journey: Building a custom cockpit is a personal experience. Don’t hesitate to experiment and adjust components to find the perfect setup for your body and riding style. Consult a local bike shop for professional fitting advice if needed.
RELATED CONTENT – Say Goodbye to Dead Phones: Unleash the Power of Dynamo Hub Charging
The Foundation: Handlebars and Stem – Building the Backbone of Your E-Bike Cockpit
The handlebar and stem are the foundation of your e-bike cockpit, forming the core interface between you and your machine. Choosing the right ones has a profound impact on comfort, control, and overall riding experience. Let’s delve into the world of e-bike handlebars and stems to help you build a solid foundation for your custom cockpit.
Handlebars: Swept vs Flat, Finding Your Perfect Match
- Swept handlebars: These handlebars feature an upward bend at the ends, creating a more upright riding position. This can be a great choice for comfort-focused riders, particularly commuters or those who enjoy cruising around town. Swept handlebars come in various degrees of sweep, so you can find one that balances comfort with an engaged feel. (Target keyword: ebike swept handlebars)
- Flat handlebars: These handlebars offer a more traditional, forward-leaning posture. They provide greater leverage for steering and better control on technical terrain, making them ideal for mountain biking and more aggressive riding styles.
Material Matters: Weight vs Comfort
- Aluminum handlebars: The most common choice, aluminum handlebars offer a good balance of affordability, weight, and durability.
- Carbon fiber handlebars: Lighter than aluminum, carbon fiber handlebars can improve handling and reduce fatigue on long rides. However, they tend to be more expensive and can be less forgiving in a crash.
- Steel handlebars: While not as common on e-bikes, steel handlebars offer a balance between weight and shock absorption, providing a comfortable ride with a bit more flex than aluminum.
Choosing the Right Size for Your Riding Style
The width of your handlebars should complement your riding style:
- Wider handlebars (720mm and above): Provide increased stability and control, ideal for mountain biking and off-road riding.
- Narrower handlebars (680mm and below): Offer better maneuverability in tight spaces and can be preferable for commuting or urban riding.
The Stem: It’s All About Position
The stem is the link between your handlebars and the head tube of your e-bike frame. Its length and angle significantly impact your riding position.
- A longer stem puts you in a more stretched-out, aerodynamic position, favorable for aggressive riding or racing.
- A shorter stem creates a more upright posture, ideal for comfort-focused riding and better visibility in traffic.
- Adjustable stems: These allow you to fine-tune your position for optimal comfort and control.
Finding the Perfect Fit
The ideal handlebar and stem combination depends on your individual body type, riding style, and desired level of comfort. Here are some resources to help you find the perfect fit:
- Online fit guides: Several online resources offer handlebar and stem sizing recommendations based on your height and inseam.
- Consult your local bike shop: Experienced mechanics can assess your posture and recommend handlebar and stem options that optimize your comfort and control on your e-bike.
Remember, the handlebar and stem are the foundation of your e-bike cockpit. By carefully considering your needs and exploring the available options, you can build a solid base for a comfortable, efficient, and enjoyable ride.
RELATED CONTENT – Enhancing the Comfort of Long Electric Bike Rides
Creating the Perfect Control Center: Where Comfort Meets Functionality
Once you’ve laid the foundation with your handlebars and stem, it’s time to focus on the nerve center of your e-bike cockpit: the control center. This is where your hands meet the machine, so ensuring comfort and functionality is paramount. Here’s how to craft a control center that puts you in complete command of your ride.
Grippin’ it Right: Material and Shape for Peak Comfort
Your grips are the primary contact point between your hands and the handlebars. Choosing the right ones can significantly impact comfort and reduce hand fatigue, especially on longer rides. Let’s explore some popular grip options:
- Material:
- Gel grips: A popular choice for comfort seekers, gel grips provide excellent vibration dampening and a softer feel on the hands.
- Foam grips: Offering a balance between comfort and affordability, foam grips are lightweight and absorb some vibration.
- Rubber grips: These offer a more direct feel and better grip in wet conditions, but may not be as comfortable on long rides.
- Leather grips: A premium option, leather grips provide a classic look, good grip, and can mold to your hands over time. However, they require more maintenance and can be slippery when wet.
- Shape: Grips come in various shapes, including anatomic grips with ridges and contours that promote better hand positioning and reduce pressure points. Consider trying different shapes to find what feels most comfortable for you.
Shifter and Brake Lever Placement: Control at Your Fingertips
The placement of your shifters and brake levers is crucial for easy access and confident control. Most e-bikes come with these pre-installed, but some allow for adjustments. Ideally, your shifters and levers should be within easy reach without compromising your grip on the handlebars. If you find the stock positioning isn’t ideal, some manufacturers offer aftermarket levers with improved ergonomics and adjustability.
Maintaining a Clean Cockpit: Internal Routing and Storage Solutions
A cluttered cockpit can be visually distracting and hinder control. To achieve a clean and organized setup, consider these options:
- Internal cable routing: This allows for a sleek look by hiding shifter and brake cables inside the frame. While typically found on higher-end e-bikes, some aftermarket kits can enable internal routing on certain models.
- Handlebar bags: These provide a convenient and accessible storage solution for essentials like tools, snacks, or your phone. Choose a bag that fits your handlebar width and doesn’t impede your grip or visibility.
By carefully selecting your grips, optimizing shifter and brake lever placement, and implementing solutions for a clean cockpit, you can create a control center that’s not just functional but also enhances the overall aesthetics and comfort of your e-bike experience.
RELATED CONTENT – Can You Install Accessories Like Racks or Baskets to an Electric Bike?
Best Phone Mount and Mirror Setup for E-Bike: Stay Connected and Ride Informed
In today’s digital world, our phones have become an extension of ourselves, and that holds true even on e-bike rides. Whether you’re using a GPS app, tracking your fitness data, or simply jamming to tunes, having your phone readily accessible is a must. But safety and security are paramount. Let’s explore the best phone mount and mirror setup to keep you connected and informed without compromising your ride.
Seeing is Believing: Ensuring Phone Visibility and Security
The key to a good phone mount is clear visibility. You want to be able to glance down quickly at your phone’s screen without taking your eyes off the road for too long. Security is equally important. A sturdy mount that securely grips your phone will prevent it from bouncing or ejecting during your ride, especially on rough terrain.
Mounting Options: Finding the Perfect Fit
There are various phone mount options available, each with its own advantages:
- Handlebar mounts: These attach directly to your handlebars, offering a central and easily accessible location for your phone. However, they can clutter the cockpit and may block your view of the stem or controls.
- Stem mounts: Mounted directly to the stem, these offer a cleaner look and often provide a more stable position for your phone. Be sure the mount you choose is compatible with your stem diameter.
- Waterproof mounts: For riders who frequently encounter rain or splashes, waterproof mounts offer an extra layer of protection for your phone.
- Mounts with integrated charging: These mounts keep your phone juiced up while you ride, perfect for long journeys.
Consider your riding style and needs when choosing a mount. For casual riders, a handlebar mount might suffice. For mountain bikers or those venturing on longer rides, a stem mount with a waterproof or charging feature could be ideal. (
Seeing Beyond: Mirrors for Enhanced Safety
E-bikes often lack the side mirrors commonly found on motorcycles. While not mandatory, adding mirrors significantly improves your safety and situational awareness on the road. Here’s a breakdown of two main mirror types:
- Traditional mirrors: These offer a wider field of view, allowing you to see far behind you. However, they can catch wind resistance and potentially create a shaky view.
- Aero mirrors: Designed with a more streamlined profile, these mirrors minimize wind resistance and offer a clearer view in windy conditions. However, their smaller size may limit your field of vision.
RELATED CONTENT – Enhancing Ebike Safety: The Importance of Rear Mirrors
The Added Benefit of Blind Spot Mirrors
Blind spot mirrors are small convex mirrors that attach to your existing mirrors, providing a view of areas directly behind you that might otherwise be hidden from view. These are especially helpful in busy traffic situations.
The best phone mount and mirror setup depends on your individual needs and riding style. Prioritize clear phone visibility, secure mounting, and choose mirrors that enhance your overall safety and awareness on the road.
Optimizing E-Bike Ergonomics for Long Rides: Comfort is King
E-bikes are fantastic for conquering longer distances, but an improperly set-up cockpit can quickly turn those miles into misery. Here’s where optimizing ergonomics for long rides comes in. By ensuring a comfortable and sustained posture, you can maximize your enjoyment and prevent aches and pains that can derail your adventure.
The Importance of Proper Posture
Just like a well-adjusted office chair keeps you comfortable throughout the workday, proper posture is crucial for long e-bike rides. An ideal posture distributes your weight evenly across your body, reducing pressure points and preventing fatigue. Conversely, a hunched or strained posture can lead to neck pain, backaches, and sore wrists.
Understanding Saddle to Bar Drop: The Key to Comfort
One crucial factor in achieving proper posture is the concept of “saddle to bar drop.” This refers to the vertical distance between your saddle and your handlebars. A larger drop creates a more aggressive, forward-leaning posture, while a smaller drop positions you in a more upright and relaxed stance.
- For long rides, a smaller saddle to bar drop is generally recommended. This keeps your back straighter and reduces strain on your neck and shoulders.
- A larger drop might be preferable for riders prioritizing aerodynamics or power transfer. However, this position can put more strain on your upper body and may not be ideal for extended distances.
Taking Ergonomics a Step Further: Additional Considerations
While the handlebar and saddle position are key, there are other ways to optimize ergonomics for long rides:
- Handlebar extensions: These extensions provide additional hand positions, reducing pressure on your wrists and forearms.
- Padded saddles: Investing in a comfortable and supportive saddle can significantly improve comfort on long journeys.
- Proper clothing: Wearing padded cycling shorts and breathable clothing can further enhance your comfort during extended rides.
Ergonomics is a personal journey. Experiment with different handlebar and saddle positions, and don’t hesitate to consult a local bike shop for a professional fitting to find the perfect setup for your body and riding style. By prioritizing comfort, you can transform your e-bike into a true extension of yourself, allowing you to conquer miles in style and
Bonus Section: Building Your E-Bike Cockpit on a Budget
Crafting a comfortable and functional e-bike cockpit doesn’t have to break the bank. Here are some cost-effective component recommendations and considerations to keep your wallet happy:
Grips: Stock grips are often basic and can cause discomfort. Upgrading to ergonomic gel or foam grips can significantly improve comfort for minimal investment. Look for options in the $10-$20 range.
Handlebar Pad: A simple handlebar pad adds cushioning and comfort, especially on longer rides. Consider gel or foam handlebar pads that wrap around the handlebar for better pressure distribution. Prices typically range from $15-$25.
Bar-End Mirrors: For enhanced safety on a budget, bar-end mirrors offer a more affordable alternative to full-size mirrors. These typically mount at the ends of your handlebars and provide a decent rearward view. Expect to spend around $10-$20 for a pair.
DIY Phone Mount: Feeling crafty? With a phone case, zip ties, and some creativity, you can create a surprisingly secure DIY phone mount. Utilize zip ties to create a bracket that attaches to your handlebars and securely holds your phone case in place. This option requires some effort but can be practically free if you have spare zip ties lying around.
Second-Hand Components: Online marketplaces and local bike shops often have used components available at significantly reduced prices. You might find gently used handlebars, stems, or even phone mounts that perfectly suit your needs. Be sure to inspect any used components for wear and tear before purchasing.
Cost-Effective Material Choices:
- Grips: Foam grips offer a good balance of affordability and comfort compared to gel grips.
- Handlebars: Aluminum handlebars are a great budget-friendly option, striking a good balance between weight and durability. Steel handlebars can be another cost-effective choice, offering a bit more flex for comfort.
- Stems: Aluminum stems are widely available and affordable. Adjustable stems might be slightly more expensive but offer greater adjustability for optimizing your posture.
When prioritizing a budget-friendly cockpit, focus on upgrading the components that will have the most significant impact on your comfort and safety. Grips and a handlebar pad can make a surprisingly big difference in ride quality, while bar-end mirrors enhance safety without breaking the bank.
Sample Custom E-Bike Cockpits by Riding Style
The Commuter Cockpit:
- Focus: Comfort and visibility for daily rides.
- Components:
- Swept handlebars for a more upright posture.
- Shorter stem to keep your torso upright and comfortable.
- Ergonomic gel grips for added comfort.
- Bar-end mirrors for rearward visibility.
- Simple handlebar bag for essentials (optional).
The Mountain Biker Cockpit:
- Focus: Control and responsiveness for technical terrain.
- Components:
- Flat handlebars for better leverage and control.
- Longer stem for a more aggressive, forward-leaning posture.
- Lock-on grips for a secure hold on rough terrain.
- Low-profile mirror with good adjustability for rearward visibility.
- Handlebar extensions for various hand positions.
The Touring Cockpit:
- Focus: Comfort and functionality for long distances.
- Components:
- Swept handlebars with a slight backsweep for comfort on long rides.
- Adjustable stem for fine-tuning posture throughout the journey.
- Ergonomic grips with good palm support.
- Full-size mirrors for optimal rearward visibility.
- Large handlebar bag for storing essentials and maps.
These are just a few examples, and the possibilities are endless. Remember, the key is to prioritize your riding style and comfort needs when building your custom e-bike cockpit.
FAQs
Absolutely! Here are some cost-effective tips:
Grips: Consider replacing your stock grips with ergonomic gel or foam grips for better comfort without breaking the bank.
Handlebar pad: Adding a cushioned handlebar pad can improve comfort on longer rides for minimal cost.
Bar-end mirrors: These simple mirrors offer a budget-friendly way to enhance safety compared to full-size mirrors.
DIY phone mount: If you’re handy, consider creating a DIY phone mount using a phone case and zip ties (ensure a secure fit!).
Yes! The beauty of a custom cockpit is its versatility. Here’s a basic approach:
Commuting: Prioritize comfort with swept handlebars, a more upright posture (smaller saddle to bar drop), and ergonomic grips.
Mountain Biking: Opt for flat handlebars for better control, a lower saddle to bar drop for a more aggressive posture, and handlebar extensions for various hand positions.
The internet is a treasure trove of inspiration! Here are some suggestions:
Online forums and communities: Connect with other e-bike enthusiasts and share cockpit setup ideas.
Social media: Platforms like Instagram and Pinterest showcase a variety of custom e-bike cockpits.
E-bike brand websites: Many e-bike brands offer pre-built cockpits or component recommendations for various riding styles.
Not necessarily! You can upgrade your cockpit gradually. Start with the component that bothers you the most (e.g., uncomfortable grips) and add on from there as your budget allows.
In general, customizing your cockpit is safe as long as you use high-quality components and ensure everything is securely mounted. However, if you’re unsure about any modifications, consult a professional bike mechanic for guidance.
Conclusion:
By now, you’re equipped with the knowledge and tools to transform your e-bike cockpit into a personalized haven of comfort, control, and style. Remember, there’s no single “perfect” setup – the key lies in understanding your needs and preferences as a rider. Experiment, explore different options, and don’t be afraid to fine-tune your cockpit over time.
The road (or trail) awaits! Now that you’ve built your dream cockpit, it’s time to hit the road and experience the joy of a truly customized e-bike ride. We’d love to see your creations! Share photos of your custom e-bike cockpit builds in the comments section below. For further inspiration and to connect with other e-bike enthusiasts, explore online communities and bike forums dedicated to the exciting world of e-bikes.
So, what are you waiting for? Get out there, craft your perfect cockpit, and experience the full potential of your e-bike adventure!
- Heybike Ranger S Review: Powerful, Comfortable, and Feature-Packed E-Bike
- Jam on the Go: The Ultimate Guide to Ebike Sound Systems
- The Ultimate Guide to Stylish Ebikes for Teens
- Craft Your Dream Ebike Ride: The Ultimate Guide to Building a Custom Cockpit
- Night Ebiking: Light Up Your Ride and Rule the Darkness
Kristina Grant is not just an enthusiast but a true authority on electric bikes. Nestled in the coastal beauty of Virginia, Kristina has found the perfect backdrop for her passion for electric biking. As a dedicated wife and homeschooling mom, her life revolves around family, faith, and the thrill of adventure.
Originally hailing from Ohio, Kristina's journey with electric bikes began as a curiosity and quickly evolved into a deep expertise. Her blog is a testament to her love for electric biking, combining her fascination for eco-friendly transportation with her coastal lifestyle.
When she's not cruising the beach on her electric bike, you'll find Kristina indulging in her other loves: long walks along the shore, getting lost in a good book, and cherishing moments with her loved ones. With a heart as big as her love for animals, especially cats, Kristina brings a unique perspective to the electric bike world, grounded in her strong faith in God and her dedication to a sustainable lifestyle.
Through her blog, Kristina shares her extensive knowledge of electric bikes, offering valuable insights, tips, and recommendations to fellow enthusiasts. Whether you're a seasoned rider or a newcomer to the electric bike scene, Kristina's blog is your go-to source for all things electric biking, fueled by her passion, expertise, and the scenic beauty of coastal Virginia.
