Don’t Let a Flat Tire Stop Your E-Bike Adventure: A DIY Fix-It Guide
Last Updated on June 24, 2024 by Kristina Grant
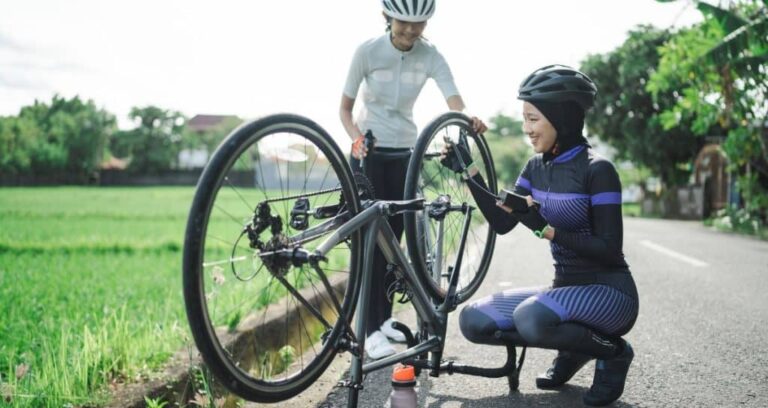
Imagine this: you’re cruising along on your e-bike, enjoying the scenery and the satisfying hum of the electric motor. Suddenly, the ride gets bumpy, and you hear the dreaded hiss of a flat tire. A flat tire on a regular bike can be inconvenient, but on an e-bike, it can feel even more frustrating. You might be worried about getting stranded, the cost of a shop repair, or even the possibility of damaging your e-bike by riding on a flat.
But fear not, fellow e-bikers! This guide is here to empower you to tackle a flat tire with confidence. We’ll walk you through a step-by-step process that’s clear, concise, and designed to get you back on the road quickly. We’ll also share some time-saving hacks and address common concerns like the cost of repairs at a shop and the risks of riding with a flat tire.
By the end of this guide, you’ll be equipped with the knowledge and tools to fix a flat tire on your e-bike, ensuring your e-bike adventures are filled with smooth rides and happy trails!
Key Takeaways
- Fix a flat e-bike tire on the road with the right tools and know-how.
- Carry a patch kit, tire levers, pump, and wrench for roadside repairs.
- Slime can help with small punctures but may not fix larger holes.
- Consider a CO2 inflator for a quick refill
- Knowing your e-bike’s inner tube size helps when buying a spare.
- Practice changing a tire at home before encountering a flat on the road.
- Don’t attempt repairs if uncomfortable; seek help or take it to a shop (e-bike flat tire cost to fix at shop).
RELATED CONTENT – Ebike Maintenance for Beginners
E-Bike Fix Flat Tire
Throughout this guide, we’ll be focusing on how to conquer a common e-bike foe: the dreaded flat tire. We’ll break down the entire process of an e-bike fix flat tire into a series of easy-to-follow steps. Whether you’re a seasoned cyclist or a new e-bike owner, this guide will equip you with the knowledge and tools to get your e-bike rolling again in no time.
Step-by-Step Guide:
Before we dive into the specifics of tools and techniques, let’s set the stage for a successful e-bike fix flat tire operation.
- Find a Safe Location: Safety first! When you experience a flat tire, prioritize finding a safe spot to pull over. Look for a flat, stable surface away from traffic. This will make the repair process easier and less risky.
- Prepare a Stable Work Area: If possible, park your e-bike on a sturdy surface like a sidewalk or level ground. This will prevent your e-bike from tipping over while you’re working on the tire.
RELATED CONTENT – Don’t Get Stranded! DIY Ebike Repair Kit: Bonus Repurposed Supplies
Step-by-Step Guide: Be Prepared for a Smooth Fix
Conquering a flat tire on your e-bike is all about preparation and having the right tools at hand. Here’s what you’ll need to ensure a smooth and efficient e-bike fix flat tire operation:
1. Find a Safe Location:
A flat tire can be stressful, but it’s crucial to stay calm and prioritize safety. Don’t attempt to fix the flat on a busy road or uneven terrain. Here’s what to look for in a safe location:
- Off the Road: Move your e-bike to a location away from traffic. Ideally, find a designated bike lane shoulder or a wide sidewalk.
- Flat and Stable Surface: Look for a level, stable surface like pavement or packed dirt. Avoid areas with loose gravel or uneven ground, which could cause your e-bike to tip over while you’re working.
- Good Visibility: Choose a well-lit area, especially if you’re facing a flat tire after dark. This will ensure you have good visibility for the repair process and can be easily seen by oncoming traffic (if applicable).
2. Gather Your Tools:
Having the right tools on hand will make the e-bike fix flat tire process much faster and less frustrating. Here’s the essential toolkit:
- Tire Levers (2-3): These specialized tools help pry the tire off the rim. Opt for nylon or plastic tire levers to avoid damaging the rim.
- Patch Kit: Look for a patch kit specifically designed for e-bike tires. These kits typically include sandpaper, glue, and patches sized for e-bike inner tubes.
- Bike Pump: A good quality bike pump will help you inflate the tire back to its recommended pressure. Consider a pump with a pressure gauge for accurate inflation.
- Wrench: The size of the wrench will depend on your e-bike’s axle nuts. Ensure you have the right size to loosen and tighten the nuts securely.
Optional, But Handy:
- Slime: This tire sealant can be a lifesaver for small punctures. Slime injects a self-sealing liquid into the inner tube, potentially fixing minor leaks without needing a patch.
- CO2 Inflator: For a quick and easy refill, a CO2 inflator can be a convenient option. These compact devices use small CO2 cartridges to rapidly inflate your tire.
Note: We’ll discuss Slime in more detail later in the guide, explaining their specific uses and limitations for e-bike tire repair.
RELATED CONTENT – Can Ebikes Be Easily Repaired at Local Bike Shops?
Fixing the Flat: Get Rolling Again
Now that you’ve found a safe location and gathered your tools, it’s time to tackle the e-bike fix flat tire itself. Here’s a breakdown of each step:
1. Locating the Puncture (E-Bike Fix Flat Tire on Trail):
The first order of business is finding the culprit – the puncture that’s causing the flat. Here’s how:
- Visual Inspection: Carefully examine the tire for any visible signs of damage, like sharp objects embedded in the tread or sidewall. This is especially important if you got the flat on a trail, where encountering thorns, rocks, or other debris is more common.
- The Listening Trick: Spin the wheel slowly and listen for a hissing sound. This sound can help pinpoint the location of the leak.
Trail Tip: If you’re fixing a flat on the trail, be extra vigilant when inspecting the tire. Trail surfaces are often littered with potential puncture hazards like thorns, sharp rocks, or broken glass. Carry a small pair of pliers to remove any embedded objects safely.
2. Deflating the Tire:
Once you’ve located the puncture, it’s time to deflate the tire completely. Locate the valve stem on the inner tube and use your thumb to press down on the valve core to release the air. You can also use a valve tool (often included in patch kits) for a more controlled release.
3. Wheel Removal
Now it’s time to remove the wheel with the flat tire. The exact steps might vary slightly depending on your e-bike model. Here’s a general guideline:
- Disc Brakes: For disc brakes, you might need to loosen the brake caliper slightly to create space for the wheel to come out. Consult your e-bike’s manual for specific instructions on brake adjustment.
- Rim Brakes: For rim brakes, simply loosen the brake pads to provide clearance for the wheel.
Once the brakes are out of the way, proceed to:
- Loosen the Axle Nuts: Use the wrench you brought in your toolkit to loosen the axle nuts on each side of the wheel. Do not remove the nuts completely yet!
- Slide Out the Wheel: Once the nuts are loose, carefully pull the wheel out of the fork or frame slot.
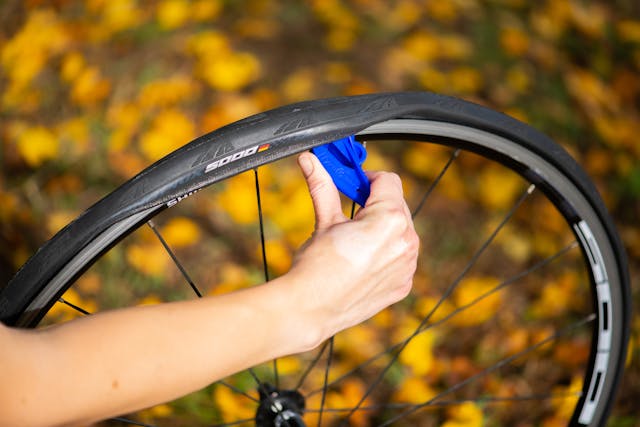
4. Tire Removal (Using Tire Levers):
Here’s where the tire levers come in handy.
- Position the Levers: Place one tire lever under the lip of the tire, near the valve stem. Hook the lever onto the rim and push down to pry a small section of the tire off the rim.
- Work Around the Tire: Slide another tire lever a few inches away from the first lever and repeat the prying motion. Continue working your way around the tire, adding more levers as needed to pry off the entire tire.
How to Change a Flat Tire on an Electric Scooter (if applicable):
The process of removing a tire on an electric scooter is generally similar to removing an e-bike tire. However, some scooters might have unique features like a single-sided swingarm or hub motor design. Always refer to your scooter’s user manual for specific instructions on wheel removal.
5. Inspecting the Tire:
With the tire off the rim, carefully examine both the inside and outside for any signs of damage beyond the puncture. Look for cuts, worn areas, or debris lodged in the tread. If you find significant damage, it might be best to replace the entire tire instead of patching.
6. Patching the Hole (Best Tire Patch Kit for E-Bike):
If the puncture is a small hole or tear, you can attempt to fix it with a patch kit. Here’s what to do:
- Roughen the Area: Use the sandpaper included in the patch kit to roughen up the area around the puncture site. This helps the patch adhere better.
- Apply the Glue: Following the instructions on the patch kit, apply the glue to the roughened area around the hole. Let the glue dry for the recommended time (usually a few minutes).
- Patch Placement: Center the patch over the hole and press it firmly onto the glued area. Ensure there are no air bubbles around the patch.
When choosing a patch kit, opt for one specifically designed for e-bike tires. These kits offer several advantages over regular bike patch kits:
- Patch Size: E-bike inner tubes are typically thicker and wider than regular bike tubes. E-bike tire patch kits come with patches sized to effectively cover punctures on these larger tubes.
- Stronger Adhesive: The adhesive in e-bike tire patch kits is formulated to create a stronger bond with the thicker material of e-bike inner tubes. This ensures a more reliable and long-lasting repair, withstanding the higher pressure e-bike tires are inflated to.
Here are some additional factors to consider when choosing an e-bike tire patch kit:
- Vulcanizing vs. Glueless Patches: Vulcanizing patches require applying a curing agent (glue) that activates with a chemical reaction. Glueless patches utilize a pressure-sensitive adhesive for a faster application process. Both types can be effective for e-bike inner tubes, so choose based on your preference and comfort level.
- Patch Quantity: Consider the number of patches included in the kit. A kit with more patches offers better value and preparedness for future punctures.
By investing in a quality e-bike tire patch kit, you’ll be equipped to tackle flat tires on the road with confidence, ensuring a smooth and uninterrupted e-bike riding experience.
RELATED CONTENT – Ebike Braking: Conquer Any Descent
Applying Slime (E-Bike Fix Flat Tire with Slime Only): A Quick Fix for Small Punctures
Slime can be a lifesaver when you encounter a flat tire on the road, especially if the culprit is a tiny puncture. Here’s why Slime is a handy tool to have in your e-bike repair kit:
- Self-Sealing Technology: Slime is a tire sealant that injects a self-sealing liquid into your inner tube. When the tire encounters a small puncture, the Slime fills the hole and forms a seal, potentially stopping the leak and allowing you to reinflate the tire.
- Convenience and Speed: Using Slime can be a quicker and less involved fix compared to patching a hole. This can be a major advantage if you’re short on time or don’t have a patch kit readily available.
How to Use Slime:
Here’s a general guide on using Slime for a quick fix (always refer to the specific instructions on your Slime product):
- Deflate the Tire: As mentioned earlier, completely deflate the tire before applying Slime.
- Shake the Slime Bottle: Give the Slime bottle a good shake to ensure the sealant is evenly mixed.
- Attach the Slime Hose: Most Slime bottles come with a hose attachment. Screw the hose onto the valve stem of the inner tube.
- Inject the Slime: Following the recommended dosage on the Slime bottle, slowly inject the sealant into the inner tube.
- Reinflate the Tire: Reinflate the tire to the recommended pressure listed on the tire sidewall.
- Rotate the Tire: Spin the wheel a few times to distribute the Slime evenly inside the tire.
Important Note: While Slime is a convenient solution for small punctures, it’s crucial to understand its limitations. Slime is not a permanent fix and may not work for larger holes or tears in the inner tube. If the puncture is significant, patching the hole or replacing the inner tube is necessary for a reliable repair.
Additional Resources: For detailed instructions and a visual guide on using Slime, you can refer to the manufacturer’s website or instructional videos on platforms like YouTube.
RELATED CONTENT – Guide to Troubleshooting and Resetting Electric Bikes
Reassembly and Safety Checks: Getting Back on the Road Safely
With the flat fixed, it’s time to reassemble everything and ensure your e-bike is safe to ride again. Here’s a breakdown of the final steps:
1. Reinstalling the Tire:
- Slide the Tire Back Onto the Rim: With the patched (or Slime-treated) inner tube back inside the tire, carefully begin pushing the tire bead back onto the rim. Start opposite the valve stem and work your way around the tire.
- Tire Lever Assistance (Optional): If needed, you can use the tire levers again to help pry the final sections of the tire bead back onto the rim. Be careful not to pinch the inner tube while applying leverage.
2. Reinflating the Tire (Checking Recommended Pressure):
- Locate the Valve Stem: Find the valve stem on the inner tube again.
- Attach Your Pump: Screw the head of your bike pump onto the valve stem.
- Inflate to Recommended Pressure: The recommended tire pressure is typically printed on the sidewall of your e-bike tire. Don’t underinflate or overinflate the tire. An underinflated tire can handle poorly and be more susceptible to punctures, while an overinflated tire can be uncomfortable to ride and at risk of exploding.
3. Reinstalling the Wheel:
- Slide the Wheel Back In: Carefully slide the wheel back into the fork or frame slot, aligning the axle with the slots.
- Tighten the Axle Nuts: Use your wrench to tighten the axle nuts on each side of the wheel. Ensure the nuts are secure but avoid overtightening them.
4. Testing the Brakes:
- Spin the Wheel: Before hopping back on your e-bike, spin the wheel freely to ensure it’s not rubbing against the brakes.
- Squeeze the Brakes: Squeeze the brakes to test their responsiveness. If the brakes feel loose or spongy, you might need to adjust them slightly. Refer to your e-bike’s manual for brake adjustment instructions, or consult a bike mechanic if needed.
Safety First!
Once you’ve completed these steps, take your e-bike for a short test ride on a flat, safe surface. Listen for any unusual sounds or feel for any wobbling in the wheel. If everything feels secure and the brakes are functioning properly, you’re good to get back on the road and continue your e-bike adventure!
RELATED CONTENT – Fat Tire Electric Bikes vs Traditional Mountain Bikes
Additional Tips for E-Bike Fix Flat Tire Success
Conquering a flat tire on your e-bike is a valuable skill, but there’s more to mastering the e-bike fix flat tire than just the repair process itself. Here are some additional tips to keep you rolling:
1. When to Replace the Tire:
While patching a small puncture can extend the life of your e-bike tire, there are times when a complete tire replacement is necessary. Here are some signs to watch out for:
- Significant Damage: If the tire has large cuts, tears, or bulges in the tread, it’s best to replace it entirely. Patching such damage is unreliable and could lead to a sudden tire failure while riding.
- Excessive Wear: Over time, e-bike tires wear down due to regular use. Look for signs of worn tread, especially on the contact patch (the area of the tire that touches the road). If the tread depth indicators are worn down or the tire appears bald, it’s time for a new one.
2. Carrying a Spare Inner Tube (E-Bike Inner Tube Size Chart):
Being prepared is key to fixing a flat on the road. One of the most important things to carry in your e-bike toolkit is a spare inner tube. Here’s why:
- Faster Fix: Having a spare inner tube allows you to replace the flat tube entirely, which can be a quicker fix compared to patching a hole, especially if you’re not familiar with the patching process.
- Peace of Mind: Carrying a spare inner tube provides peace of mind, knowing that you can fix a flat and get back on the road without relying on external assistance.
Finding the Correct Size:
E-bike inner tubes come in various sizes, so it’s crucial to choose one that’s compatible with your specific tire. The size information is typically printed on the sidewall of your e-bike tire. Here’s a common e-bike inner tube size chart to give you an idea:
| Rim Diameter (inches) | ETRTO Size |
|---|---|
| 16 | 35-559 |
| 20 | 40-406 |
| 24 | 47-507 |
| 26 | 50-559 |
| 27.5 | 584 (26×1.50) |
| 700c | 622 (700×23/28c) |
Note: This is not an exhaustive list, and there might be variations depending on the specific tire model. Always refer to the size information on your tire sidewall for the most accurate fit.
3. Practice at Home:
Before venturing out on a long e-bike ride, it’s a good idea to practice fixing a flat tire at home. This will help you familiarize yourself with the tools and steps involved in the process. Find a safe and comfortable space to work, and simulate a flat tire by deflating your tire and practicing the entire repair process, from removing the tire to patching the hole and reinflating.
4. E-Bike vs. Regular Bike Tires:
While e-bike tires share some similarities with regular bike tires, there are some key differences to keep in mind:
- Thicker Construction: E-bike tires are typically thicker and heavier than regular bike tires. This is because they need to be able to handle the additional weight and power of an electric motor.
- Puncture Resistance: E-bike tires often have puncture-resistant features like thicker liners or built-in puncture protection layers.
- Patch Kit Compatibility: Most patch kits are compatible with both e-bike and regular bike inner tubes. However, it’s always a good practice to check the manufacturer’s recommendations to ensure the patch kit is suitable for e-bike inner tubes.
By following these additional tips and practicing your e-bike fix flat tire skills, you’ll be well-equipped to handle a flat tire situation calmly and efficiently, ensuring a smooth and uninterrupted e-bike riding experience.
RELATED CONTENT – Can Fat Tire Electric Bikes Handle Bikepacking or Long Distance Touring?
FAQs
A: Yes, tire plugs can be an alternative to patch kits for repairing small punctures on e-bike tires. However, tire plugs might not be as effective for larger holes or tears compared to patches.
A: No, Slime is not a permanent fix. Slime is a temporary solution that can seal small punctures. For a reliable and long-lasting repair, patching the hole or replacing the inner tube is necessary.
A: Riding on a flat tire with your e-bike is not recommended. Doing so can damage the rim of your wheel, especially if you’re riding on an e-bike with a heavier frame. Additionally, a flat tire can make it difficult to control your e-bike and increase the risk of an accident.
A: You can usually find a repair manual for your e-bike model by searching online or contacting the e-bike manufacturer directly. The manual might also be available on a CD or downloadable file included with your e-bike purchase.
A: In most cases, a regular bike shop can fix a flat tire on your e-bike. However, it’s always a good idea to call the shop beforehand to confirm they are comfortable working on e-bikes. Some shops might have specific tools or expertise required for e-bikes.
Conclusion:
Conquering a flat tire on the road can be frustrating, but with the right knowledge and preparation, you can fix it yourself and get back on your e-bike adventure quickly. This guide has equipped you with the step-by-step process for an e-bike fix flat tire, from finding the puncture to reassembling the wheel and ensuring everything is safe for riding.
Remember, practice makes perfect! Familiarize yourself with the tools and steps involved in fixing a flat tire at home before encountering one on the road. By carrying a spare inner tube, a patch kit, and essential tools, you’ll be prepared to handle most flat tire situations with confidence.
So, the next time you hit the road on your e-bike, you can ride with the peace of mind knowing you have the skills and tools to tackle a flat tire and keep rolling!
Ready to hit the road with confidence? Gear up with an e-bike repair kit and essential tools. Many online retailers and bike shops offer e-bike specific repair kits to get you started.
External Sources:
- E-Bike Tire Pressure Recommendations: Finding the optimal tire pressure for your e-bike is crucial. Here’s a link to a reputable source from Aventon.


Kristina Grant is not just an enthusiast but a true authority on electric bikes. Nestled in the coastal beauty of Virginia, Kristina has found the perfect backdrop for her passion for electric biking. As a dedicated wife and homeschooling mom, her life revolves around family, faith, and the thrill of adventure.
Originally hailing from Ohio, Kristina's journey with electric bikes began as a curiosity and quickly evolved into a deep expertise. Her blog is a testament to her love for electric biking, combining her fascination for eco-friendly transportation with her coastal lifestyle.
When she's not cruising the beach on her electric bike, you'll find Kristina indulging in her other loves: long walks along the shore, getting lost in a good book, and cherishing moments with her loved ones. With a heart as big as her love for animals, especially cats, Kristina brings a unique perspective to the electric bike world, grounded in her strong faith in God and her dedication to a sustainable lifestyle.
Through her blog, Kristina shares her extensive knowledge of electric bikes, offering valuable insights, tips, and recommendations to fellow enthusiasts. Whether you're a seasoned rider or a newcomer to the electric bike scene, Kristina's blog is your go-to source for all things electric biking, fueled by her passion, expertise, and the scenic beauty of coastal Virginia.