Easy DIY Electric Bike Conversions – A How-To Guide For Beginners
Last Updated on April 28, 2026 by Kristina
Disclosure: As an Amazon Associate, I earn from qualifying purchases. This comes at no extra cost to you and helps support the content on this site.
Converting a regular bicycle into an electric bike is one of the easiest and most affordable ways to enjoy the power, speed, and fun of eBiking. Instead of buying a brand-new electric bike, you can add a motor, battery, and controller to the bike you already own. The process is beginner-friendly, and with the right DIY eBike conversion kit, you can transform almost any bicycle into a strong, reliable electric ride.
If you’re new to electric bikes, you may also find our eBike troubleshooting guide helpful, along with our guide to understanding eBike voltage, which helps you naturally pair the right battery and motor for your build.
This full guide includes everything riders search for: how to convert a bike to an electric bike, best ebike conversion kits, front hub motors, rear hub motors, mid-drive motors, battery compatibility charts, wiring diagrams, legal limits, tools, maintenance, and more.
Important: Building or converting an e-bike involves electrical components, tools, and mechanical work. This guide is for educational purposes and focuses on safe, common DIY practices. Always follow manufacturer instructions, use proper safety gear, and make sure your finished e-bike complies with local laws. If you are unsure about any step, consult a qualified bike mechanic or e-bike technician.
Converted bikes may require brake upgrades and frame compatibility checks to safely handle added weight and speed.
Quick Start Summary (Beginner-Friendly Overview)
This is the simplest way to understand the whole process at a glance.
Quick Start – How to Convert a Bike to an eBike
- Choose the right kit.
Hub motors are easiest. Mid-drives are best for steep hills. - Measure your bike.
Check dropout width, bottom bracket width, wheel size, and battery space. - Mount the battery.
The downtube is best. Rear racks work for step-through frames. - Install the motor.
Replace the wheel (hub kit) or bottom bracket (mid-drive). - Connect wiring.
Plug in motor, battery, display, throttle, PAS, and brake sensors. - Test the system.
Lift the wheel. Test throttle, PAS, and brake cutoffs.
Most conversions take 1–3 hours, even for beginners.
What Is an Ebike Conversion Kit?
An ebike conversion kit is a collection of parts that turn a regular bicycle into an electric bike. These kits usually include:
- A motor (front hub, rear hub, or mid-drive)
- A battery
- A controller
- A display
- A throttle
- A pedal assist sensor (PAS)
- Wiring harness and connectors
DIY kits are budget-friendly and flexible. They let you keep your current bicycle while adding smooth electric assist.
Looking to build your own lightweight, high-performance ebike?
Check out DIY Carbon's premium carbon fiber frames and kits — perfect for custom ebike builds that cost less but ride like top-tier brands.
Types of Ebike Conversion Kits
Each kit type has its advantages. Understanding the differences helps you choose the best setup for your terrain and riding style.
Front Hub Motor Conversion Kits
Front hub motors power the front wheel. They’re the easiest for beginners.
Pros
- Very simple install
- No need to touch your gears or chain
- Works on many bikes
- Affordable option
Cons
- Can slip on steep hills
- Slightly heavier steering
- Not recommended for carbon forks
- Torque arms required for safety
Important Safety Note
Always install one or two torque arms on a front hub motor to prevent axle spin-out.
Rear Hub Motor Conversion Kits
Rear hub motors are the most popular conversion option. They feel natural and offer great traction.
Pros
- Best traction
- Natural “push from behind”
- Great for commuting
Cons
- Harder installation
- Must install cassette/freewheel
- Needs strong dropouts
- Torque arms recommended for 750W+
Clarification
Rear hub motors loosen spokes over time. Check spoke tension after 50 miles, then monthly.
Mid-Drive Conversion Kits
Mid-drives mount at the crankset and use your gears. Excellent for hills.
Pros
- Best climbing ability
- Most natural pedaling feel
- High torque
Cons
- Hardest to install
- More expensive
- Requires 68–73mm BSA threaded bottom bracket
- Battery mounting is difficult on some full-suspension bikes
Motor Decision Tree (Choose Your Kit in Seconds)
This decision tree helps beginners find the right kit without stress.
Simple Ebike Kit Selection Guide
Do you ride steep hills?
→ Yes → Mid-drive
→ No → Continue
Do you want the easiest install?
→ Yes → Front hub motor
→ No → Continue
Is your rear dropout 135mm?
→ Yes → Rear hub motor
→ No → Continue
Do you have a carbon fork?
→ Yes → Rear hub or mid-drive
→ No → Any kit works
Do you want the most natural pedaling feel?
→ Yes → Mid-drive
→ No → Hub motor
Cost Comparison: How Much a DIY Ebike Conversion Costs
Conversion Cost Breakdown (Typical Ranges)
| Item | Budget | Mid-Range | High-End |
|---|---|---|---|
| Hub motor kit (no battery) | $120–$200 | $250–$350 | $400–$600 |
| Rear hub kit w/battery | $280–$450 | $500–$700 | $800–$1,100 |
| Mid-drive kit | $350–$500 | $600–$900 | $900–$1,300 |
| Battery | $180–$250 | $300–$450 | $500–$800 |
| Tools & extras | $30–$60 | $75–$120 | $150+ |
Total Estimated Cost
- Budget build: $300–$450
- Mid-range build: $600–$900
- High-performance build: $1,200+
Still far cheaper than buying a new electric bike.
💡 Not sure if DIY saves you enough to make it worth the effort? Check out our full comparison on DIY e-bike costs vs buying one outright to see which option fits your budget and skills.
Is Your Bike Compatible With an Ebike Conversion Kit?
Most hybrid, city, and mountain bikes work well. But check a few details first.
Basic Compatibility Checks
- Frame is steel or aluminum
- Wheel size matches kit
- Rear dropout is usually 135mm
- Disc brakes recommended for 750W+
- 68–73mm threaded bottom bracket (mid-drive)
- Avoid front hubs on carbon forks
Compatibility & Measurement Checklist
Dropout Width (Hub Motors)
- Front: 100mm
- Rear: 135mm
Thru-axles (142mm/148mm) usually require adapters or a mid-drive.
Axle Type
- Quick-release
- Bolt-on
- Thru-axle (not ideal for hub kits)
Bottom Bracket (Mid-Drives)
- Width: 68–73mm
- Fat bikes: 100mm or 120mm
Wheel Size
- 26″, 27.5″, or 700c
- Fat bikes: 20″ or 26″ fat
Brake Compatibility
- Rim brakes
- 6-bolt disc
- Centerlock disc
Battery Space
Measure triangle or rack area to confirm fit.
Simple Compatibility Diagram
Bike Type?
   |
   ├── Mountain / Hybrid?
   |        |
   |        ├── 68–73mm Bottom Bracket?
   |        |       |
   |        |       ├── Yes → Mid-drive or hub motor
   |        |       └── No  → Hub motor recommended
   |
   └── Road / Step-through → Hub motor recommended
Motor Power and Battery Options
Motor Power (Watts)
- 250–350W: Flat areas
- 500W: Light hills
- 750W: Most popular
- 1000W+: Heavy hills (check laws)
Battery Voltage
- 36V: 250–500W
- 48V: 500–1000W
- 52V: High performance
Use 52V only if your motor and controller support it.
Battery Capacity (Ah & Wh)
- Ah = capacity
- Wh = total energy (Volts × Ah)
More Wh = longer range.
Motor & Battery Pairing Chart
| Riding Style | Motor | Voltage | Ah | Range |
|---|---|---|---|---|
| City | 250–350W | 36V | 10–13Ah | 15–25 mi |
| Mixed terrain | 350–500W | 36–48V | 13–15Ah | 20–35 mi |
| Moderate hills | 500–750W | 48V | 14–17Ah | 25–40 mi |
| Steep hills | 750–1000W | 48–52V | 17–20Ah | 30–50 mi |
Range Calculator (Quick Estimate)
Formula
Estimated Range = (Battery Wh × 0.7) ÷ Wh per mile
Typical Wh per Mile
- Light PAS: 12–15 Wh
- Medium PAS: 18–22 Wh
- Heavy throttle: 25–35 Wh
Example
48V × 15Ah = 720 Wh
720 × 0.7 = 504 usable Wh
504 ÷ 20 Wh/mi = ~25 miles
👉 For a more precise estimate based on your battery size and riding style, use our Ebike Range Calculator.
Tools You Need for Your DIY Ebike Build
Basic Tools
- Allen keys
- Adjustable wrench
- Tire levers
- Pump
- Screwdrivers
- Zip ties
Optional Tools
- Torque wrench
- Crank puller
- BB tool
- Cassette tool
- Cable cutters
- Multimeter
Best Tool Kits for DIY Electric Bike Conversion Projects
Installing a conversion kit is much easier when you have the right tools ready first. Here are beginner, intermediate, and advanced setups depending on your bike and conversion type.
Beginner ($30)
- Allen keys
- Adjustable wrench
- Tire levers
- Small screwdriver set
- Zip ties
Intermediate ($60–$90)
- Torque wrench
- Bottom bracket tool
- Crank puller
- Cassette tool
- Cable cutters
Advanced ($120+)
- Digital torque wrench
- Multimeter
- Spoke wrench
- Chain whip
- Cone wrenches
Optional Garage Upgrades That Make DIY Easier
- Bike repair stand
- Rechargeable shop light
- Magnetic parts tray
- Floor mat
- Work gloves
What to Upgrade First
Brakes
Hydraulic disc brakes → best stopping power.
Tires
Use puncture-resistant tires:
- Schwalbe Marathon Plus
- Maxxis Hookworm
- Continental Contact Urban
Torque Arms
Required for:
- ALL front hubs
- Any 750W+ rear hub
Chains (Mid-Drive)
Choose strong eBike-rated chains.
Common Mistakes to Avoid
- Not checking dropout width
- Wrong battery size for your frame
- PAS disc installed backward
- Forgetting torque arms
- Running wires near moving parts
- Using 52V on a 36V motor
- Loose spokes on hub motors
- Mounting battery too high
- Over-tightening crank bolts
Avoid these to prevent issues.
Step-by-Step: How to Install a Conversion Kit
Step 1 – Gather Tools
Lay out all tools and parts.
Step 2 – Remove Old Parts
Remove wheel (hub kits) or crankset/BB (mid-drives).
Step 3 – Mount the Battery
Best location: downtube.
Step-through frames can use rear rack.
Step 4 – Install Display and PAS
Mount close to hand.
Align PAS magnets properly.
Step 5 – Connect Wiring
Text diagram:
- Battery → Controller
- Motor → Controller
- Display → Controller
- PAS → Controller
- Throttle → Controller
- Brake sensors → Controller
Avoid routing near chain, tires, or rotors.
Step 6 – Test Before Riding
Lift wheel.
Test throttle, PAS, and brake cutoffs.
Video Guide: How to Install a Motor Kit
Troubleshooting Your DIY Conversion
Motor Won’t Turn On
- Loose connections
- Blown fuse
- Battery not seated
- Wrong display voltage
PAS Not Working
- Magnet ring backwards
- Sensor too far
- PAS disabled in settings
Throttle Not Responding
- Brake cutoff stuck
- Bent connector pins
Battery Cuts Out
- Voltage sag
- Loose power connection
- Cold temperatures
What to Do If Your Kit Breaks
Battery Issues
Check fuse, port, or BMS.
If battery smells or heats → stop using.
Controller Failure
Common signs:
- Flickering display
- Clicking
- No power
Controllers are inexpensive to replace.
Motor Problems
Check:
- Hall sensors
- Phase wires
- Controller settings
Sometimes cheaper to replace than repair.
Hidden Costs You May Not Expect
- Brake upgrades
- Torque arms
- Better tires
- Rear rack
- Extra tools
Waterproofing Tips
- Heat-shrink tubing
- Electrical tape
- Dielectric grease
- Avoid pressure washers
Weight Distribution Tips
- Rear hub + downtube battery = most stable
- Front hub → put battery on rear rack
- Cargo bikes → mid-drive recommended
Choosing the Right Tires
Electric bikes strain tires more.
Best upgraded tires:
- Schwalbe Marathon Plus
- Maxxis Hookworm
- Continental Contact Urban
How Much PSI Should Ebike Tires Have?
700c / 29” Tires
- 28–32mm → 70–95 PSI
- 35–40mm → 50–70 PSI
- 45–50mm → 40–55 PSI
26” / 27.5” Tires
- 1.5–1.75″ → 50–65 PSI
- 1.9–2.1″ → 40–55 PSI
- 2.2–2.4″ → 35–50 PSI
Fat Tires
- Pavement → 18–25 PSI
- Trails → 12–18 PSI
- Sand/snow → 5–12 PSI
Heavier riders (+200 lbs): Add +5 PSI (within tire max).
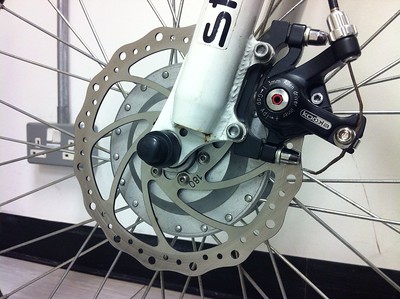
Brake Upgrades for Converted Ebikes
- Hydraulic disc brakes recommended
- Larger 180–203mm rotors improve cooling and stopping
Cadence vs Torque Sensors
Cadence Sensor
- Simple
- Affordable
- “On/off” power feel
Torque Sensor
- Smooth
- Natural
- Best for hills
Legal Requirements for DIY Ebike Kits
U.S. Ebike Classes
- Class 1: PAS only, 20 mph
- Class 2: PAS + throttle, 20 mph
- Class 3: PAS only, 28 mph
Different states have wattage limits.
Battery Care Tips
- Store at 60–80%
- Avoid extreme heat
- Don’t drain to 0%
- Charge in a fire-safe location
Riding Tips That Save Energy
- Pedal on takeoff
- Lower PAS on flats
- Proper tire pressure
Maintenance Tips for Converted Ebikes
Monthly
- Check spoke tension
- Tighten bolts
- Inspect wiring
- Lube chain
Every 6 Months
- Retension wheels
- Check battery mounts
- Inspect controller box
Best Conversion Kit Brands
- Bafang
- Tongsheng
- Ebikeling
- Voilamart
- Leafbike
FAQs
Converting a regular bike into an electric bike can be a cost-effective and environmentally friendly way to enjoy the benefits of electric biking without having to purchase a new electric bike
The basic components needed for an electric bike conversion include a motor, battery, controller, throttle, and sensor. These components work together to power your bike and give you an electric boost while pedaling.
Converting a regular bike into an electric bike can be a DIY project that requires some technical knowledge and basic tools. With the right instructions and guidance, even beginners can successfully convert their bike into an electric one.
Some advantages of converting a regular bike into an electric bike include increasing your biking range, climbing hills with ease, reducing the effort required to bike, and enjoying a more comfortable ride, especially on longer trips.
The time it takes to convert a regular bike into an electric bike can vary depending on your technical skills and the complexity of the conversion kit. On average, it can take a few hours to a full day to complete the conversion process.
Yes, there are different types of electric bike conversion kits available, such as front wheel kits, rear wheel kits, and mid-drive kits. Each kit has its advantages and considerations, so it’s necessary to choose the one that best suits your needs.
Yes, you can still use your regular bike as a traditional bike even after converting it into an electric bike. Most conversion kits allow you to switch between electric and manual modes, giving you the flexibility to enjoy both biking experiences.
Final Thoughts — Is a DIY Ebike Conversion Worth It?
Yes – converting your bike into an ebike is a great way to save money and customize your ride. With a good conversion kit, the right tools, safe installation, and proper maintenance, you can build a reliable and powerful electric bike that fits your needs perfectly.
Kristina is not just an enthusiast but a true authority on electric bikes. Nestled in the coastal beauty of Virginia, Kristina has found the perfect backdrop for her passion for electric biking. As a dedicated wife and homeschooling mom, her life revolves around family, faith, and the thrill of adventure.
Originally hailing from Ohio, Kristina's journey with electric bikes began as a curiosity and quickly evolved into a deep expertise. Her blog is a testament to her love for electric biking, combining her fascination for eco-friendly transportation with her coastal lifestyle.
When she's not cruising the beach on her electric bike, you'll find Kristina indulging in her other loves: long walks along the shore, getting lost in a good book, and cherishing moments with her loved ones. With a heart as big as her love for animals, especially cats, Kristina brings a unique perspective to the electric bike world, grounded in her strong faith in God and her dedication to a sustainable lifestyle.
Through her blog, Kristina shares her extensive knowledge of electric bikes, offering valuable insights, tips, and recommendations to fellow enthusiasts. Whether you're a seasoned rider or a newcomer to the electric bike scene, Kristina's blog is your go-to source for all things electric biking, fueled by her passion, expertise, and the scenic beauty of coastal Virginia.