E-Bike Motor Not Working After a Tire Change or Rear Wheel Removal: Causes & Fixes
Last Updated on September 23, 2026 by Kristina
Start Here: Check What Changed First
If your e-bike worked normally before a tire change, flat repair, or rear-wheel removal and the motor stopped working immediately afterward, start by checking the parts that were disturbed during that job before assuming the motor or controller failed.
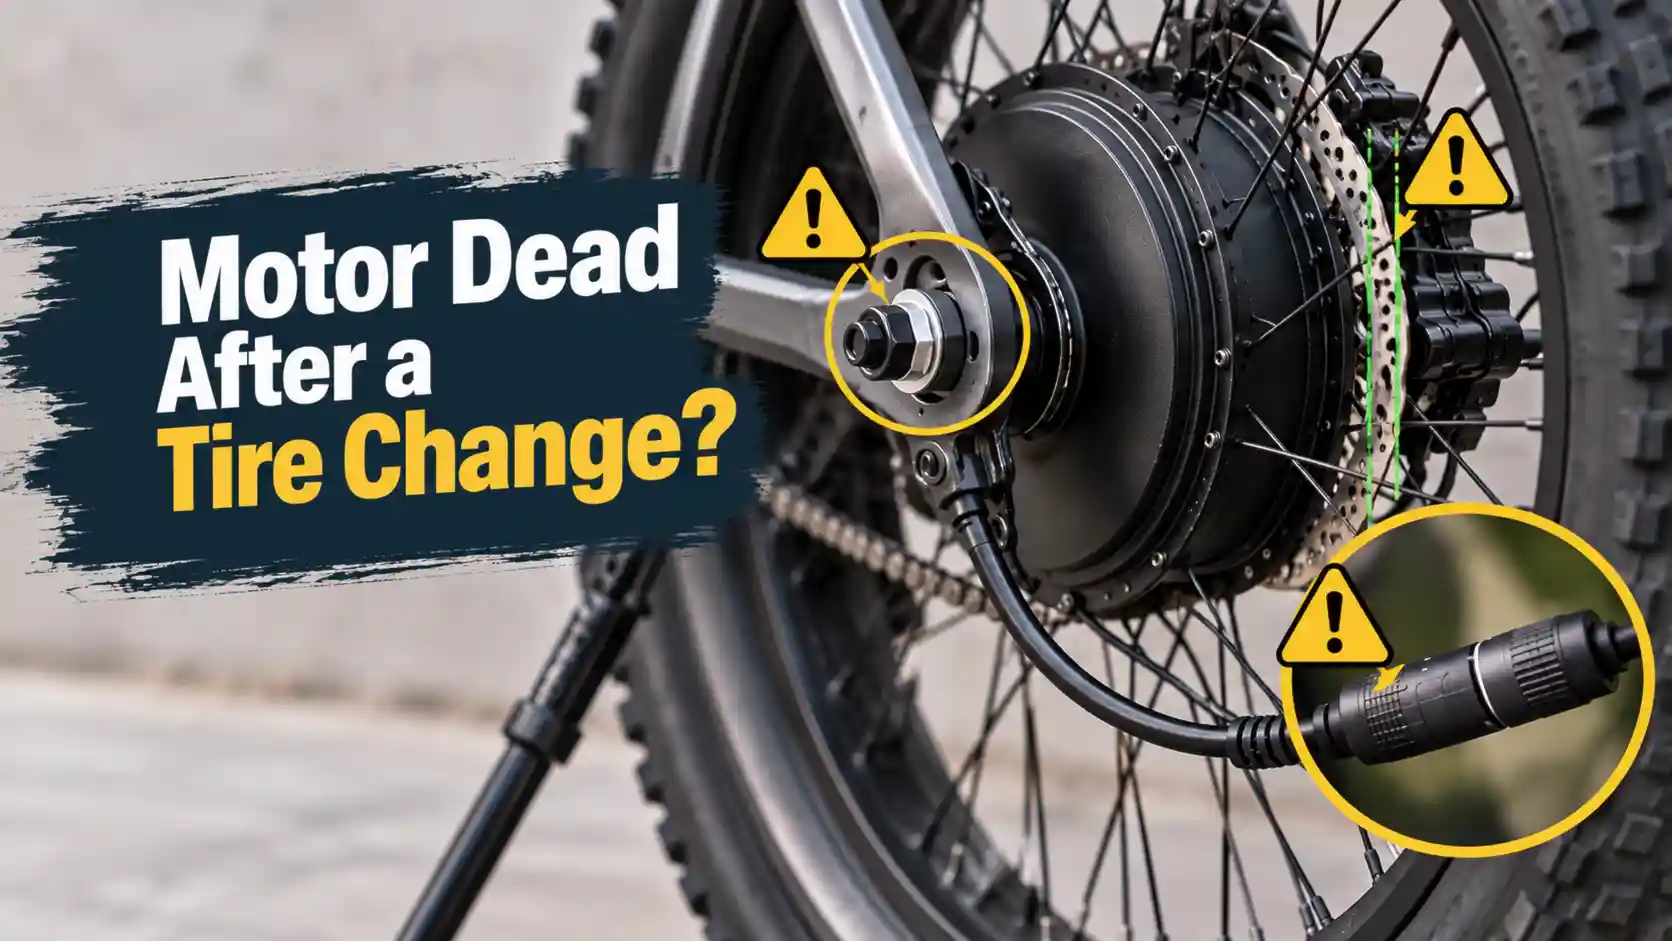
On a hub-motor e-bike, that usually means checking the rear wheel seating, axle hardware, brake drag, motor cable, external motor connector, cable routing near the axle, and any speed-sensor components near the rear wheel. A connector that is only partly seated, a cable that was pinched or pulled, or a wheel that is not sitting correctly in the dropouts can produce symptoms that look much more serious.
If you are not sure where to begin, use the E-Bike Troubleshooting Tool or start with my E-Bike Troubleshooting and Maintenance Guide.
The timing is an important diagnostic clue. If the bike worked before the wheel was removed and the problem appeared immediately after it was reinstalled, it makes sense to inspect the wheel, wiring, brakes, sensors, and connectors involved in that work first. That timing does not prove one of those parts is responsible, but it helps narrow the search efficiently.
Safety First
Turn the e-bike off before inspecting the rear wheel, axle area, brakes, motor cable, or electrical connectors. If the manufacturer permits normal owner removal of the battery, remove it before disconnecting or reconnecting electrical plugs.
Stop troubleshooting and do not ride the bike if you find melted connectors, a burnt electrical smell, smoke, sparks, unusual heat, exposed or badly damaged wiring, significant axle or dropout damage, a wheel that cannot be secured correctly, or a serious brake problem.
Do not open a lithium-ion battery, controller, or motor unless the manufacturer specifically documents that procedure as normal owner service. Battery packs and many integrated electrical components should be handled by the manufacturer or a qualified e-bike technician.
Hub Motor vs. Mid-Drive: Why the Difference Matters
This problem is especially relevant to hub-motor e-bikes because the motor is built into the wheel itself. Removing a powered rear wheel may require disconnecting a motor cable, moving axle hardware and anti-rotation hardware, and routing the motor wire back into its correct position during reinstallation.
On a mid-drive e-bike, the motor remains mounted at the crank area when the rear wheel comes off. Removing the wheel normally does not involve disconnecting the motor itself. However, rear-wheel work can still affect the brake rotor, drivetrain, wheel seating, speed magnet, speed sensor, or sensor wiring, depending on the system.
If you are not sure which system your bike uses, my E-Bike Motor Guide explains the main differences between hub motors and mid-drives.
Symptoms and What to Check First
| Symptom | Areas Worth Checking First | What the Symptom Does Not Prove |
|---|---|---|
| Motor completely dead after reinstalling the wheel | Motor connector, cable routing, brake cutoff, wheel seating, error code | It does not prove the motor or controller failed |
| Motor hums but the wheel will not turn | Brake drag, mechanical binding, wheel seating, motor cable and connector | A hum alone does not identify the failed component |
| Motor jerks, stutters, or runs roughly | Partially seated or damaged motor connection, cable damage, error code, controller-to-motor connection | It does not automatically mean the motor windings or controller are bad |
| Display works but throttle and pedal assist do not | Brake cutoff signal, motor connection, wiring, error code | A powered display does not confirm that the motor circuit is intact |
| Speedometer suddenly reads 0 | Speed magnet, sensor position, sensor wiring, motor connection on systems that derive speed through the hub | A zero reading does not automatically mean the display has failed |
| Error code appears after wheel installation | Record the code, inspect disturbed connections, then check the exact manufacturer’s definition | Error meanings are not universal across brands |
| Motor cuts in and out | Partially seated connector, stretched or damaged wire, brake cutoff, cable routing | Intermittent power does not by itself prove controller failure |
Step-by-Step Diagnostic Process
1. Recheck What Changed
What to inspect: Think through exactly what was touched during the repair. Was the powered wheel removed? Was the motor cable disconnected? Were zip ties removed? Was the brake caliper moved? Were washers, torque hardware, spacers, a speed magnet, or sensor components disturbed?
Why it matters: A problem that begins immediately after maintenance is often diagnosed faster by starting with the parts involved in that maintenance rather than testing unrelated components across the whole bike.
What to look for: Anything that looks different from its pre-repair position, including cable routing, axle hardware order, wheel position, brake alignment, or an unplugged connector.
What to do next: If something is obviously out of position, compare it with the exact owner’s or service manual before correcting it. If nothing stands out, continue with the mechanical checks below.
2. Make Sure the Rear Wheel Is Correctly Seated and Secure
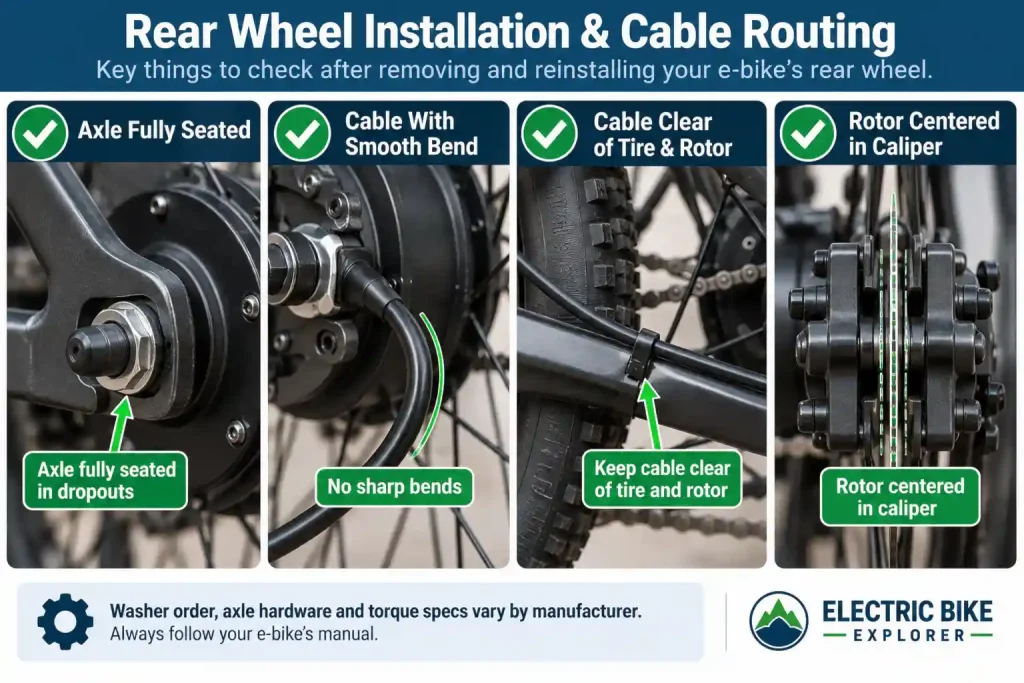
What to inspect: With the bike powered off, look at how the axle sits in the dropouts or axle mounts. Check that the wheel is centered and that model-specific washers, torque plates, torque washers, spacers, or other axle hardware are in the correct locations and orientations.
Why it matters: Manufacturers specifically warn that hub-motor wheels must be fully seated and correctly secured. Incorrect axle positioning can affect wheel safety, brake alignment, motor-cable routing, and the way torque is transferred into the frame.
What to look for: A visible gap where the axle should sit fully in the dropout, a crooked wheel, misplaced hardware, an axle that does not match the manufacturer’s illustrated orientation, or a wheel that shifts when handled.
What to do next: If the wheel is not fully seated or you are unsure about the hardware order, do not ride. Reinstall it according to the bike manufacturer’s instructions or have a bike shop do it.
Do not use a generic axle-nut torque value. Hub-motor axle specifications vary by bike, motor and hardware design. Use the torque stated by the bike or motor manufacturer for your exact system.
3. Check for Brake or Other Mechanical Drag
What to inspect: With the power off and the bike safely supported, rotate the rear wheel by hand when the design allows it. Watch and listen around the brake rotor, caliper, tire, fender and drivetrain.
Why it matters: A wheel installed slightly differently can move the rotor’s position relative to the caliper. A rubbing rotor, bent rotor, improperly seated wheel, tire rubbing the frame or another mechanical obstruction can make the motor struggle, hum or refuse to accelerate normally.
What to look for: Heavy scraping, a wheel that stops abruptly, a rotor contacting a pad continuously, a tire rubbing the frame or fender, or another obvious obstruction.
What to do next: Correct the mechanical problem before testing the motor again. If the wheel is hard to turn and the cause is unclear, stop and have the bike inspected rather than repeatedly applying motor power.
If your main symptom is a humming motor and a wheel that will not rotate, use my E-Bike Motor Hums but Wheel Won’t Move guide for the deeper symptom-specific diagnosis.
4. Inspect the Hub-Motor Cable From the Axle Outward
What to inspect: On a hub-motor bike, follow the visible motor cable from where it exits the axle toward the frame and connector.
Why it matters: The axle area is a vulnerable location during wheel removal. Manufacturer service documentation warns against supporting a wheel on the motor cable, pulling it unnecessarily, routing it where the tire or rotor can contact it, or reinstalling the wheel in a way that strains the cable.
What to look for: Cuts, flattened insulation, crushed sections, sharp bends, stretching, twisting, abrasion, exposed conductors, damage where the wire exits the axle, or routing that puts the cable close to a tire, brake rotor or moving drivetrain part.
What to do next: If the cable has obvious physical damage, do not continue powered testing. Contact the manufacturer or an e-bike technician. If the cable looks intact, inspect the external connector next.
5. Inspect and Reseat an External Motor Connector – Only When the Manufacturer Allows It
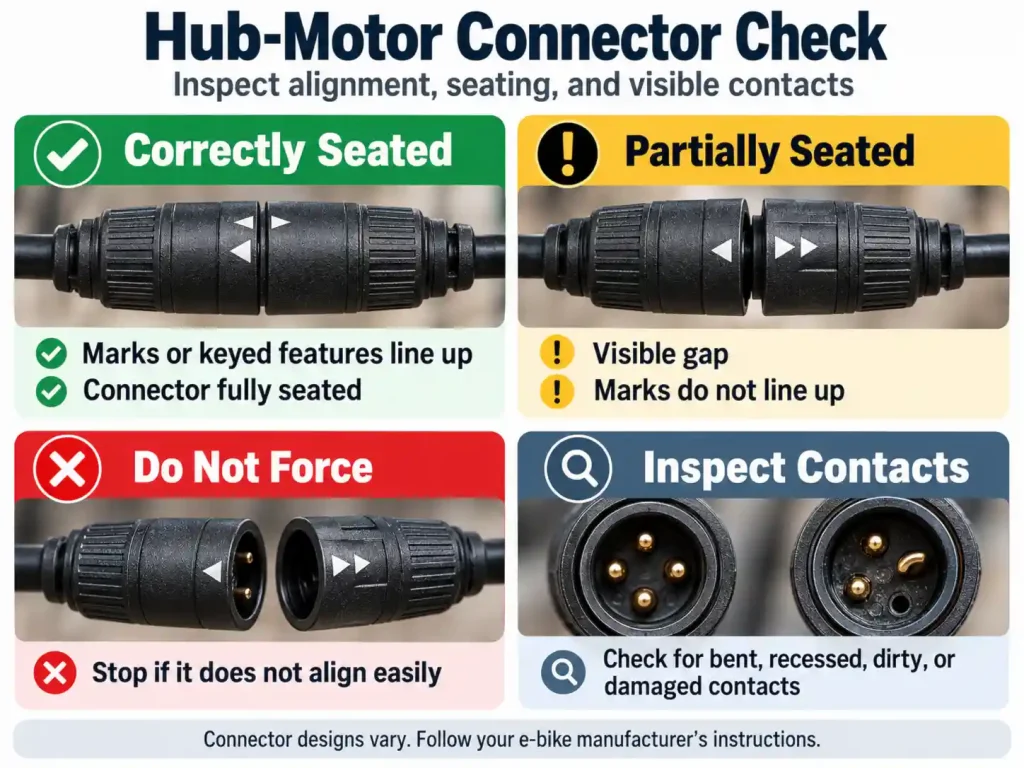
Many hub-drive e-bikes use an external motor connector near the chainstay, although the location and connector design vary. Some systems route the cable internally or use a different connection arrangement.
What to inspect: With the bike powered off and the battery removed when permitted by the manufacturer, inspect the accessible motor connector.
Why it matters: A connector can be disturbed when a hub-motor wheel is removed. Manufacturers commonly instruct riders to align connector arrows, marks, keyed features, pins and sockets carefully and to reconnect the plug without twisting.
What to look for:
- A connector that is not fully seated
- Alignment arrows or marks that do not line up
- Bent pins where visible
- A pin that appears recessed compared with neighboring pins
- Dirt, moisture or contamination
- Cracked or distorted connector bodies
- Damaged seals or cable strain near the connector
Some sealed or waterproof-style connectors can look joined from the outside even when the mating surfaces are not fully seated. Compare the connection with the manufacturer’s instructions rather than judging it only by the outer boot or housing.
Do not force the connector together and do not twist it to make it fit. If the connector does not align smoothly, stop and identify the correct orientation first.
If you want a broader connector-inspection walkthrough, see my guide to finding loose electrical connections on an e-bike.
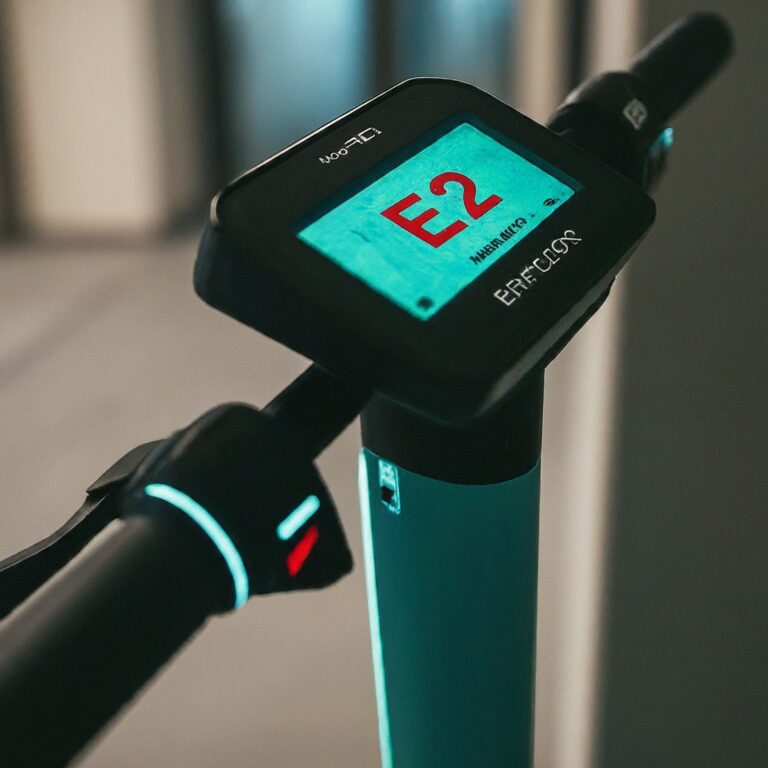
6. Check the Display, Error Code and Speed Reading
What to inspect: Power the bike back on only after the wheel, brakes, cables and connectors appear safe. Record any error code exactly as displayed and watch whether the speed reading stays at 0 when the wheel is rotating.
Why it matters: An error code can narrow the fault, but code meanings vary between brands, displays, controllers and model years. A zero speed reading can also point toward a disturbed speed magnet, sensor, sensor cable or a system-specific speed signal.
What to look for: A new motor-related, communication-related, brake-related or speed-sensor warning, or a speed display that remains at zero.
What to do next: Check the exact manufacturer’s manual before interpreting the code. You can also use the E-Bike Error Code Finder as a starting point.
If the display works normally but the speedometer suddenly reads zero, my zero-speedometer troubleshooting guide goes deeper into speed magnets, sensors, wiring and system differences.
7. Check the Brake Cutoff System Where Applicable
What to inspect: If the bike has brake cutoff sensors, make sure both brake levers return fully to their normal resting positions. Look for a brake icon or brake-related error if your display provides one.
Why it matters: Brake cutoff sensors are designed to stop motor output while braking. On equipped bikes, a sensor that remains active can leave the display working while both throttle and pedal assist appear dead.
What to look for: A brake lever that feels sticky or slow to return, a brake indication that stays active, recently disturbed brake wiring, or a symptom that changes when the brake lever is moved.
What to do next: Follow the manufacturer’s brake-sensor procedure. Do not permanently bypass or defeat a brake cutoff to restore motor operation.
For a detailed walkthrough, see E-Bike Brake Cutoff Sensor Stuck? Causes, Fixes, and When to Stop Riding.
8. Only Then Consider Controller-to-Motor or Internal Motor Problems
What to inspect: If the wheel is installed correctly, turns normally, the brake is not binding, the external motor connector is secure, visible wiring is intact, speed-sensor issues have been addressed and brake cutoffs are not blocking power, then broader electrical diagnosis becomes more reasonable.
Why it matters: Controller faults, motor hall-sensor problems, phase-circuit faults or internal hub-motor problems can produce no movement, humming, jerking or rough operation. Those symptoms overlap heavily with connector and wiring faults, so they should not be treated as proof of a failed motor or controller.
What to look for: A repeatable manufacturer-defined motor or controller error, visible heat damage, a motor that remains rough after its connections are verified, or a fault that professional diagnostics can reproduce.
What to do next: Use my Controller vs. Battery vs. Motor diagnostic guide or the E-Bike Controller Diagnostic Tool before replacing expensive parts.
A Simple Decision Path
Bike worked normally before wheel removal → problem began immediately after the wheel or tire work → inspect the parts and connections disturbed during that work first.
If the wheel is mechanically correct and secure, move to the motor cable and connector on a hub-drive bike. If those are good, check speed-sensor clues, brake cutoff behavior and error codes. Controller or internal motor diagnosis belongs later in the process unless you find direct evidence such as obvious heat damage, a manufacturer-defined fault or physically damaged motor wiring.
If the Speedometer Suddenly Reads Zero
Rear-wheel work can affect speed sensing even when the motor itself was never damaged.
Some e-bikes use a magnet mounted on a spoke. Others use a magnet associated with a brake rotor, rotor adapter or lockring. Some systems obtain wheel-speed information through a different integrated arrangement.
Do not assume every e-bike has a spoke magnet, and do not copy a sensor gap from an unrelated brand. Shimano documentation, for example, specifies model-specific magnet and sensor positioning. Follow the instructions for your exact system.
A missing speed signal may cause different behavior depending on the drive system. It can produce a zero display reading, an error code, restricted assistance or no assistance on some systems. The manufacturer’s documentation should determine how your particular bike responds.
What Changes on a Mid-Drive E-Bike?
If you removed the rear wheel from a mid-drive e-bike, you normally did not disconnect the motor because the drive unit remains mounted at the crank.
That moves the first checks toward:
- Rear-wheel seating
- Disc-brake rotor alignment
- Chain, belt, cassette, freehub or drivetrain installation
- Speed magnet and speed sensor
- Sensor wiring near the chainstay
Some mid-drive systems use very specific rear-wheel magnets, rotor magnets or sensor arrangements. MAHLE also illustrates why exceptions exist: its X20 rear-hub system uses an automatic motor connection at the wheel rather than the more familiar external plug. The safest rule is to identify your exact drive system before assuming how its wiring works.
What Not to Do
- Do not open a lithium-ion battery pack.
- Do not bypass the battery management system or another safety interlock.
- Do not bridge electrical connections to see whether the motor runs.
- Do not force a motor connector together.
- Do not randomly swap wires or copy a connector pinout from another e-bike.
- Do not assume two similar-looking connectors use the same electrical arrangement.
- Do not install an incompatible controller, motor, battery or other electrical component.
- Do not permanently bypass a brake cutoff sensor.
- Do not keep riding with an improperly seated wheel, damaged axle, damaged dropout or serious brake problem.
- Do not repeatedly hold the throttle against a motor that only hums or stalls.
- Do not buy a new motor or controller before the simpler installation, brake, wiring, sensor and connection checks have been reasonably ruled out.
When the Problem May Actually Be the Motor or Controller
Motor or controller diagnosis becomes more reasonable after the recently disturbed parts have been checked and the evidence begins pointing away from installation problems.
Examples include:
- The wheel is confirmed correctly installed and rotates without abnormal mechanical resistance.
- The motor cable and accessible connectors are correctly seated and show no visible damage.
- Brake cutoff sensors are not blocking motor output.
- Any speed sensor or magnet involved in the repair is correctly positioned.
- A repeatable manufacturer-defined motor or controller fault remains.
- The motor still jerks, stutters or runs abnormally after connections have been verified.
- A qualified technician confirms abnormal controller output or an internal motor fault with the correct system-specific diagnostic procedure.
- There is verified internal motor damage or controller heat damage.
Even then, avoid treating one symptom as proof. The controller-vs-battery-vs-motor guide explains why several components can create very similar symptoms.
When to Call a Bike Shop, Manufacturer, or E-Bike Technician
Stop DIY troubleshooting and get qualified help when:
- The rear wheel will not seat securely.
- The axle, dropout, torque hardware or frame appears damaged.
- The motor cable is cut, crushed, exposed or damaged where it exits the axle.
- A connector is melted, discolored or smells burnt.
- You see smoke, sparks or unusual electrical heat.
- The brake rotor, caliper or braking system cannot be restored to safe operation.
- A connector has visibly damaged or recessed contacts and you are unsure whether it is serviceable.
- A manufacturer-defined motor, controller or communication error remains after the basic checks.
- The motor repeatedly jerks, stalls or cuts out after the external connections have been inspected.
- The required next step involves opening a motor, controller or battery that is not documented as owner-serviceable.
- The bike is under warranty and further disassembly could affect coverage.
When contacting support, tell them the bike’s exact model, what repair was performed, whether the wheel was removed, what the display shows, whether throttle and pedal assist both fail, whether the speedometer works, and what you found at the motor cable and connector. Photos of the axle area and external connector can also be useful if the manufacturer requests them.
Practical Tools for This Diagnosis
You usually do not need advanced electrical equipment for the first round of checks. Useful items may include:
- A bright flashlight for inspecting the axle, cable and connector
- The exact hand tools specified for your bike’s wheel hardware
- A stable repair stand rated for the weight of your e-bike, when appropriate
- A torque wrench only when you have the manufacturer’s correct torque specification
- Replacement cable ties if the manufacturer uses them to keep the motor cable safely routed
- Your owner’s manual or model-specific rear-wheel service instructions
You do not need tools for opening batteries, bypassing electrical protection or improvising live electrical tests for the troubleshooting covered here.
How to Prevent the Problem Next Time
- Take clear photos of axle washers, torque hardware, cable routing and connector position before removing a hub-motor wheel.
- Power the bike off and follow the manufacturer’s battery-removal procedure before disconnecting permitted owner-service connectors.
- Support the wheel by the wheel itself – never by the motor cable.
- Do not place the hub-motor wheel down on the side where the cable exits the axle.
- Pull connectors apart using the connector bodies rather than the wires, and follow the manufacturer’s direction about twisting or straight-pull disconnection.
- Keep connector caps, seals and mating surfaces clean and dry.
- Before tightening the axle, confirm the wheel is fully seated and the manufacturer-specific washers or torque hardware are correctly positioned.
- Route the motor cable exactly as specified so it cannot contact the tire, rotor, chainring or other moving parts.
- Use the bike or motor manufacturer’s torque specification rather than a generic internet value.
- After installation, spin the wheel with the bike powered off and verify that the brake rotor and tire move freely.
- Check the display, speed reading, throttle and pedal assist at low risk before beginning a normal ride.
- If anything feels wrong, stop and recheck the repair instead of hoping the problem will clear itself while riding.
Like Electric Bike Explorer?
Add Electric Bike Explorer as a Preferred Source on Google to make it easier to see more of our e-bike news, guides, reviews, and troubleshooting content in Google Search.
Related Electric Bike Explorer Tools and Guides
- E-Bike Troubleshooting and Maintenance Guide – broader symptom-based troubleshooting and maintenance.
- E-Bike Troubleshooting Tool – guided starting point when you have several symptoms.
- E-Bike Error Code Finder – look up common codes before replacing parts.
- E-Bike Controller Diagnostic Tool – useful after simpler installation and wiring checks are complete.
- E-Bike Motor Hums but Wheel Won’t Move – deeper help for humming or stalled motors.
- E-Bike Display Turns On but Speedometer Shows Zero – sensor and wheel-speed diagnosis.
- Controller vs. Battery vs. Motor – helps separate major component symptoms before replacement.
- How to Find Loose Electrical Connections on an E-Bike – connector and visible-wiring inspection.
Why You Can Trust Electric Bike Explorer
This troubleshooting guide was researched using e-bike manufacturer and component documentation, established bicycle-service guidance, official safety information and carefully separated rider symptom patterns. The goal is to start with safe, observable checks and avoid treating one symptom as proof that an expensive component has failed.
You can read more about Electric Bike Explorer’s research and editorial process. Troubleshooting guidance is research-based unless firsthand testing is specifically stated.
Disclosure: As an Amazon Associate, I earn from qualifying purchases. This comes at no extra cost to you and helps support the content on this site.
Sources
- Ride1Up – How to Remove the Rear Wheel – hub-motor cable protection, wheel seating, connector orientation and model-specific installation guidance.
- Radio Flyer – Removing the Rear Wheel on a Flyer E-Bike – motor connector, axle hardware, wheel seating and reconnection procedure for specified Flyer models.
- Bafang H730 Hub Motor Dealer Manual – model-specific axle installation and motor-cable routing guidance.
- Shimano E-Bike Speed Sensor Dealer Manual – model-specific rear-wheel speed magnet and sensor installation.
- MAHLE X20 System User Manual – rear-wheel installation and the X20 automatic motor connection.
- Park Tool – Hydraulic Disc Brake Alignment – wheel seating and brake-rotor rub diagnosis.
- Ride1Up – Brake Sensor Issues – manufacturer example of brake cutoffs preventing throttle and pedal-assist motor output on equipped models.
- U.S. Consumer Product Safety Commission – Micromobility Safety Information – lithium-ion and e-bike electrical safety guidance.

Kristina is not just an enthusiast but a true authority on electric bikes. Nestled in the coastal beauty of Virginia, Kristina has found the perfect backdrop for her passion for electric biking. As a dedicated wife and homeschooling mom, her life revolves around family, faith, and the thrill of adventure.
Originally hailing from Ohio, Kristina's journey with electric bikes began as a curiosity and quickly evolved into a deep expertise. Her blog is a testament to her love for electric biking, combining her fascination for eco-friendly transportation with her coastal lifestyle.
When she's not cruising the beach on her electric bike, you'll find Kristina indulging in her other loves: long walks along the shore, getting lost in a good book, and cherishing moments with her loved ones. With a heart as big as her love for animals, especially cats, Kristina brings a unique perspective to the electric bike world, grounded in her strong faith in God and her dedication to a sustainable lifestyle.
Through her blog, Kristina shares her extensive knowledge of electric bikes, offering valuable insights, tips, and recommendations to fellow enthusiasts. Whether you're a seasoned rider or a newcomer to the electric bike scene, Kristina's blog is your go-to source for all things electric biking, fueled by her passion, expertise, and the scenic beauty of coastal Virginia.