New E-Bike Owner’s Guide: Everything You Need to Know Before Your First Ride
Last Updated on July 1, 2026 by Kristina
Introduction
Buying your first e-bike is exciting, but once it arrives, it’s completely normal to have questions. Should you charge the battery before riding? Is there anything you need to tighten after assembly? What do all the buttons on the display mean? How do pedal assist and the throttle work? And perhaps most importantly, how do you make sure your first ride is safe?
The good news is that learning to own and ride an electric bike isn’t nearly as complicated as it might seem. If you already know how to ride a traditional bicycle, you’re already halfway there. The biggest differences are understanding how the electric system works, getting comfortable with the extra weight, and learning how to use the motor safely and efficiently.
I created this guide specifically for first-time e-bike owners. Rather than focusing on which bike to buy, this guide covers everything that happens after your new bike arrives. You’ll learn how to set it up correctly, perform a basic safety inspection, understand the controls, ride with confidence, care for the battery, perform simple maintenance, avoid common beginner mistakes, and know what to do if something doesn’t seem right.
Whether you’ve purchased a commuter, fat tire, folding, cargo, cruiser, or electric mountain bike, the fundamentals are very similar. By the time you finish this guide, you’ll know how to get the most from your e-bike while riding safely and protecting your investment for years to come.
🧭 New to Electric Bike Explorer?
If this is your first visit, I recommend starting with my Start Here page. It’s designed to help new riders quickly find the information they’re looking for, including beginner guides, buying advice, battery and charging tips, maintenance tutorials, troubleshooting guides, state e-bike laws, product reviews, recommended accessories, and much more.
Still shopping for your first e-bike?
Before you make a purchase, I recommend reading my Complete E-Bike Buying Guide, where I explain the different styles of e-bikes, motors, batteries, features, and price ranges to help you choose the right bike for your needs.
What You’ll Learn
This guide walks you through the complete journey of becoming a confident e-bike owner.
By the end, you’ll understand:
- How to assemble and prepare your new e-bike
- The safety checks you should perform before every ride
- What all the buttons and display settings mean
- How pedal assist, throttles, and gears work together
- How to ride an e-bike safely for the first time
- Battery charging and care
- Simple maintenance every owner should know
- The most common beginner mistakes and how to avoid them
- Where you can legally ride your e-bike
- Which accessories are actually worth buying
- What to do if your e-bike develops a problem
Throughout this guide, you’ll also find links to more detailed tutorials if you’d like to dive deeper into a particular topic.
Before You Ride: Read This First
If you’ve just bought your first e-bike, don’t simply charge the battery and head out for a ride. Spend a few minutes assembling it correctly, checking the brakes and tire pressure, adjusting it to fit you, and learning how the controls work. Those simple steps will make your first ride much safer and far more enjoyable.
Why You Can Trust Electric Bike Explorer
Electric Bike Explorer was created to help everyday riders make informed decisions without the confusing jargon that often surrounds electric bikes.
My guides combine hands-on riding experience, manufacturer documentation, industry research, real rider feedback, and recommendations from respected cycling and safety organizations. Whenever possible, I verify information across multiple trusted sources rather than relying solely on manufacturer claims.
My goal isn’t to convince you to buy the fastest or most expensive e-bike. It’s to help you ride safely, understand how your bike works, avoid costly mistakes, and enjoy riding with confidence.
Before Your First Ride Checklist
Before you ride your new e-bike for the first time, take five to ten minutes to complete these simple checks.
✅ Fully charge the battery
✅ Inflate the tires to the recommended pressure
✅ Tighten the pedals
✅ Verify the handlebars and stem are secure
✅ Test both front and rear brakes
✅ Adjust the saddle to the correct height
✅ Confirm the battery is securely locked into place
✅ Learn the display and controls
✅ Wear a properly fitted helmet
✅ Practice somewhere quiet before riding in traffic
These simple checks can prevent many of the issues new riders experience during their first few rides.
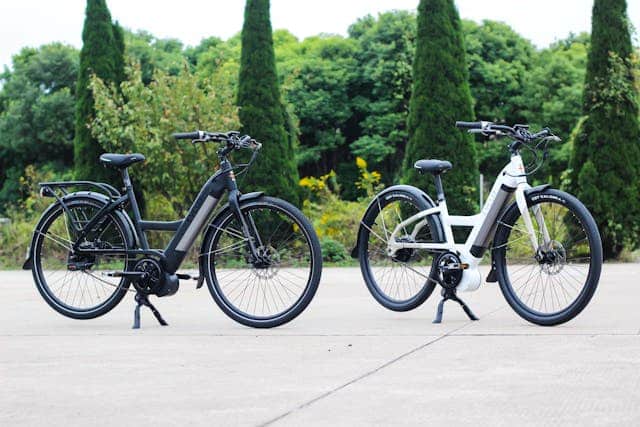
What Is an E-Bike?
An electric bike, or e-bike, is a bicycle equipped with an electric motor that assists you while you pedal. Rather than replacing pedaling altogether, the motor provides extra power, making hills easier to climb, helping you accelerate more smoothly, and reducing fatigue on longer rides.
Most e-bikes still ride very much like traditional bicycles. You steer, shift gears, brake, and balance the same way you always have. The difference is that the motor provides assistance when you need it, allowing you to ride farther and with less effort.
Many Class 2 e-bikes include a throttle that allows the motor to propel the bike without pedaling, although not every e-bike includes one.. Later in this guide, I’ll explain exactly how pedal assist and throttles differ, and when each is useful.
If you’re unfamiliar with the different categories of electric bikes, you may also find these guides helpful:
The Four Main Parts of Every E-Bike
Although manufacturers offer hundreds of different models, nearly every e-bike uses the same four major components.
| Component | What It Does |
|---|---|
| Motor | Provides electric assistance while you ride. |
| Battery | Rechargeable lithium-ion battery stores electrical energy that powers the motor. Battery capacity is measured in watt-hours (Wh). |
| Controller | The “brain” of the bike, controlling how much power flows between the battery and motor. |
| Display & Controls | Allows you to change assist levels, monitor battery life, view speed, and access ride information. |
Understanding these four components will make it much easier to understand the rest of this guide.
If you’d like to learn more about the differences between motor types, don’t miss my Hub Drive vs Mid-Drive E-Bikes Explained guide.
E-Bike vs. Regular Bicycle
Many first-time buyers assume an e-bike is basically a motorcycle with pedals. In reality, most electric bikes still require you to pedal and ride much like a traditional bicycle.
| Feature | Traditional Bicycle | Electric Bike |
|---|---|---|
| Power Source | Rider only | Rider + electric motor |
| Pedaling Required | Always | Yes for Class 1 and Class 3. Class 2 models may also be ridden using the throttle. |
| Hills | Rider supplies all the effort | Motor provides assistance |
| Weight | Lighter | Heavier because of the motor and battery |
| Distance | Limited by rider fitness | Easier to ride farther with less effort |
| Maintenance | Standard bicycle maintenance | Bicycle maintenance plus battery and electrical system care |
The biggest adjustment for most first-time riders isn’t the extra speed – it’s the weight. Many e-bikes weigh between 50 and 80 pounds, while some cargo and moped-style models weigh considerably more. Once you’re riding, the weight isn’t very noticeable, but you’ll certainly notice it when lifting the bike, pushing it into storage, or loading it onto a bike rack.
If transporting your bike is important, you may also want to read my How to Transport an Electric Bike Safely guide
Before You Ride: Unboxing and Assembly
If your e-bike was delivered to your home, it almost certainly arrived partially assembled. To fit inside the shipping box, manufacturers often remove components such as the handlebars, pedals, front wheel, saddle, or accessories.
Take your time during assembly and carefully follow the manufacturer’s instructions. Even if the bike appears to be fully assembled, don’t assume every bolt was tightened correctly at the factory. Shipping vibrations can occasionally loosen components, and many manufacturers expect the owner to perform the final adjustments.
Before your first ride, you should:
- Install the handlebars, pedals, front wheel, saddle, and any remaining accessories.
- Check that all critical bolts are properly tightened. If your manufacturer provides torque specifications, use a torque wrench whenever possible. Avoid overtightening carbon components or aluminum parts.
- Inflate the tires to the recommended pressure listed on the tire sidewall.
- Fully charge the battery using only the charger supplied with your bike.
- Install reflectors and lights if they weren’t pre-installed.
- Make sure the battery locks securely into the frame.
- Store your battery keys somewhere safe.
- Register your e-bike with the manufacturer if warranty registration is available.
If you’ve never assembled a bicycle before, there’s nothing wrong with having a local bike shop perform the final assembly and safety inspection. Considering the investment you’ve made, the cost is often worthwhile for the added peace of mind.
For a more detailed walkthrough, see my How to Assemble an Electric Bike Step-by-Step guide.
Your First Safety Inspection
Before heading out on your first ride, take a few minutes to perform a basic safety inspection. Even if your e-bike was professionally assembled, developing a quick pre-ride routine can help you spot small problems before they become safety issues.
One of the easiest ways to do this is by using the ABC Quick Check, a simple inspection recommended by many cycling organizations that only takes a minute or two.
| Check | What to Look For |
|---|---|
| A – Air | Tires are inflated within the recommended pressure range and show no signs of excessive wear or damage. |
| B – Brakes | Both brakes engage firmly, stop the bike smoothly, and don’t feel loose or spongy. |
| C – Chain & Cranks | The chain is clean and lubricated, pedals are tight, and crank arms feel secure. |
| Quick Check | Confirm the battery is locked into place, handlebars are secure, wheels are properly fastened, lights work, and nothing appears loose. If your bike has quick-release levers or thru-axles, make sure they’re fully secured. |
Getting into this habit before every ride can dramatically reduce the chances of experiencing mechanical problems while you’re out riding.
RELATED CONTENT: Electric Bike Maintenance Checklist
The PeopleForBikes ABC Quick Check is an excellent resource that explains this inspection in more detail and is worth bookmarking.
Understanding the Three E-Bike Classes
One of the first things every new owner should understand is that not all electric bikes are treated the same under the law.
In the United States, most states use a three-class system that determines how an e-bike operates and, in some cases, where you’re legally allowed to ride.
| Class | How It Works | Maximum Assisted Speed |
|---|---|---|
| Class 1 | Pedal assist only | 20 mph |
| Class 2 | Pedal assist plus throttle | 20 mph |
| Class 3 | Pedal assist only | 28 mph |
Although most U.S. states have adopted this three-class system, some have additional requirements or unique regulations. Even if your state follows the three-class system, cities, counties, parks, beaches, boardwalks, and trail systems may have their own rules about where different classes are permitted.
Before riding somewhere unfamiliar, it’s always worth checking the local regulations.
RELATED CONTENT:
- Electric Bike Classes Explained
- State-by-State Electric Bike Laws
- Can You Ride an E-Bike on Bike Trails?
PeopleForBikes’ Model E-Bike Legislation provides an excellent overview of how the three-class system is used throughout much of the United States.
Hub Motors vs. Mid-Drive Motors
One of the biggest differences between electric bikes is the type of motor they use.
The two most common systems are hub motors and mid-drive motors, and each has its own strengths.
Hub Motors
A hub motor is located inside either the front or rear wheel.
Because the motor drives the wheel directly, hub motors are mechanically simple, reliable, and generally require very little attention beyond normal bicycle maintenance.
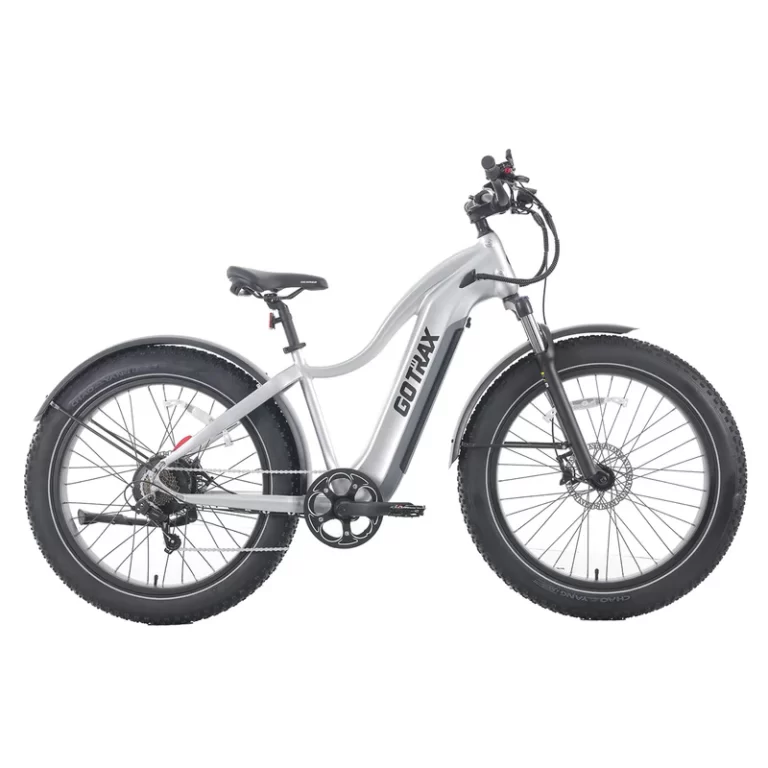
They’re commonly found on commuter, folding, cruiser, and fat tire e-bikes.
A hub motor may be the better choice if you:
- Ride mostly on pavement or bike paths.
- Want a lower-maintenance drivetrain.
- Prefer smooth, predictable power delivery.
- Want excellent value for your money.
Mid-Drive Motors
A mid-drive motor is mounted near the pedals and powers the bike through its drivetrain rather than directly turning the wheel.
Because it works with the bike’s gears, a mid-drive motor usually climbs hills more efficiently and often provides a more natural pedaling feel than a hub motor.
They’re commonly found on higher-end commuter bikes, trekking bikes, cargo bikes, and electric mountain bikes.
A mid-drive motor may be the better choice if you:
- Frequently ride steep hills.
- Carry heavy cargo.
- Ride off-road.
- Want the most natural riding experience.
Neither system is automatically better. The right choice depends on where you ride, how much assistance you want, and your budget.
RELATED CONTENT: Hub Drive vs. Mid-Drive E-Bikes Explained
Watts vs. Torque: What Really Matters?
Two specifications confuse new riders more than almost anything else: motor wattage and torque.
Although they’re often mentioned together, they measure two completely different things.
| Specification | What You Notice While Riding |
|---|---|
| Watts (W) | Helps determine the motor’s overall power and ability to maintain speed. |
| Torque (Nm) | Determines how strongly the bike accelerates and climbs hills. |
A simple way to think about it is this:
- Watts help determine how much overall power the motor can produce.
- Torque determines how forcefully the bike accelerates and how confidently it climbs hills.
For many everyday riders, torque has a bigger impact on how powerful an e-bike feels during starts and climbs than wattage alone.
If you mostly ride on flat bike paths, either specification may be perfectly adequate.
If you regularly ride hills, carry cargo, or tow a trailer, torque becomes much more important.
RELATED CONTENT: Torque vs. Wattage: Which Matters More When Choosing an E-Bike?
Understanding Pedal Assist Levels
One of the biggest differences between riding an electric bike and a traditional bicycle is learning how pedal assist works.
Most e-bikes offer several levels of pedal assist, allowing you to choose how much help the motor provides while you pedal.
Although every manufacturer labels the levels a little differently, they generally work like this:
| Assist Level | Typical Use |
|---|---|
| Level 0 | No motor assistance. Ride the bike like a traditional bicycle. |
| Level 1 | Light assistance that’s ideal for learning, casual riding, and maximizing battery range. |
| Level 2 | Moderate assistance for everyday riding and gentle hills. |
| Level 3 | Strong assistance that’s useful for steeper hills and faster riding. |
| Levels 4-5 | Maximum assistance for difficult climbs, heavy cargo, or riding into strong headwinds. |
For your first few rides, I recommend starting in Pedal Assist Level 1. It gives you a gentle introduction to how the motor responds without surprising you with rapid acceleration.
Once you feel comfortable, you can gradually experiment with the higher assist levels.
RELATED CONTENT:
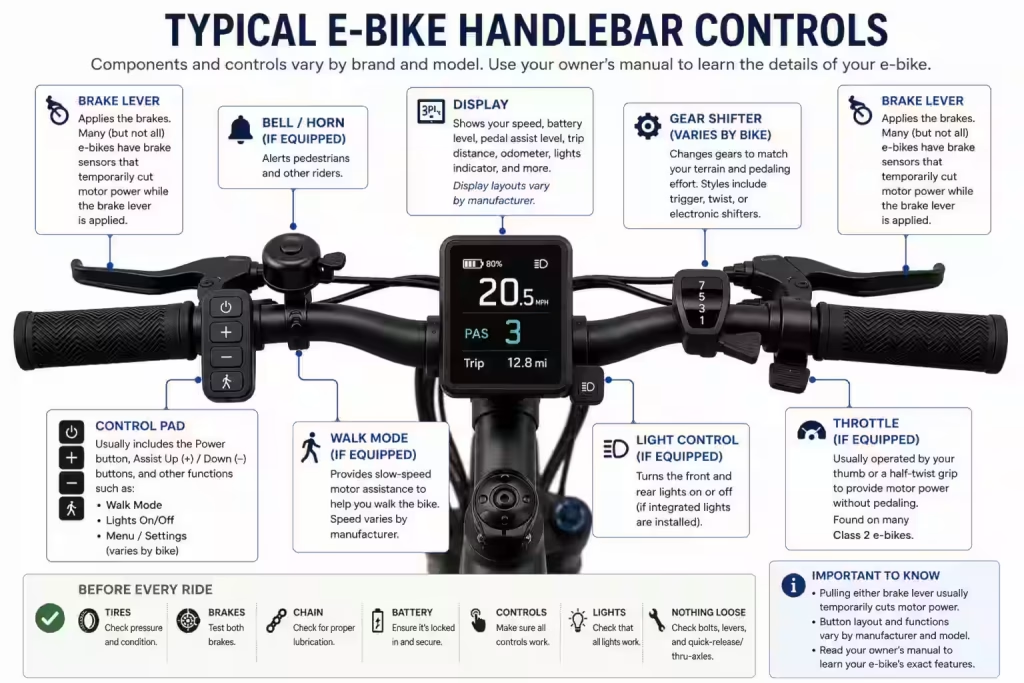
Learning Your Controls
Before riding, spend a few minutes getting familiar with your bike’s controls while it’s stationary.
Although displays and button layouts vary between manufacturers, most e-bikes include the same basic controls.
| Control | Purpose |
|---|---|
| Power Button | Turns the e-bike on and off. |
| Display | Shows speed, battery level, assist level, trip distance, and ride information. |
| Assist Buttons | Increase or decrease pedal-assist levels. |
| Throttle (if equipped) | Provides motor power without pedaling on many Class 2 e-bikes. |
| Brake Levers | Activate the brakes. Many e-bikes also use motor cut-off switches that immediately stop motor power whenever either brake lever is pulled. |
| Gear Shifter | Changes gears just like a traditional bicycle. |
| Bell or Horn | Alerts pedestrians and other riders. |
| Light Controls | Turn integrated lights on and off if equipped. |
Spend a few minutes reading your owner’s manual so you understand exactly what each button does before your first ride.
Adjusting Your Bike for Comfort
A properly fitted e-bike is safer, more comfortable, and easier to control.
Saddle Height
With one pedal at its lowest position, your knee should have a slight bend rather than being completely straight or overly bent.
Handlebar Position
Adjust the handlebars so you’re sitting comfortably without feeling stretched or cramped.
Many commuter and comfort e-bikes allow the handlebars to be raised for a more upright riding position.
Brake Levers
Position the brake levers so your wrists remain straight while braking.
Suspension
If your e-bike has suspension, consult the owner’s manual for the recommended setup based on your weight. Some suspension forks use preload adjustment, while others use adjustable air pressure or rebound settings.
Tire Pressure
Proper tire pressure affects:
- Ride comfort
- Traction
- Battery range
- Flat tire resistance
- Handling
Inflate your tires within the recommended pressure range printed on the tire sidewall, adjusting as needed for your weight and riding conditions.
RELATED CONTENT:
- E-Bike Tire Pressure Calculator
- Step-Through vs. Step-Over E-Bikes
- Best E-Bikes for Seniors and Comfort Riders
Before You Start the Motor
Before turning on pedal assist for the first time, spend a few minutes getting comfortable with the bike while it’s stationary.
Practice:
- Mounting and dismounting the bike.
- Squeezing both brake levers.
- Shifting through the gears.
- Turning the display on and off.
- Changing pedal-assist levels.
- Finding the light controls.
- Locating the throttle (if equipped) without looking down.
Taking just a few minutes to become familiar with your e-bike before moving can make your first ride much more relaxed and enjoyable.
📽️ Watch: If this is your first e-bike, this beginner-friendly video walks through the basic controls and what to expect before your first ride.
Your First Ride: Step-by-Step
After assembling your e-bike, completing your safety inspection, and becoming familiar with the controls, you’re finally ready for your first ride.
If you’ve ridden a traditional bicycle before, an e-bike won’t feel completely unfamiliar. The biggest differences are the additional weight and the way the motor assists you while you pedal.
The goal of your first ride isn’t to travel a long distance or see how fast your bike can go. Instead, focus on becoming comfortable with how the bike accelerates, brakes, turns, shifts, and responds to different pedal assist levels.
If possible, choose an empty parking lot, a quiet neighborhood street, or a low-traffic bike path where you can practice without distractions.
Step 1: Start in a Low Pedal Assist Level
One of the most common mistakes new riders make is selecting the highest pedal assist level before they even begin riding.
For most new riders, Pedal Assist Level 1 is the best place to start. It provides a gentle amount of assistance while helping you become familiar with how the motor responds.
Before you begin moving, select a low assist level, then start pedaling smoothly. Depending on your bike, the motor may begin assisting immediately or after a partial pedal rotation. Bikes with torque sensors often feel more natural, while cadence sensor bikes may provide a more noticeable “on/off” feeling.
If your bike feels too responsive even in the lowest assist setting, check your owner’s manual to see if the assist levels can be adjusted.
If your e-bike includes a throttle, resist the temptation to use it immediately. Spend a few minutes riding with pedal assist first so you understand how the bike responds before introducing throttle control.
Many experienced riders spend most of their time using Pedal Assist Levels 1 or 2. Higher assist levels are especially useful for steep hills, carrying cargo, riding into strong headwinds, or reducing effort on longer rides—not simply for going faster.
Step 2: Practice Smooth Starts
When you’re ready to move, begin pedaling normally and allow the motor to assist you naturally.
Keep both hands on the handlebars, look well ahead rather than down at the front wheel, and allow the bike to accelerate gradually.
If your bike has a throttle, practice using it gently in an open area. Applying full throttle from a standstill can surprise new riders, especially on more powerful e-bikes.
Spend a few minutes practicing smooth starts until they feel comfortable and predictable.
Step 3: Learn How Your Motor Responds
Every e-bike feels a little different.
Some motors deliver power gradually, while others respond more quickly.
During your first ride, spend time experimenting with:
- Pedal Assist Levels 1 through 3
- Starting from a complete stop
- Gentle acceleration
- Riding slowly
- Coasting without pedaling
- Turning pedal assist off completely (Level 0)
The goal isn’t speed. It’s simply becoming familiar with how your own e-bike behaves before riding in traffic or crowded areas.
Step 4: Practice Braking
One of the biggest differences between an e-bike and a traditional bicycle is stopping distance.
Because e-bikes are typically heavier and can travel at higher speeds, they generally require more distance to come to a complete stop.
Find a safe, open area and practice braking several times before increasing your speed.
Remember to:
- Use both brakes together.
- Apply smooth, even pressure rather than grabbing the brake levers suddenly.
- Most of your stopping power comes from the front brake, while the rear brake helps keep the bike stable.
- Begin braking earlier than you would on a traditional bicycle.
- Practice emergency stops while riding in a straight line.
Many e-bikes also include brake sensors that temporarily cut motor power whenever either brake lever is applied, helping the bike slow down more predictably.
RELATED CONTENT:
- How to Fix Brakes on an Electric Bike
- How to Adjust E-Bike Brakes (coming soon)
Step 5: Turning and Cornering
Turning an e-bike is very similar to riding a traditional bicycle, but the additional weight means you’ll want to make smooth, controlled movements.
As you become more comfortable:
- Finish most of your braking before entering the turn.
- Slow down before cornering.
- Look through the turn instead of directly in front of your wheel.
- Lean the bike gradually.
- Avoid heavy braking while already in the turn whenever possible.
Smooth, predictable movements almost always result in better control and greater confidence.
Step 6: Shift Gears Properly
Many first-time owners forget that an e-bike still has gears.
Although the motor provides assistance, using the correct gear makes riding smoother, improves battery efficiency, and reduces wear on the drivetrain.
When shifting gears:
- Ease off the pedals briefly while shifting.
- Avoid shifting while pushing hard on the pedals or while the motor is delivering maximum power.
- Shift before climbing a steep hill instead of halfway up it.
- Use easier gears when starting from a stop.
These habits are especially important on mid-drive e-bikes, where the motor also uses the bike’s drivetrain.
RELATED CONTENT:
- Electric Bike Gears Explained (coming soon)
- Single-Speed vs. Multi-Gear E-Bikes
- How to Shift an Electric Bike Properly (coming soon)
Riding in Traffic
Once you’re comfortable riding in a quiet area, you can begin riding on public roads.
Ride confidently, but predictably.
Drivers are much more likely to react appropriately when they can anticipate what you’re going to do.
Good riding habits include:
- Ride in a straight, predictable line.
- Obey all traffic signs and signals.
- Use hand signals well before turning.
- Make eye contact with drivers whenever possible.
- Leave extra stopping distance.
- Ride far enough from parked cars to avoid suddenly opened doors.
- Assume drivers may not see you.
Never weave between parked vehicles or make sudden movements into traffic.
The League of American Bicyclists Smart Cycling program offers excellent guidance on defensive riding techniques and safely sharing the road with motor vehicles.
Riding on Shared Paths
Many new owners spend most of their time riding on greenways, rail trails, and multi-use paths.
Remember that you’re sharing the space with:
- Walkers
- Joggers
- Children
- Dog walkers
- Other cyclists
Ride courteously by:
- Slowing down before passing.
- Ringing your bell or saying a friendly “On your left” while recognizing that not everyone will hear or react the same way.
- Giving pedestrians plenty of room.
- Following posted speed limits where applicable.
- Yielding whenever required.
Courtesy goes a long way toward helping keep e-bikes welcome on shared trails.
RELATED CONTENT:
Can You Ride an E-Bike on Bike Trails?
The PeopleForBikes E-Bike Smart program provides excellent riding etiquette and safety tips specifically for new e-bike riders.
Riding in Different Weather Conditions
Most modern e-bikes are designed to handle light rain and wet roads, but weather still affects both safety and battery performance.
Rain
- Brake earlier than usual.
- Reduce your speed.
- Avoid painted road markings and metal surfaces when possible.
- Increase your following distance.
- Wipe your bike dry after riding.
Wind
Strong headwinds can significantly reduce battery range.
If you’re riding into a stiff wind, consider lowering your speed or selecting a slightly higher assist level to maintain a comfortable pedaling cadence.
Cold Weather
Cold temperatures temporarily reduce battery performance.
Whenever possible:
- Store the battery indoors.
- Install the battery immediately before your ride.
- Allow the battery to warm to room temperature before charging.
- Never charge the battery below the manufacturer’s recommended charging temperature.
RELATED CONTENT:
- Summer E-Bike Maintenance Checklist
- How Weather Affects E-Bike Battery Range (coming soon)
- Can You Get an Ebike Wet?
If You Don’t Feel Comfortable Yet
It’s completely normal for an e-bike to feel different during your first few rides.
If something doesn’t feel quite right, don’t rush the learning process.
Instead:
- Lower the pedal assist level.
- Return to a quiet practice area.
- Double-check that your saddle and handlebars are adjusted correctly.
- Ask a local bike shop to inspect the bike if you’re unsure about anything.
- Keep practicing. Confidence comes with experience.
Every experienced e-bike rider started exactly where you are today.
Building Confidence
Rather than trying to master everything during your first ride, focus on one skill at a time.
Practice:
- Starting and stopping smoothly.
- Braking confidently.
- Shifting gears.
- Riding one-handed briefly while signaling.
- Tight turns.
- Small hills.
- Parking and walking your bike.
Within a few rides, these skills will begin to feel completely natural.
Your First Week of Ownership
Here’s a simple plan to help you become comfortable with your new e-bike.
Day 1
- Fully charge the battery.
- Practice in a quiet parking lot.
- Learn the controls.
Day 2
- Ride around your neighborhood.
- Practice shifting gears.
Day 3
- Experiment with different pedal assist levels.
- Practice braking from slightly higher speeds.
Days 4-5
- Ride a longer route.
- Practice riding gentle hills.
Days 6-7
- Check tire pressure.
- Reinspect the handlebar, stem, seatpost, and pedal bolts.
- Wipe the bike down.
- Lubricate the chain if needed.
Many manufacturers recommend checking important fasteners after the first few rides, as components can settle slightly during the initial break-in period.
📽️ Watch: If you’re new to electric bikes, seeing proper riding techniques can make learning much easier. This video demonstrates smooth starts, braking, shifting, cornering, and other riding skills every new e-bike owner should practice before venturing into busy streets or crowded trails.
Battery Charging and Care
Your e-bike’s battery is one of the most valuable components on your bike, so taking good care of it will help maximize both its performance and lifespan.
The good news is that modern lithium-ion batteries require very little maintenance. A few simple habits can help them perform reliably for years while reducing unnecessary wear.
If you’d like to learn more about battery technology, charging, storage, troubleshooting, and replacement, I recommend visiting my Battery & Charging Hub, where I’ve collected all of my battery-related guides in one place.
Before Charging
Before connecting your charger, take a few moments to inspect both the battery and charging equipment.
I recommend that you:
- Allow the battery to cool down after a long ride before charging.
- Inspect the battery casing for cracks, dents, swelling, or other signs of damage.
- Check the charging port for dirt, moisture, or debris.
- Use only the charger supplied by the manufacturer or an approved replacement.
- Charge in a dry, well-ventilated location away from direct sunlight.
If your battery has been stored in freezing temperatures, allow it to warm to room temperature before charging.
Charging Best Practices
Following a few simple charging habits can help extend the life of your battery.
For everyday charging:
- Charge indoors whenever possible.
- Place the battery and charger on a hard, non-flammable surface.
- Keep the charger away from combustible materials.
- Avoid covering the charger while it’s operating.
- Keep the charging area dry and well ventilated.
- Disconnect the charger once charging is complete unless your manufacturer specifically recommends otherwise.
Although most modern chargers automatically stop charging when the battery reaches full capacity, unplugging the charger after charging is complete is still considered good practice.
Long-Term Battery Storage
If you won’t be riding for several weeks or months, proper storage is important.
To help preserve battery health:
- Store the battery indoors in a cool, dry location.
- Avoid prolonged exposure to extreme heat or freezing temperatures.
- For long-term storage, many manufacturers recommend leaving the battery at approximately 30% to 70% charge (often around 50% to 60%). Always follow your manufacturer’s recommendations, as they may vary slightly.
- Check the battery every month or two and recharge it if necessary according to the manufacturer’s instructions.
Proper storage helps reduce battery aging and maintain long-term performance.
Battery Safety
Quality e-bike batteries are generally very safe when used correctly, but they should always be treated with respect.
Stop using your battery immediately if you notice:
- Swelling
- Cracks or physical damage
- Smoke
- Burning odors
- Excessive heat
- Leaking fluid
- Damage after a crash
Never attempt to open, repair, or modify a lithium-ion battery yourself.
Only use batteries and chargers designed specifically for your e-bike. Using incompatible chargers or poor-quality replacement batteries can create serious safety risks, damage your electrical system, reduce battery life, and may void your warranty.
For additional battery safety guidance, both the U.S. Consumer Product Safety Commission (CPSC) and UL Solutions publish excellent information about lithium-ion battery safety and charging practices.
Learn More About Batteries
If you want to dive deeper into battery care, these guides are a great place to start:
- Battery & Charging Hub
- How Often Should You Charge Your E-Bike?
- E-Bike Not Holding a Charge? Causes, Fixes & When to Replace the Battery
- How Long Do E-Bike Batteries Last?
- Battery Replacement Cost Calculator
Basic Maintenance Every Owner Should Know
One of the biggest misconceptions about e-bikes is that they’re difficult to maintain.
In reality, most maintenance is exactly the same as a traditional bicycle. The motor and battery require very little routine attention, while tires, brakes, gears, and the chain still need regular care.
The good news is that most routine maintenance only takes a few minutes and can help prevent expensive repairs later.
| Frequency | What to Check |
|---|---|
| Before Every Ride | Tire pressure, brakes, battery security, lights, and a quick visual inspection. |
| Weekly (or Every Few Rides) | Wipe down the bike, inspect tires, clean dirt from the drivetrain, and check for loose bolts. |
| Monthly | Clean and lubricate the chain, inspect brake pads, check drivetrain wear, inspect cables and electrical connectors. |
| Every 500-1,000 Miles | Consider a professional tune-up, especially if you notice changes in braking, shifting, unusual noises, or overall performance. |
Keeping your bike clean also makes it much easier to spot worn tires, damaged cables, loose fasteners, leaking suspension components, or other small issues before they become larger repairs.
Related Maintenance Guides
If you’re new to maintaining an e-bike, these guides walk through everything step by step.
- Electric Bike Maintenance & Troubleshooting Hub
- Electric Bike Maintenance Checklist
- Chain Cleaning & Lubing Guide
- How to Change an Electric Bike Tire
- How to Fix Brakes on an Electric Bike
- Why Your E-Bike Tires Keep Losing Air
- Summer E-Bike Maintenance Checklist
Common Beginner Mistakes
Every experienced rider has made at least a few mistakes while learning.
Fortunately, most of them are easy to avoid once you know what to watch for.
Buying Based Only on Speed
Many first-time buyers focus almost entirely on top speed.
In reality, comfort, reliability, fit, and battery range usually have a much bigger impact on how much you’ll enjoy your e-bike.
Ignoring Bike Weight
Many e-bikes weigh between 50 and 80 pounds, while cargo and moped-style models may weigh even more.
Think about:
- Can you lift it onto your bike rack?
- Will you need to carry it upstairs?
- Do you have enough storage space?
Weight is something you’ll notice every time you move the bike when you’re not riding it.
Using Maximum Pedal Assist All the Time
Higher assist levels drain the battery faster and aren’t necessary for most everyday riding.
Many experienced riders spend most of their time in Pedal Assist Levels 1 or 2, increasing assistance only when climbing hills, riding into strong winds, or carrying cargo.
Forgetting Tire Pressure
Low tire pressure is one of the most common causes of poor range, sluggish handling, and flat tires.
Check your tire pressure regularly and inflate your tires within the manufacturer’s recommended pressure range.
Skipping Chain Maintenance
A clean, lubricated chain shifts better, lasts longer, and helps improve efficiency.
It only takes a few minutes but can significantly extend the life of your drivetrain.
Charging with the Wrong Charger
Always use the charger recommended for your battery.
Using an incompatible charger can damage the battery and create unnecessary safety risks.
Leaving the Battery in Extreme Temperatures
Avoid leaving your battery inside a hot vehicle or outdoors during freezing weather whenever possible.
Extreme temperatures can reduce battery performance and shorten its lifespan over time.
Forgetting to Remove the Battery Key
Many new owners accidentally leave the battery key in the lock while riding.
Removing it after locking or unlocking the battery helps prevent it from being bent, damaged, or lost.
Ignoring Strange Noises
Clicking, grinding, rubbing, rattling, or unusual vibrations should never be ignored.
Small problems are usually much easier—and less expensive—to fix when they’re caught early.
Riding Beyond Your Comfort Level
There’s no prize for mastering everything on your first ride.
Take your time, ride at your own pace, and gradually build confidence.
Every experienced e-bike rider started as a beginner.
Recommended Accessories for New E-Bike Owners
These are the accessories I recommend to nearly every new e-bike owner. They improve safety, convenience, and help you get more enjoyment from every ride.
🔹 Quality Helmet
Your most important piece of safety equipment.
🔹 Heavy-Duty Lock
Protects your investment whenever you park.
🔹 Handlebar or Helmet Mirror
Makes it much easier to monitor traffic approaching from behind.
🔹 Floor Pump with Pressure Gauge
Proper tire pressure improves handling, comfort, and battery range.
🔹 Portable Mini Pump or CO₂ Inflator
Perfect for roadside flat tire repairs.
🔹 Compact Multi-Tool
Allows you to tighten loose bolts and make minor adjustments while riding.
🔹 Phone Mount
Great for GPS navigation and ride tracking.
🔹 Chain Lubricant
Keeps your drivetrain running quietly and efficiently.
🔹 Spare Tube or Patch Kit
Helps get you back on the road if you experience a puncture.
If Something Doesn’t Seem Right
Even a brand-new e-bike can occasionally develop a problem.
The good news is that many common issues have surprisingly simple solutions. Before assuming something expensive has failed, always start by checking the basics.
I recommend working through this quick checklist:
- Make sure the battery is charged.
- Confirm the battery is fully seated and locked into the frame.
- Verify that all electrical connectors are securely connected.
- Check the display for any error codes or warning messages.
- Make sure the brakes aren’t activating the motor cut-off unexpectedly.
- Confirm the pedal assist level is turned on if you’re expecting motor assistance.
Many problems turn out to be something simple rather than a failed motor, controller, or battery.
If your e-bike…
- Won’t turn on
- Turns on but won’t move
- Won’t charge
- Loses power while riding
- Shuts off while climbing hills
- Makes clicking noises
- Vibrates unexpectedly
- Displays an error code
…don’t panic. Most of these issues can be diagnosed with a few simple checks before replacing expensive parts.
Before You Replace Expensive Parts
always check the simple things first:
- Is the battery fully charged?
- Is the battery locked into place?
- Are all electrical connectors fully seated?
- Is the display showing an error code?
- Are the brakes releasing completely?
- Has a connector become loose after transporting the bike?
These simple checks solve many e-bike problems without replacing any parts
Troubleshooting Guides
If you need more help, these guides walk through the most common problems step by step.
- Electric Bike Maintenance & Troubleshooting Hub
- E-Bike Turns On But Won’t Move
- Why Won’t My E-Bike Charge?
- Motor Cutting Out While Riding
- E-Bike Shuts Off Going Uphill
- Why Is My E-Bike Shaking or Vibrating?
- Why Does My E-Bike Make Clicking Noises?
- Finding Loose E-Bike Connections
- Battery & Charging Hub
FAQs
Should I charge my battery before my first ride?
Yes. Many manufacturers recommend fully charging the battery before your first ride. Always follow the instructions included with your specific e-bike, as charging recommendations may vary slightly between manufacturers.
Is it okay to leave the battery on the bike while charging?
Many manufacturers allow this, while others recommend removing the battery before charging.
Always follow the instructions provided for your specific e-bike.
How long does it take to get comfortable riding an e-bike?
Most riders begin feeling comfortable after just a few rides.
Starting in a quiet location and using a low pedal assist level helps build confidence much faster than immediately riding in traffic.
Can I still ride my e-bike if the battery runs out?
Yes.
Nearly all e-bikes can still be pedaled like a regular bicycle, although they’ll usually feel noticeably heavier because of the additional weight of the motor and battery.
How often should I check tire pressure?
Ideally before every ride, especially if you ride frequently.
At a minimum, check your tire pressure at least once a week. Proper tire pressure improves comfort, handling, battery range, and tire life.
Should I remove the battery when transporting my e-bike?
Yes, whenever practical.
Removing the battery before transporting your e-bike on a vehicle-mounted bike rack reduces weight and helps protect the battery from vibration, weather exposure, and unnecessary stress.
Always follow both your bike manufacturer’s and bike rack manufacturer’s recommendations.
Can I wash my e-bike with a garden hose?
A gentle stream of water is generally fine for cleaning most e-bikes, but avoid using high-pressure washers.
Never spray water directly at the motor, display, battery contacts, charging port, bearings, or electrical connectors.
After washing, dry the bike thoroughly before charging or storing it.
Internal Link: Can You Ride an E-Bike in the Rain?
How often should I lubricate the chain?
That depends on how often and where you ride.
For most riders, cleaning and lubricating the chain every few hundred miles—or sooner after riding in wet or dusty conditions—helps keep the drivetrain running smoothly.
Internal Link: Chain Cleaning & Lubing Guide
When should I schedule my first tune-up?
Many manufacturers and local bike shops recommend scheduling a tune-up after the first 100 to 300 miles or after the first month or two of regular riding. Cables, spokes, and other components can settle during the initial break-in period, so an early inspection helps ensure everything remains properly adjusted.
After that, follow the maintenance schedule recommended by your manufacturer or local bike shop based on how often you ride.
My Take
Buying your first e-bike can feel overwhelming because there’s so much information online.
The good news is that you don’t need to become an expert overnight.
Start with the basics.
Take time to learn how your bike works, become comfortable with the controls, practice somewhere quiet, and gradually build confidence before tackling busy streets or challenging trails.
One thing I’ve learned is that the riders who enjoy their e-bikes the most aren’t necessarily the ones with the fastest or most expensive bikes. They’re the riders who understand their equipment, perform simple maintenance, take care of their battery, and ride within their comfort level.
As your confidence grows, you’ll naturally become more comfortable experimenting with different assist levels, riding longer distances, tackling steeper hills, and exploring new places.
Most importantly, remember that your e-bike is meant to make cycling more enjoyable. Whether you’re commuting to work, exploring local trails, running errands, or simply riding for fun, the goal is to spend more time enjoying the ride and less time worrying about the bike.
Where to Go Next
Ready to keep learning? These guides are the best next step after finishing this one.
Start Here
- Complete E-Bike Buying Guide
- Battery & Charging Hub
- Electric Bike Maintenance & Troubleshooting Hub
- State-by-State E-Bike Laws
- Best Electric Bikes of 2026
Helpful Beginner Guides
- How Often Should You Charge Your E-Bike Battery?
- Electric Bike Maintenance Checklist
- Hub Drive vs. Mid-Drive E-Bikes Explained
- Torque vs. Wattage: Which Matters More?
- Electric Bike Classes Explained
- Recommended E-Bike Accessories
External Resources
These organizations publish reliable information that can help you become a safer and more informed e-bike rider.
- PeopleForBikes – E-bike education, riding etiquette, and model legislation. https://www.peopleforbikes.org/
- League of American Bicyclists – Smart Cycling resources and bicycle safety education. https://bikeleague.org/
- Local Ebike Clubs: Join a community of ebike enthusiasts near you to share tips, organize rides, and stay updated on local events. Find an Ebike Club near you!
- Consumer Product Safety Commission – lithium-ion battery safety: https://www.cpsc.gov/
- UL safety standards (UL 2849, UL 2271): https://www.ul.com/
- ElectricBikeExplorer Subreddit: Join our growing community on ElectricBikeExplorer to discuss all things ebikes! Share your experiences, ask questions, and learn from fellow riders.
Kristina is not just an enthusiast but a true authority on electric bikes. Nestled in the coastal beauty of Virginia, Kristina has found the perfect backdrop for her passion for electric biking. As a dedicated wife and homeschooling mom, her life revolves around family, faith, and the thrill of adventure.
Originally hailing from Ohio, Kristina's journey with electric bikes began as a curiosity and quickly evolved into a deep expertise. Her blog is a testament to her love for electric biking, combining her fascination for eco-friendly transportation with her coastal lifestyle.
When she's not cruising the beach on her electric bike, you'll find Kristina indulging in her other loves: long walks along the shore, getting lost in a good book, and cherishing moments with her loved ones. With a heart as big as her love for animals, especially cats, Kristina brings a unique perspective to the electric bike world, grounded in her strong faith in God and her dedication to a sustainable lifestyle.
Through her blog, Kristina shares her extensive knowledge of electric bikes, offering valuable insights, tips, and recommendations to fellow enthusiasts. Whether you're a seasoned rider or a newcomer to the electric bike scene, Kristina's blog is your go-to source for all things electric biking, fueled by her passion, expertise, and the scenic beauty of coastal Virginia.