E-Bike Crank Arm Keeps Coming Loose? Causes, Fixes, and When to Stop Riding

Is your e-bike crank arm coming loose, wobbling when you pedal, or making a clicking noise that keeps returning?
A crank arm that keeps coming loose may have an improperly secured fastener, incorrect installation, or damage where the crank attaches to its spindle. If you’ve already ridden with the arm loose, simply tightening the bolt again may not solve the problem.
This is something I’d take seriously. A crank arm can detach while you’re pedaling, potentially causing you to lose your footing or control of the bike.
In this guide, I’ll explain how to tell whether the problem is the crank arm, pedal, or bottom bracket, what you can safely check, and when a repair shop should inspect or replace the parts.
If you’re also hearing clicking or creaking, my guide to common e-bike clicking noises can help you identify other possible sources. If you are troubleshooting several symptoms, the e-bike troubleshooting and maintenance guide is another useful starting point.
E-Bike Crank Arm Keeps Coming Loose? Start Here
Before grabbing a wrench, check what is actually moving.
| What you notice | Possible cause | What to do first |
|---|---|---|
| One crank arm rocks sideways near the motor or bottom bracket | Loose retaining hardware or damaged crank-to-spindle interface | Stop riding and inspect without applying pedaling force |
| Crank bolt keeps loosening after being tightened | Incorrect installation, hardware problem, or worn connection | Have the crank and spindle inspected before tightening again |
| Crank arm fell off | Missing or loosened hardware, damaged fitting, or installation failure | Do not ride; collect the parts and arrange inspection |
| Clicking once per pedal revolution | Loose pedal, crank arm, chainring, or bottom bracket | Check which part moves and when the sound occurs |
| Pedal wobbles but crank arm feels secure | Loose pedal axle, damaged pedal threads, or pedal bearings | Inspect the pedal separately |
| Both crank arms appear to move sideways together | Possible bottom bracket or bearing play | Have the crank assembly and bearings evaluated |
| Crank feels secure but chain skips under load | Chain, cassette, chainring, or drivetrain issue | Investigate the drivetrain rather than tightening crank hardware |
These are possible explanations, not definitive diagnoses.
Important: If a crank arm moves independently of its spindle, has begun to detach, or has repeatedly loosened, stop riding until the cause is identified and corrected.
What Should You Do Next?
- Crank arm visibly wobbles at the spindle: Stop riding. Have the crank interface and retaining hardware inspected for damage.
- Crank bolt keeps loosening: Don’t keep retightening it. Ask a mechanic to inspect how the crank fits the spindle.
- Crank arm has fallen off: Do not ride. Keep the loose parts together and arrange service.
- Clicking without confirmed movement: Check whether the noise is coming from the pedal, drivetrain, or another nearby component before assuming the crank is the cause.
If you cannot identify the moving part, stop using the bike until it can be checked safely.
What Is a Crank Arm, and Why Does It Matter?
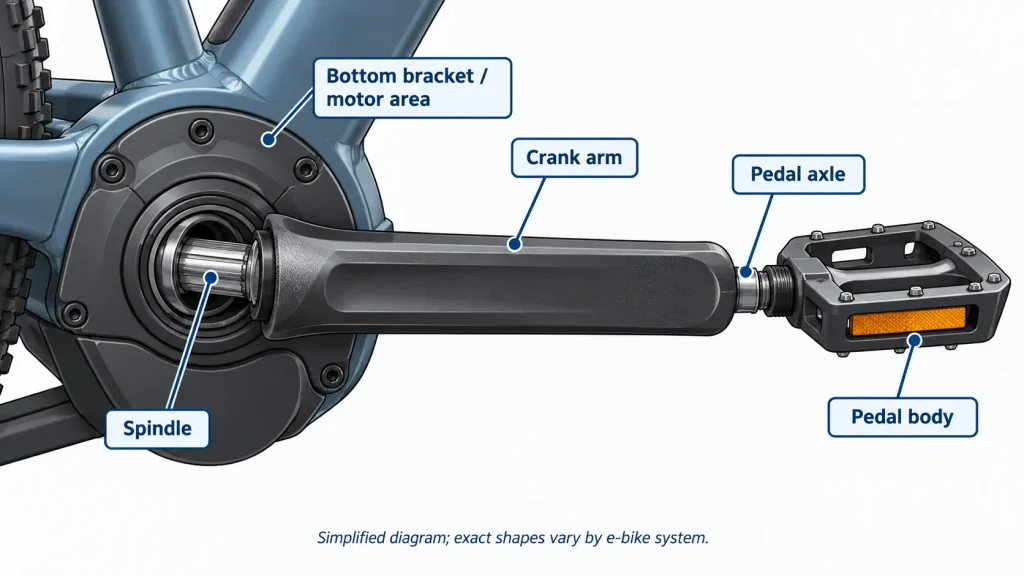
The crank arms are the two components connecting your pedals to the bike’s rotating crank assembly.
When you push on a pedal, your foot applies force through the crank arm. That force turns the crank assembly and can help drive the bicycle. Depending on the e-bike design, the pedal-assist system may also sense pedaling or the force applied.
Most conventional e-bikes have two crank arms positioned opposite each other.
The attachment method varies by bicycle and motor system.
Some cranks are secured by a central retaining bolt. Others use a spindle with splines, pinch bolts, or another manufacturer-specific fastening arrangement.
That difference matters when troubleshooting.
Retaining hardware, installation sequences, and tightening torques differ between systems, even when the bolts look similar.
How to Tell if Your Crank Arm Is Actually Loose
A clicking sound doesn’t automatically mean the crank arm is loose.
Before replacing parts, try to identify where the movement originates.
Step 1: Turn off the e-bike
Switch off motor assistance and make sure the bike is securely supported on level ground.
Keep the bike stationary.
Don’t activate the throttle or pedal assistance while inspecting the crank area.
If your manufacturer’s instructions call for removing the battery during maintenance, follow those instructions when it can be done safely.
Step 2: Check for visible movement at the crank
Without riding the bike, look at where the crank arm connects to the spindle near the motor or bottom bracket.
Gently check for abnormal movement with your hands while keeping clear of the chainring and other pinch points.
Look for:
- A crank arm moving relative to the spindle.
- A visible gap that has changed.
- Missing or damaged retaining hardware.
- Cracks around the crank attachment.
- Metal dust or signs of rubbing.
- A crank arm sitting at an unusual angle.
Don’t apply heavy force to reproduce the problem.
A crank arm that is visibly moving at its attachment point needs inspection before riding.
Step 3: Check the pedal separately
Sometimes the problem isn’t the crank arm at all.
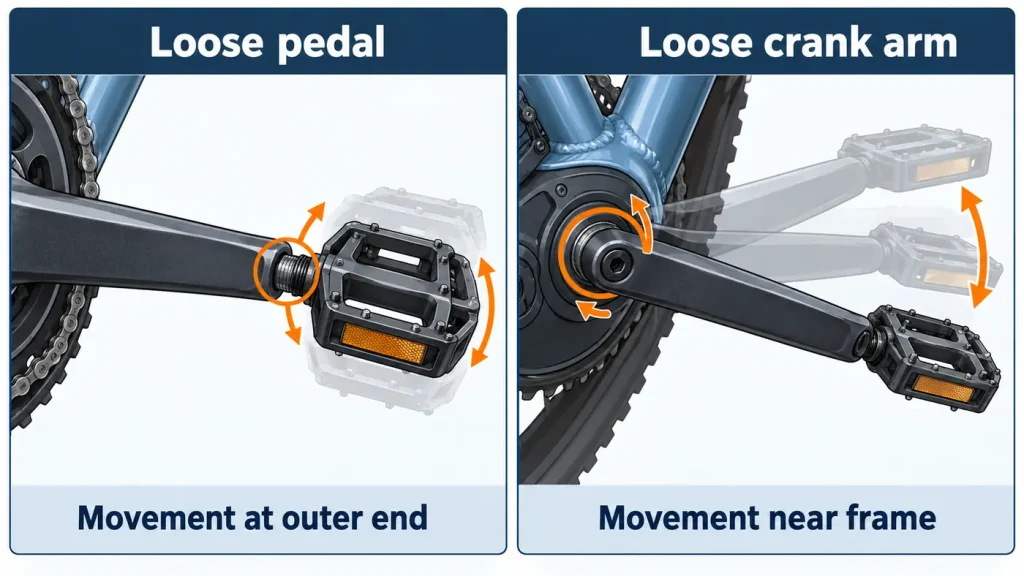
The pedal threads into the outer end of the crank arm.
If that connection is loose, the pedal can wobble even when the crank arm remains securely attached to the spindle.
Check whether the movement is concentrated around the pedal axle rather than the inner crank attachment.
Also distinguish a loose pedal axle from movement inside the pedal’s own bearings.
For more detailed information, Park Tool provides an illustrated pedal installation and removal guide.
Step 4: Consider bottom bracket movement
If both crank arms appear to move together relative to the frame, the problem may involve the bottom bracket or another part of the crank assembly.
This is not a reliable diagnosis by itself, especially on an e-bike with an integrated mid-drive motor.
A qualified mechanic may need to determine whether movement is coming from the crank interface, spindle, bearings, or motor assembly.
Don’t keep riding to see whether the problem gets worse.
Why Does an E-Bike Crank Arm Keep Coming Loose?
There are several possible causes, and the most likely one depends on the crank system and how long the bike has been ridden with the problem.
1. The crank wasn’t installed or tightened correctly
A crank arm needs to be fitted and secured according to its manufacturer’s instructions.
If its retaining hardware wasn’t installed or tightened correctly, the crank may begin moving during use.
TENWAYS has published specific guidance for loose crank arms on several CGO-series models. The manufacturer identifies installation problems and wear as possible causes and recommends addressing wobbling promptly.
However, that guidance shouldn’t be treated as a universal procedure for every e-bike.
2. The crank-to-spindle connection has worn
This is one of the most important possibilities when a crank keeps coming loose.
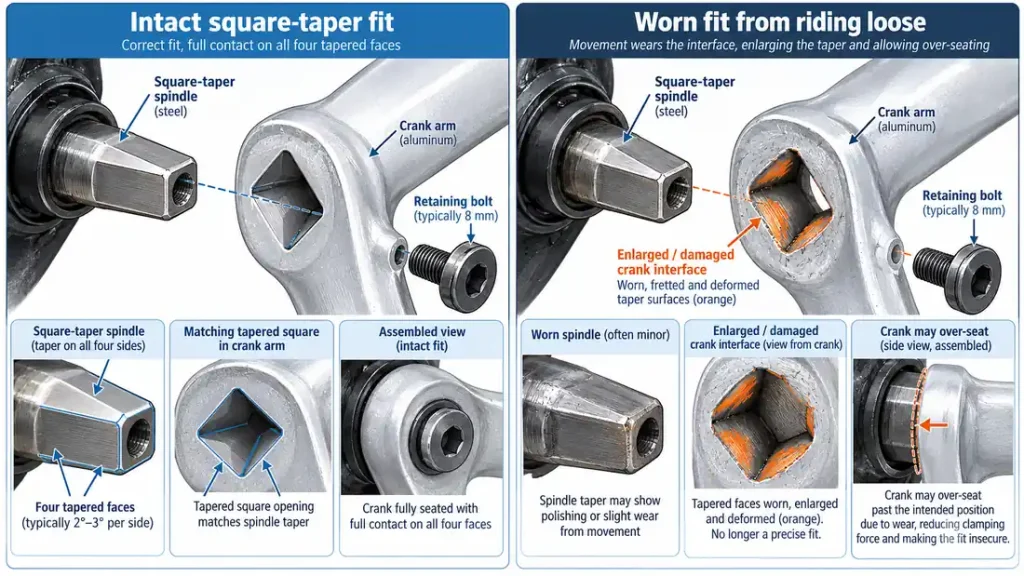
On a square-taper system, a tapered spindle fits into a corresponding opening in the crank arm.
The retaining bolt helps secure that fit.
If the bike is ridden with the crank loose, movement between the components can damage the mating surfaces.
Park Tool explains that wear can eventually reach a point where the crank no longer seats or clamps correctly.
At that stage, tightening the bolt may not restore a reliable connection.
Some splined systems can also suffer damage if repeatedly ridden loose.
3. The retaining bolt or other fastening hardware is damaged
Possible problems include:
- Damaged bolt threads.
- Incorrect or missing hardware.
- A bolt that cannot be tightened correctly.
- A missing washer or retention component where one is required.
- Damaged crank threads.
- Improperly installed pinch bolts.
Don’t assume that replacing the bolt alone will repair a damaged crank.
Both the hardware and the surfaces it holds together may need inspection.
4. The crank wasn’t fully seated
A crank arm must be positioned correctly on its spindle before the retaining hardware is secured.
Different crank designs use different seating methods.
For example, some splined systems rely on correct engagement between the crank and spindle, while certain two-piece systems require specific bearing-preload and clamping procedures.
An arm that wasn’t fully installed may loosen even if the bolt initially seemed tight.
5. The crank assembly has missing or incorrectly installed components
Some crank systems include additional parts such as a preload cap, retention plate, spacers, or bearing-preload adjuster.
Those parts don’t all perform the same function.
On certain Shimano HOLLOWTECH II cranksets, for example, a left-arm stopper plate and two mounting bolts are part of the installation.
Other crank systems don’t use that arrangement.
If a component is missing, incorrectly positioned, or damaged, the assembly may not be secure.
6. The crank or spindle is incompatible or damaged
Replacement cranks must match the relevant spindle interface and the motor or bottom bracket system.
Two crank arms can look similar without being interchangeable.
An incorrect interface, unsuitable replacement part, or damaged spindle can contribute to poor retention.
This is particularly important for electric mountain bikes and mid-drive systems that use motor-specific crank components.
7. The crank has already been ridden loose
Repeated tightening is not necessarily a repair.
e*thirteen’s technical guidance for certain Bosch-compatible ISIS crank systems specifically warns that an arm ridden loose may develop enough interface damage to require replacement.
That doesn’t mean every crank that loosens once is ruined.
It does mean that a crank that repeatedly works loose needs more than another quick turn of a wrench.
Loose Crank Arm vs. Loose Pedal: How to Tell the Difference
These problems can feel remarkably similar while riding.
Both may cause clicking, wobbling, or an unstable feeling under your foot.
| Crank arm problem | Pedal problem |
|---|---|
| Movement occurs near the spindle or motor | Movement occurs where the pedal joins the crank or within the pedal |
| Entire crank arm may rock | Pedal may wobble independently of the crank |
| Crank retaining bolt or interface may be affected | Pedal axle, threads, or bearings may be affected |
| May require crank replacement | May require pedal replacement, thread repair, or crank replacement |
| Can cause the entire crank arm to detach | Can cause the pedal to detach or become unstable |
Why pedal thread direction matters
On conventional bicycle pedals, the right pedal uses a right-hand thread, while the left pedal uses a left-hand thread.
That means they install in opposite directions.
Trying to force a pedal the wrong way can damage its threads.
If a pedal is cross-threaded or the crank’s pedal threads are stripped, tightening it harder isn’t a reliable fix.
Park Tool describes professional thread-insert repair for some solid-aluminum crank arms, but notes that replacing the arm is often the better option and that the method is not recommended for hollow or carbon-fiber cranks.
If the pedal won’t engage smoothly, stop and have the connection inspected.
How to Identify Your E-Bike Crank System Before Attempting a Repair
You don’t need to remove the crank just to begin identifying it. Start with information you can collect while the bike is switched off and stationary.
- Find the exact bike model and production version. Check the owner’s manual, purchase information, and manufacturer’s support page. Model year or revision can matter.
- Look for crank or motor markings. A brand name or part number printed on the crank arm may help you find the correct service instructions. A motor brand alone does not necessarily identify the crank arm or its fastening system.
- Examine the attachment without dismantling it. A central bolt is common on square-taper and some splined designs. Certain two-piece cranks use a separate left-arm clamp with pinch bolts and a preload cap. Some systems use self-extracting retaining hardware. These are clues, not proof of compatibility.
- Find the actual crank installation manual. Match the crank model and interface, not just the tool size or motor brand. If the identification is uncertain, send clear photographs to the bike manufacturer or an experienced repair shop.
Park Tool describes different puller configurations for square-taper and splined interfaces, and some self-extracting systems need no separate puller. The safest approach is to confirm the exact interface before buying a puller, crank arm, or replacement bolt.
Even when two cranks look similar, they may use incompatible interfaces or model-specific hardware.
Different E-Bike Crank Systems Need Different Repairs
This is why I wouldn’t recommend one generic tightening procedure.
Square-taper cranksets
A square-taper crank fits onto a tapered, square-shaped spindle.
A central bolt or nut secures the arm.
If the interface has been damaged by movement, the crank may no longer fit correctly.
A mechanic should inspect both the arm and spindle before determining whether tightening or replacement is appropriate.
ISIS and other splined cranksets
Splined crank arms engage with corresponding features on the spindle.
Some e-bike motor systems use ISIS-style interfaces.
The quality of that fit matters.
e*thirteen’s guidance for its Bosch-compatible e*spec crank arms specifically addresses repeated loosening and potential interface damage.
Those instructions apply to the documented system, not every crank with splines.
Shimano HOLLOWTECH II-style cranksets
Some Shimano two-piece cranksets use two left-arm pinch bolts and a stopper plate.
Shimano instructs mechanics to tighten the two mounting bolts alternately and incrementally, then verify the specified torque.
The manufacturer warns that incorrect installation can allow the arm to detach during riding.
This is not the same procedure used for a conventional square-taper crank.
SRAM DUB cranksets
SRAM’s DUB documentation describes crank-arm retaining hardware and a separate bearing-preload adjustment procedure on applicable models.
The preload adjuster isn’t a substitute for correctly securing the crank arm.
Owners should follow the instructions and torque specifications for their exact DUB crankset, rather than borrowing values from another brand.
Mid-drive motor crank systems
On some e-bikes, the crank spindle is part of or passes through the motor assembly.
That makes compatibility particularly important.
Don’t assume a conventional bicycle crank is a suitable replacement for the arm supplied with your e-bike motor.
If you suspect spindle damage within the motor system, I’d recommend manufacturer-authorized service rather than opening the drive unit.
🎬 Watch: Park Tool demonstrates three-piece crank installation for square-taper, ISIS, and Octalink systems. This is not a universal procedure for every e-bike crankset; use instructions for your exact model.
Can You Tighten a Loose E-Bike Crank Arm Yourself?
Sometimes, but only under the right circumstances.
A correctly specified fastener that has loosened before any crank movement or damage may be something an experienced owner can address using the manufacturer’s procedure and an appropriate torque wrench.
But there are important limits.
When owner maintenance may be reasonable
You should be able to confirm all of the following:
- You have positively identified the crank model and fastening system.
- You have the correct, current installation instructions.
- There is no sign of crank or spindle damage.
- The crank has not been repeatedly ridden loose.
- No required retention hardware is missing.
- You have the correct tools and specified torque information.
- The manufacturer permits the procedure to be performed by the owner.
If you can’t confirm those points, professional inspection is the safer choice.
When you shouldn’t simply tighten it again
Don’t rely on tightening alone if:
- The crank visibly wobbles on its spindle.
- It has loosened more than once.
- The arm has fallen off.
- The bolt is damaged or missing.
- There are cracks or signs of metal deformation.
- The crank won’t seat correctly.
- The attachment still has play after previous repairs.
- You don’t know which crank system is installed.
In these situations, tightening the retaining hardware can hide the symptom temporarily without correcting the underlying damage.
Why using the correct torque matters
Torque specifications vary considerably between crank designs.
For example, Shimano’s two-bolt left crank arrangement differs from SRAM’s DUB crank fastening system.
TENWAYS also publishes model-specific installation instructions for its bikes.
Don’t copy a torque value from a different crankset simply because the bolt uses the same hex-key size.
Use the current manufacturer documentation for the exact crank and motor configuration.
An example of why this matters: TENWAYS currently has two support articles with different torque recommendations for some overlapping CGO models. Its March 2025 loose-crank article lists 45 Nm, while its September 2026 installation guide lists 35-40 Nm. Neither figure should be copied to another bike, and owners of affected TENWAYS models should confirm the correct value and procedure with TENWAYS or their dealer if the published guidance conflicts.
What if the Crank Arm Is Loose on a Brand-New E-Bike?
A new e-bike can develop a loose crank because of an assembly or component problem, but the fact that it happened early doesn’t tell you which one. The crank still needs to be inspected for damage.
If you discover the problem soon after delivery or assembly:
- Stop riding rather than waiting to see whether the wobble settles down.
- Take photographs or a short stationary video showing the affected side, retaining hardware, and any visible movement. Avoid forcing the crank to recreate the problem.
- Save the order number, receipt, bike model, serial number, and assembly instructions.
- Contact the seller or manufacturer, explain when the problem started, and ask whether the bike should be inspected by an authorized shop.
- Check the warranty and service terms before removing parts or authorizing a paid repair. Coverage depends on the brand and circumstances; it isn’t automatically guaranteed.
TENWAYS, for example, directs owners to its warranty information and dealer or service-partner options. This is worth checking before spending money on a replacement crank, especially if the bike is new.
What Tools Might You Need?
For basic inspection and manufacturer-approved service, useful tools may include:
| Tool | What it’s used for | Important limitation |
|---|---|---|
| Flashlight | Looking for visible cracks, missing hardware, or unusual gaps | Cannot reveal all internal damage |
| Correct-size hex wrench or socket | Accessing approved crank fasteners | Tool size varies by system |
| Torque wrench | Applying the specified tightening torque | Only useful with the correct procedure and torque value |
| Compatible crank puller | Removing certain crank-arm designs for inspection | Not appropriate for every crank system |
| Pedal wrench | Removing or installing pedals where required | Not the same as a crank removal tool |
I would avoid purchasing a crank puller until you’ve identified the exact crank system.
Some cranks use self-extracting hardware or different removal methods.
Likewise, don’t use an impact driver or an improvised extension to force a crank bolt.
And don’t add threadlocker to crank hardware unless the manufacturer specifies its use for that particular assembly.
A useful accessory to consider
A properly sized torque wrench is one of the more useful tools for home bicycle maintenance.
But you don’t necessarily need to buy one solely for this repair.
If the crank has repeatedly loosened or may already be damaged, paying for a professional inspection is more useful than buying tools and attempting to tighten it again.
What to Do if Your E-Bike Crank Arm Falls Off
If a crank arm detaches while you’re riding, stop as soon as you can safely do so.
Don’t try to continue riding with one pedal or use motor assistance to get home.
Step 1: Move yourself and the bike to safety
Get clear of traffic and other hazards.
If you cannot safely walk the bike, arrange assistance.
Step 2: Collect the detached parts
If they are accessible without creating another hazard, keep the crank arm, retaining bolt, washers, and any other loose components together.
They may help the mechanic determine what failed.
Step 3: Look for visible damage
With the bike powered off, inspect without forcing anything together.
Possible warning signs include:
- A damaged crank opening.
- Deformed or worn splines.
- Stripped threads.
- A cracked crank arm.
- Missing hardware.
- Visible spindle damage.
Don’t assume a component is safe simply because no damage is obvious.
Step 4: Arrange an inspection
A mechanic should determine whether the crank, retaining hardware, spindle, or additional components need repair or replacement.
If the crank is part of an integrated motor system, the manufacturer may need to authorize the repair.
I wouldn’t recommend reinstalling a crank that fell off and immediately riding home without assessing the cause of the failure.
Need hands-on repair help?
Find e-bike repair shops and mobile mechanics, starting with Virginia and expanding. Check listed services and repair restrictions before contacting a business.
Find E-Bike RepairWhen Does a Loose Crank Arm Need Replacement?
Not every loose crank needs replacement, but some do.
The decision depends on whether the mating surfaces are still capable of forming a secure connection.
| Finding | Possible outcome |
|---|---|
| Incorrectly installed hardware, with no damage | Correct installation may resolve the problem |
| Damaged or missing retaining bolt | Approved replacement hardware may be needed |
| Worn square-taper crank opening | Crank-arm replacement may be necessary |
| Damaged splines or crank interface | Crank replacement, and possibly spindle inspection or repair |
| Cracked crank arm | Replacement required |
| Damaged spindle or motor crank interface | Specialist diagnosis; more extensive repair may be necessary |
| Pedal threads stripped | Crank replacement or suitable professional thread repair, depending on design |
Park Tool explains that a square-taper crank worn from being ridden loose can reach a condition where tightening the bolt no longer provides adequate retention.
Similarly, e*thirteen warns that some repeatedly loosened ISIS crank interfaces may be damaged beyond dependable reuse.
That is why I wouldn’t recommend repeatedly tightening the same arm without investigating why it keeps moving.
What if Your Crank Arm Keeps Coming Loose After a Repair?
A crank that loosens again shortly after professional service deserves another inspection.
It may indicate that the original problem wasn’t fully resolved.
Possible explanations include:
- The crank interface was already damaged.
- A component was incompatible.
- Retaining hardware wasn’t installed correctly.
- Required parts were missing or worn.
- The spindle itself has a fit or wear problem.
- The wrong tightening procedure was used.
Before replacing parts again, ask the shop to explain what caused the first failure and whether both sides of the crank-to-spindle connection were inspected.
If the bike was recently repaired, also check whether the work is covered by the shop’s service guarantee.
How to Check Your E-Bike After a Crank Arm Repair
Before returning to regular riding, make sure the repair addressed the reason the arm came loose, not just the loose fastener.
- Ask what was found: Was the retaining bolt loose, or were the crank interface, spindle, or bearings damaged?
- Confirm the correct parts were used: The crank and hardware should match the bike or motor system, including any required washers, spacers, or retention components.
- Check alignment: On a conventional two-arm crank assembly, the arms should be positioned opposite each other as specified by the manufacturer.
- Check for play with the bike switched off: There should be no abnormal movement at the crank attachment. Do not apply excessive force or put fingers near pinch points.
- Confirm the documented procedure was followed: Ask whether the specified tightening sequence, torque, and any required bearing-preload adjustment were checked.
- Ask about follow-up inspection: Shimano specifies a torque recheck after approximately 100 km (60 miles) for certain HOLLOWTECH II left-crank assemblies. e*thirteen calls for checks after the first and third rides on the specific Bosch-compatible ISIS system covered by its guide. Follow the instructions for your exact crank rather than adopting either schedule universally.
If there is still looseness, a new clicking or grinding sound, or unusual resistance, don’t ride until the shop or manufacturer has reassessed it.
Is a Loose Crank Arm More Common on Mid-Drive E-Bikes?
Not necessarily.
Both hub-motor and mid-drive e-bikes can develop crank-arm problems. I found no reliable comparative data establishing that this failure is more common on either type.
The fastening system, component compatibility, installation quality, condition, and maintenance history matter more than simply whether the motor is in the wheel or near the pedals.
However, some mid-drive systems use motor-specific crank interfaces and replacement parts.
That may make diagnosis and component selection more complicated.
A mid-drive motor can also produce noise or resistance that a rider initially mistakes for a crank problem.
The important first step is determining which component is actually loose.
Is It Safe to Ride With a Slightly Loose Crank Arm?
No. I wouldn’t continue riding with a crank arm that has noticeable play or is moving at its spindle connection.
Even if the bike still pedals normally, the attachment may be deteriorating.
Continued use can damage the crank or spindle and increase the chance of the arm detaching.
This is different from a bike that makes a clicking sound but has no confirmed crank movement.
A click deserves investigation, but it doesn’t automatically establish that the crank is loose.
If the source of the problem remains uncertain, have it diagnosed before returning to normal riding.
Could There Be a Recall?
Yes, a crank-related defect can sometimes be part of a manufacturer safety recall.
However, a loose crank arm doesn’t automatically mean the bike has been recalled.
Check the manufacturer’s safety notices and, where applicable, the U.S. Consumer Product Safety Commission recall database using the exact bike model and relevant component information.
If the bike or crank is covered by an active stop-use recall, follow the official remedy instructions rather than attempting an unrelated repair.
If you’re dealing with a relatively new e-bike, I’d check this before purchasing replacement parts.
How to Prevent Crank Arms From Coming Loose
The best approach is to follow the manufacturer-specified installation and inspection procedures.
Check for early warning signs
Pay attention to new movement, clicking, or changes in how the pedals feel.
A new clicking sound doesn’t necessarily mean the crank is loose, but it’s worth investigating.
Follow the proper tightening procedure
Use the correct torque and fastening sequence for your actual crank model.
For example, Shimano specifies alternating tightening stages for the two mounting bolts on certain HOLLOWTECH II left crank arms.
Other crank systems have different requirements.
Recheck after installation when required
Some manufacturers call for additional inspection after initial installation or a specified period of riding.
Follow those instructions rather than using a single maintenance interval for every e-bike.
Address problems early
A crank that starts moving can experience additional wear if riding continues.
Investigating the problem promptly may help prevent a more expensive repair.
For general maintenance tasks, my e-bike maintenance checklist covers weekly, monthly, and longer-term inspections.
Questions to Ask a Repair Shop
If your crank arm keeps coming loose, these are useful questions to ask:
- Is the crank arm itself damaged, or is the problem only with the fastening hardware?
- Has the crank-to-spindle interface been inspected?
- Is the replacement part compatible with my e-bike and motor?
- Are the crank and spindle both reusable?
- Was the assembly installed using the correct model-specific procedure?
- Should the fasteners be rechecked after the repair?
- Is this repair covered by my bicycle warranty or a previous service guarantee?
If possible, provide the bike’s brand, model, motor system, and photographs of the crank assembly.
A shop that is familiar with the specific motor or crank system is preferable when compatibility is uncertain.
Frequently Asked Questions
Can I ride using only the throttle if my crank arm is loose?
No. Even if the motor runs without pedaling, a loose crank can move unexpectedly, detach, or interfere with your footing. Stop riding and have the connection inspected before using your e-bike again.
Why does my e-bike crank arm keep loosening?
Possible causes include incorrect installation, damaged hardware, an improperly seated crank, or wear where the crank meets the spindle. Repeated loosening can indicate interface damage that tightening alone won’t fix.
Can I just tighten the crank bolt?
Only when the manufacturer permits that procedure, you have the correct torque specification, and the assembly has no suspected damage. If the crank has visibly moved, fallen off, or repeatedly loosened, have the interface inspected first.
Why is my left crank arm coming loose?
Many crank systems secure the non-drive-side arm with specific retaining hardware, but the exact design varies. Check your crank’s model and installation procedure rather than assuming all left crank arms use the same fastening arrangement.
What happens if I keep riding with a loose crank arm?
The crank-to-spindle connection can wear, and the arm may detach unexpectedly. That creates a risk of losing your footing or control of the bike.
Does a loose crank arm mean my e-bike motor is damaged?
No. A loose crank doesn’t automatically mean the motor has failed. However, certain mid-drive systems use motor-integrated spindles, so spindle damage may require specialist diagnosis.
Why does my crank arm click but not wobble?
The sound could come from the pedal, bottom bracket, chainring, drivetrain, or nearby hardware. A clicking noise alone isn’t enough to confirm a loose crank arm.
What’s the difference between a loose pedal and a loose crank arm?
A loose pedal moves at the outer end of the crank arm or within the pedal body. A loose crank arm moves at its connection to the spindle near the bottom bracket or motor.
Can I use threadlocker to stop a crank bolt from loosening?
Only if the manufacturer specifically calls for it. Thread preparation and retention methods vary, and threadlocker won’t restore a damaged crank or spindle interface.
Do I need a special crank puller for an e-bike?
That depends on the crank design. Some systems use conventional pullers, while others use self-extracting hardware or a different removal method. Identify your crank before purchasing a tool.
Should I replace both crank arms if one is loose?
Not automatically. The affected crank, opposite arm, spindle, and related hardware should be inspected. Replace the components that are damaged or required by the manufacturer, not simply everything by default.
How This Guide Was Researched
This research-based guide draws on published service documentation from Park Tool, Shimano, SRAM, TENWAYS, and e*thirteen. I compared the instructions where they address different crank interfaces, tightening procedures, and retention problems. It is not a substitute for a qualified mechanic inspecting your specific bike.
For other repairs, visit the Electric Bike Explorer troubleshooting and maintenance hub.
My Take
If an e-bike crank arm keeps coming loose, I wouldn’t assume the answer is simply to tighten the bolt harder.
The possibility of damage at the crank-to-spindle connection is what concerns me most.
If the arm has already been moving during rides, I’d rather have someone inspect the actual fit than repeatedly tighten hardware and hope it holds.
I’d also make sure I understood whether the movement was coming from the crank arm, pedal, or bottom bracket before spending money on replacement parts.
Those problems can feel similar, but the repairs can be very different.
For a crank that has repeatedly loosened, fallen off, or shows visible damage, I think professional inspection is the sensible choice.
Disclosure: As an Amazon Associate, I earn from qualifying purchases. This comes at no extra cost to you and helps support the content on this site.
Sources and Further Reading
- Park Tool – Three-Piece Crank Removal and Installation
- Park Tool – Pedal Installation and Removal
- Shimano – HOLLOWTECH II Left Crank Arm Safety and Installation Instructions
- SRAM – DUB Crankset Installation and Maintenance
- TENWAYS – Crank Arm Removal and Installation
- e*thirteen – Troubleshooting Bosch ISIS Crank Retention Issues
- TENWAYS – Fix a Loose Crank Arm (CGO Models)
- Park Tool – Pedal Bushing Repair Kit Procedure

Kristina is not just an enthusiast but a true authority on electric bikes. Nestled in the coastal beauty of Virginia, Kristina has found the perfect backdrop for her passion for electric biking. As a dedicated wife and homeschooling mom, her life revolves around family, faith, and the thrill of adventure.
Originally hailing from Ohio, Kristina's journey with electric bikes began as a curiosity and quickly evolved into a deep expertise. Her blog is a testament to her love for electric biking, combining her fascination for eco-friendly transportation with her coastal lifestyle.
When she's not cruising the beach on her electric bike, you'll find Kristina indulging in her other loves: long walks along the shore, getting lost in a good book, and cherishing moments with her loved ones. With a heart as big as her love for animals, especially cats, Kristina brings a unique perspective to the electric bike world, grounded in her strong faith in God and her dedication to a sustainable lifestyle.
Through her blog, Kristina shares her extensive knowledge of electric bikes, offering valuable insights, tips, and recommendations to fellow enthusiasts. Whether you're a seasoned rider or a newcomer to the electric bike scene, Kristina's blog is your go-to source for all things electric biking, fueled by her passion, expertise, and the scenic beauty of coastal Virginia.