E-Bike Lights Not Working? Headlight, Taillight and Brake-Light Troubleshooting
Last Updated on September 13, 2026 by Kristina
If your e-bike headlight, taillight, brake light, or turn signals stop working, do not assume the lamp itself has failed. The problem can be as simple as a display setting or loose external connection, but it can also involve damaged wiring, moisture, an incompatible replacement light, a brake-signal problem, or the bike’s light or accessory power system.
The failure pattern matters. One dead light usually points you in a different direction than a headlight and taillight that stop working together. Flickering when the handlebars move is different from a light that never comes on at all. And if the display, motor, and lights all lose power at the same time, look upstream at the bike’s main electrical system rather than assuming several components failed simultaneously.
This guide focuses on safe checks you can make without opening a battery, controller, sealed display, or drive unit. For broader problems, start with my E-Bike Troubleshooting and Maintenance Guide. You can also use the E-Bike Troubleshooting Tool when the problem extends beyond the lighting system.
Quick Answer: Why Are My E-Bike Lights Not Working?
An e-bike light may stop working because the light has not actually been switched on through the correct display, app, remote, or button combination. Other possibilities include a loose external connector, damaged wiring, moisture or corrosion, a failed lamp, a brake-lever or brake-signal problem, a controller or drive-system accessory-output problem, a documented fuse on systems that use one, an incompatible replacement light, or a system-specific software or communication fault.
No one cause applies to every e-bike. Lighting systems vary considerably between brands, drive systems, models, and model years.
Some bikes use a separate light button while others use a long press on a display control. Some drive systems can also have their light or accessory output configured through system software. That is why the owner’s manual for your exact bike and electrical system should take priority over generic button combinations or wiring advice.
Is This Guide for Integrated E-Bike Lights or Rechargeable Accessory Lights?
This guide primarily covers lights that are powered by, connected to, or controlled through the e-bike’s electrical system. That includes many factory headlights, taillights, brake lights, and turn signals.
A separate USB-rechargeable or battery-powered accessory light has a different troubleshooting path. For those lights, check the light’s own battery charge, charging cable, charging port, power button, mounting contacts if applicable, and the light manufacturer’s instructions.
If both an integrated light and a separate rechargeable light fail at the same time, do not assume they share the same cause.
Safety First
Stop using or charging the bike if you notice smoke, sparks, a burning or chemical odor, unusual heat, melted connectors, exposed or shorted wiring, battery swelling, leaking, physical battery damage, or serious water intrusion.
Do not open a lithium-ion battery, controller, sealed display, or sealed drive unit to troubleshoot a lighting problem. Do not connect an unidentified light directly to the battery or probe unidentified live wiring.
Before riding, check that the bike’s lights, brakes, cables, and other safety-critical components are in usable condition. Follow the instructions for your exact bike and electrical system.
If your lighting is unreliable, do not ride after dark or in poor visibility without the legally required and safely functioning lighting and reflectors for your location.
🔧 How This Guide Was Researched
This guide is based on manufacturer instructions, established safety guidance, technical references, and common rider experiences. Stop using or charging the bike if you notice smoke, swelling, unusual heat, damaged wiring, sparks, or a strong chemical odor.
I use rider experiences to help identify useful symptom patterns, not as proof that a particular electrical component has failed. You can read more about how Electric Bike Explorer researches and verifies technical information.
5-Minute E-Bike Light Check
If you want the fastest safe starting point, work through these checks before ordering a replacement light.
- Confirm how your light is supposed to turn on. Check the owner’s manual for the correct button, long press, display setting, app setting, automatic mode, or other control.
- Identify what still works. Is one light dead, are all integrated lights dead, or have the display and motor also lost power?
- Look for an error code. Photograph it before restarting the bike.
- Think about what changed. Did the problem begin after assembly, handlebar adjustment, folding, transport, rack work, wheel work, rain, washing, or installation of another component?
- Turn the bike off before inspecting wiring. Look only at safely accessible cables, connectors, mounting areas, and frame-entry points.
- Look for obvious trouble. Stop if you find melting, exposed conductors, severe corrosion, unusual heat, or damaged electrical parts.
- Do not buy a replacement yet. Confirm the correct part or electrical specification first.
If the display, motor, and lights all lose power together, skip light-only troubleshooting and move to main battery and power-system diagnosis.
Identify Which Light Is Not Working
Before touching anything, identify the exact symptom. This can narrow the possibilities considerably.
- Is only the headlight dead?
- Is only the taillight dead?
- Does the taillight work normally but fail to brighten when you brake?
- Does one turn signal fail while the other signals still work?
- Are all integrated lights dead?
- Do the lights flicker rather than stay completely off?
- Does the problem change when you turn the handlebars?
- Does the display show a light icon even though the lamp remains dark?
- Do the display and motor keep working when the lights fail?
- Does the entire bike lose power at the same time?
Also notice whether the problem is constant or intermittent. An intermittent failure often gives you more diagnostic information than a completely dead component because you can compare when the problem appears and when it disappears.
Quick E-Bike Light Decision Tree
Only one light is out?
Start with that lamp’s control, mounting area, accessible connector, and local wiring.
Headlight and taillight are both out, but the bike still runs?
Check the light controls, system settings, shared lighting circuit, accessible harness, and manufacturer-specific lighting diagnostics.
Lights, display, and motor all lose power?
Treat this as a main-power problem rather than several simultaneous component failures.
Taillight works but does not change when braking?
If your bike is designed with a brake-light function, investigate the brake-signal side of the system rather than assuming the entire rear lamp has failed.
Light flickers when the handlebars move?
Inspect the moving cable area around the handlebar, stem, and head tube with the bike powered off. The pattern suggests an intermittent connection or cable problem may be involved, but it does not prove which part is faulty.
Problem began immediately after a replacement light was installed?
Stop trial-and-error testing and verify the exact replacement specification and compatibility.
Quick Symptom and Cause Table
| Symptom | Areas That May Be Involved | Safest First Check |
|---|---|---|
| One light does not work | Light, local connector, local wiring, mounting-area damage | Confirm the light command and inspect the accessible wiring near that light |
| Headlight and taillight both fail | Shared setting, accessory output, shared harness, system fault | Confirm light controls and whether the rest of the bike still has power |
| Light icon appears but lamp stays dark | Lamp, connector, wiring, accessory output | Confirm the manual’s light-control procedure and inspect accessible connections |
| Light flickers over bumps | Intermittent connection, cable damage, mounting-area wiring | Power off and inspect visible wiring and connections |
| Light changes when handlebars turn | Cable or connection near handlebars, stem or head tube | Inspect the moving cable area with the bike powered off |
| Taillight works but brake light does not brighten | Brake signal, lever or sensor input, wiring, integrated lamp electronics | Check the bike’s manual and whether other brake-related electrical functions behave normally |
| One turn signal fails | Individual signal, local wiring, connector | Compare it with the working side and inspect the accessible local wiring |
| All turn signals fail | Switch or control, common supply, harness, system setting | Confirm the control procedure before replacing individual signals |
| Problem began after rain or washing | Moisture, connector contamination, damaged seal or existing connection fault | Power down and inspect only accessible components in a dry area |
| Replacement light does not work | Wrong specification, wiring incompatibility, system configuration, failed output | Verify the exact manufacturer-approved electrical specification |
| Display, motor and lights all shut off | Battery, main power connection or another upstream fault | Stop treating it as a light-only problem and diagnose the main power system |
What Your Symptom Does Not Prove
Lighting symptoms can help narrow the search, but they should not be treated as a confirmed diagnosis.
| Symptom | What It Does Not Prove |
|---|---|
| Headlight stays dark | It does not prove the headlight itself has failed. |
| Light flickers over bumps | It does not prove one particular connector or wire is loose. |
| Light stopped after rain | It does not prove water entered the controller or lamp. |
| Display shows a light icon | It does not prove the lamp is receiving usable electrical power. |
| Both lights stopped together | It does not prove both lamps failed simultaneously. |
| Brake light does not brighten | It does not prove the brake lever sensor is bad. |
| Replacement connector fits | It does not prove the replacement light is electrically compatible. |
| A fuse has blown | It does not prove the fuse itself was the underlying problem. |
What Changed Before the Light Stopped Working?
The timing of the failure can be one of your strongest clues. A problem that appears immediately after another part of the bike was moved or serviced deserves attention in that area first.
| What Happened Before the Failure? | Area Worth Inspecting First |
|---|---|
| Handlebars or stem adjusted | Visible wiring around the controls, stem, head tube, and headlight |
| Bike folded or unfolded | Moving cable sections and folding-joint cable routing |
| Bike transported on a vehicle rack | Exposed wiring, handlebars, lights, battery seating, and areas contacted by straps |
| Rear rack or fender serviced | Taillight cable routing and rear mounting area |
| Rear wheel or tire removed | Nearby rear-light wiring that may have been disturbed |
| Bike washed or ridden in heavy rain | Accessible connectors, seals, controls, and areas showing moisture or corrosion |
| Replacement light installed | Replacement specification, compatibility, connection, and system configuration |
| Bike fell or crashed | Impact area, mounting brackets, wiring, controls, battery attachment, and connectors |
This table tells you where to begin looking. It does not establish which component has failed.
E-Bike Headlight Not Working
If the headlight alone is not working and the display, motor, and rear light still operate normally, start locally rather than assuming the battery or controller has failed.
Confirm How the Headlight Is Supposed to Turn On
Check the exact owner’s manual first. Some e-bikes use a dedicated light button. Others use a long press on another control. Some systems allow automatic or software-controlled lighting behavior.
Lectric, for example, documents a long press of the plus button for lighting on certain models. That is a useful example of why a light that appears dead may simply not be receiving the command you expect, but it should not be treated as a universal e-bike control method.
If the display itself is blank, flickering, or not responding to its buttons, use my e-bike display troubleshooting guide before treating the headlight as a separate failure.
Inspect the Headlight Area With the Power Off
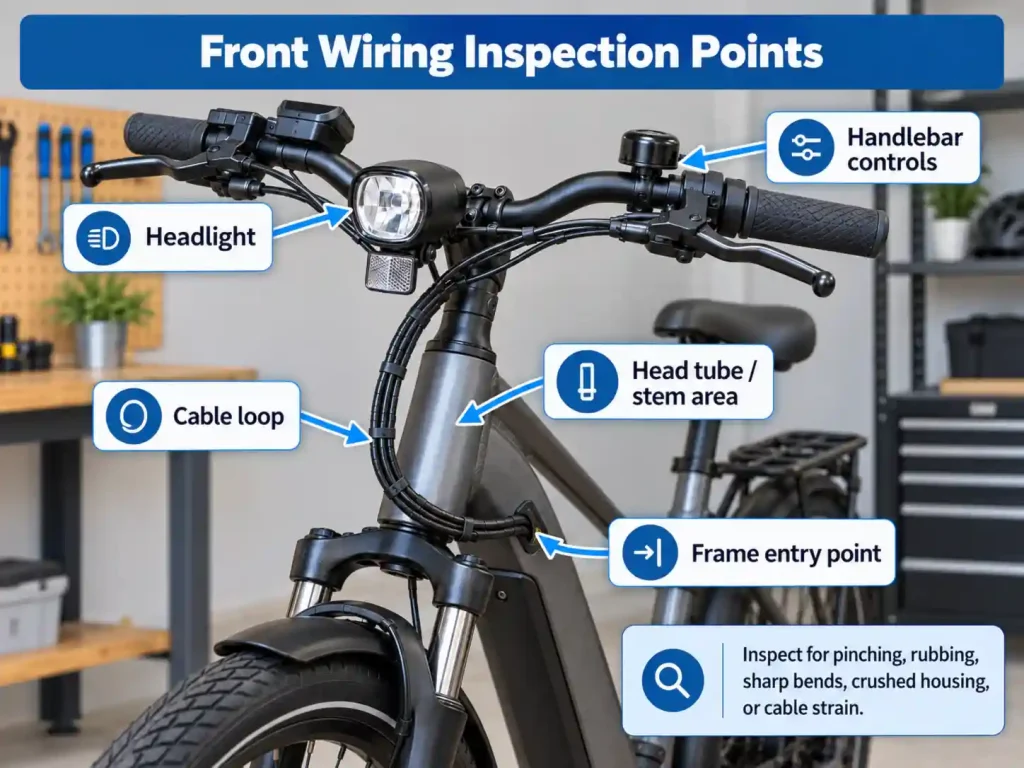
Look for a loose mounting bracket, visibly pinched wire, cut insulation, crushed cable, damaged external connector, corrosion, or evidence that the cable has been pulled tight.
Pay particular attention to wiring near the handlebars, fork, stem, and head tube because steering repeatedly moves cables in this area.
Do not force a connector apart or back together merely because it is visible. Follow the manufacturer’s instructions for any connector the owner is expected to service.
E-Bike Taillight Not Working
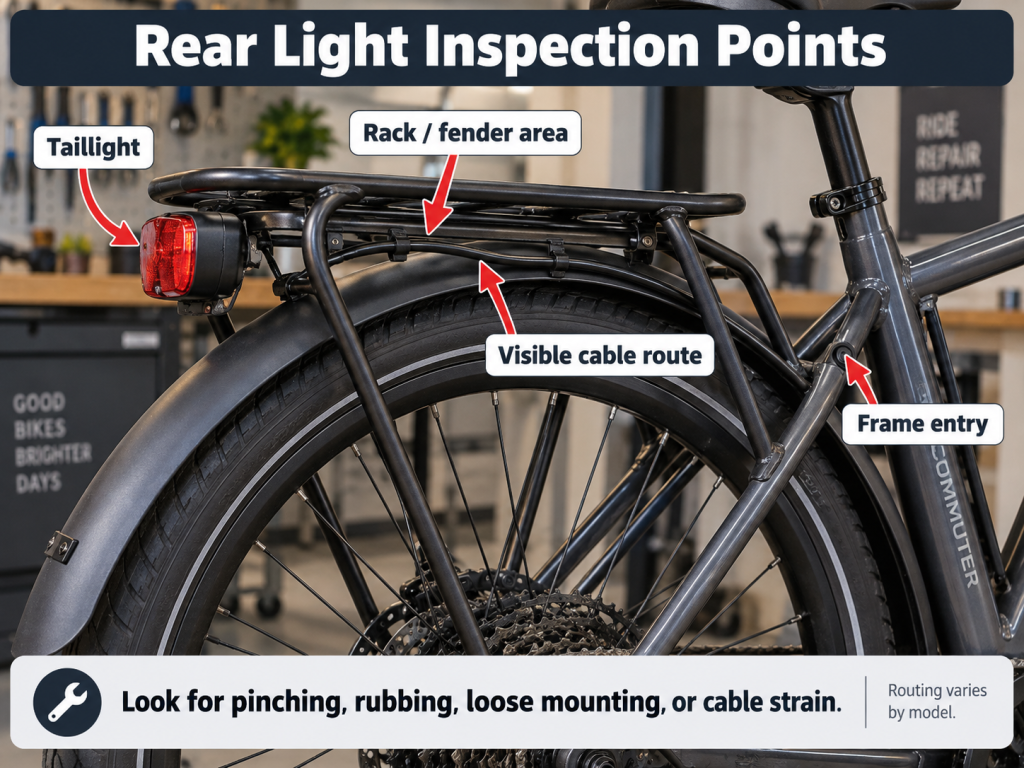
A dead taillight can involve the lamp itself, its local connector, wiring along the rear frame, a rack or fender connection, or a shared lighting circuit.
If the problem appeared after rack, fender, wheel, tire, or cargo-accessory work, inspect that work area before ordering a replacement light. Rear-light wiring is often routed through or alongside parts that may be disturbed during maintenance or accessory installation.
Look for obvious cable crushing, abrasion, excessive tension, a connector that is visibly separated, or wiring trapped between components.
If both front and rear lights are dead, however, do not assume two lamps failed simultaneously. Skip ahead to the section on both lights failing together.
E-Bike Brake Light Not Working
First determine whether the rear lamp is completely dead or whether it still works as a normal taillight but fails to brighten or change when you apply the brakes.
If the running taillight works but the brake-light function does not, that pattern can point toward the brake-signal side of the system rather than loss of all power to the rear lamp. Depending on the bike, possible areas include the brake lever or brake-signal sensor, related wiring, the controller or lighting electronics, or the lamp assembly itself.
Do not assume the motor cutoff sensor and brake-light signal are electrically identical. Designs vary. Some bikes may integrate functions while others may handle them differently.
If the motor also refuses to provide assistance or the bike behaves as though a brake lever is permanently applied, my brake cutoff sensor troubleshooting guide explains that separate motor-inhibit problem in more detail.
Do not defeat or permanently disconnect a factory brake-safety system merely to make another function work.
Safe Stationary Brake-Light Check
If your bike’s documentation says the rear lamp includes a brake-light function that is activated from a brake lever, you can perform a simple observation before diagnosing electrical parts.
- Place the bike securely on level ground where it cannot roll unexpectedly.
- Keep both wheels on the ground and do not touch the throttle or pedals.
- Set motor assistance to its lowest or zero-assist setting if your bike provides one.
- Turn the electrical system on normally.
- Have another person observe the rear lamp from a safe position.
- Squeeze one brake lever and then release it.
- Repeat with the other lever if your bike is designed to receive brake-light input from both.
- Note whether the rear lamp changes brightness or behavior as described in the owner’s manual.
If the running taillight works but the expected brake-light response does not, you have narrowed the problem to the brake-light function. You have not proven whether the cause is the lever, sensor, wiring, control electronics, or lamp.
Do not perform a riding test merely to see whether the brake light works, and do not assume every e-bike’s brake light operates from both brake levers.
E-Bike Turn Signals Not Working
Turn signals add another useful comparison: one signal failing is different from every signal failing.
If a single signal is out while the other integrated lights and signals continue working, inspect that signal’s accessible mounting area and wiring first. If every signal stops responding at once, the switch, control input, common wiring, accessory supply, or system electronics become more relevant than the simultaneous failure of every lamp.
Also consider recent handlebar work if the turn-signal switch is mounted on the bars. A control cable may have been pinched, pulled, or disturbed during adjustment.
Do not assume aftermarket signals can be connected to an existing e-bike harness simply because a plug looks similar.
E-Bike Lights Flickering or Cutting Out
Flickering is often more informative than a light that is permanently dead.
If the light flickers over bumps, after the bike is folded, or when a cable moves naturally during steering, an intermittent connection or damaged cable becomes a reasonable area to investigate. It is still a clue, not proof that one particular connector or wire has failed.
If turning the handlebars changes the symptom, inspect the visible wiring around the handlebar, stem, head tube, and frame entry points with the bike switched off.
My guide to finding loose electrical connections on an e-bike covers the broader visual-inspection process without requiring you to guess wire functions or connector pinouts.
Stop riding if a damaged cable has exposed conductors, is shorting, has melted insulation, or becomes hot.
Both Headlight and Taillight Stopped Working
When the headlight and taillight fail together, first ask whether the rest of the bike still works.
If the Display and Motor Still Work
A shared lighting control, system setting, accessory-power output, common harness, or lighting-specific system fault becomes more plausible than two unrelated lamp failures.
Shimano’s E-TUBE documentation is one example of how system configuration can matter: supported systems can have configurable light or accessory power settings. This does not mean every e-bike has such a setting. It means the correct service documentation matters before concluding the hardware is defective.
Bosch also documents a system-specific error in which excessive lighting electrical consumption can cause the lighting to switch off. Again, that is a Bosch-specific diagnostic example, not a universal explanation for all e-bikes.
If the Display, Motor and Lights All Lose Power
That is no longer a light-only symptom.
If several unrelated electrical functions lose power simultaneously, look upstream toward the battery, battery connection, main wiring, or another main-power problem. My controller vs. battery vs. motor diagnostic guide explains how to separate those broader failure patterns.
If the battery appears charged but the entire system remains dead, use my guide to an e-bike battery that charges but provides no power rather than replacing the lights.
Light Works When the Bike Is Stationary but Fails While Riding
A light that works in the garage but cuts out while riding may be reacting to movement, vibration, cable flex, a shifting connection, or another condition that appears only when the bike moves.
Think about where movement occurs:
- Handlebars and steering cables
- Head-tube cable loops
- Folding hinges and folding-frame cable runs
- Battery mounts
- Rear-rack or fender wiring
- Cables near suspension movement
- Wiring disturbed during wheel or tire work
Do not deliberately ride at night with unreliable lights to reproduce the problem. Inspect the bike in daylight with the system powered off. If diagnosis would require manipulating live wiring while the bike operates, that is a good point to involve the manufacturer or an e-bike technician.
Light Stopped Working After Rain or Washing
Timing matters, but a failure after rain does not prove that water destroyed the light.
Moisture may affect a connector, control, wiring junction, lamp, or system electronics. Wet conditions can also expose a connection that was already loose or damaged.
Power the bike off and move it to a dry area. Inspect only accessible components for visible moisture, corrosion, damaged seals, discolored connectors, or other obvious damage.
Do not use a pressure washer to try to clean contamination out of the system. Manufacturer guidance for e-bike electronics commonly warns against high-pressure cleaning because water can penetrate sensitive components.
If the bike or battery was submerged, suffered significant water intrusion, or shows electrical damage after the exposure, stop using and charging it and get model-specific guidance. Drying the outside does not establish that internal electrical parts are safe.
Replacement E-Bike Light Does Not Work
A replacement light that fits mechanically – or even uses a connector that appears to fit – is not automatically electrically compatible.
Before installing a replacement, verify the exact part number or manufacturer-approved specification for your bike and drive system. Depending on the system, compatibility can involve more than connector shape.
Do not guess:
- Supply voltage
- Current or power requirements
- Wire polarity
- Connector pin functions
- Brake-light or turn-signal inputs
- Controller accessory-output limits
Shimano’s STEPS service documentation specifically says replacement front and rear lights should use the same specification on the systems covered by that documentation. That is a good example of why the plug fitting is not enough information.
If installing a replacement causes the display to reset, the lighting to switch off, an error code to appear, or the whole bike to shut down, disconnect the replacement according to the manufacturer’s safe procedure and stop troubleshooting by trial and error.
🎬 Helpful Video: This general e-bike troubleshooting video walks through common electrical checks, including connectors, wiring, displays, batteries, controllers, and sensors. Use it as a visual companion to the steps above, but always follow the instructions for your exact e-bike model.
Replacement E-Bike Light Compatibility Checklist
Before ordering or connecting a replacement integrated light, confirm as many of these details as the manufacturer makes available:
- Exact e-bike brand and model
- Model year or generation
- Drive-system or controller family when relevant
- Original light part number
- Manufacturer-approved replacement part number
- Specified electrical requirements
- Whether the light includes a running-light function
- Whether it includes a brake-light function
- Whether it includes turn-signal functions
- Whether configuration by an app, dealer tool, display, or drive-system software is required
- Whether replacement affects warranty or requires an authorized dealer
A connector that looks identical is not enough. Do not guess supply voltage, polarity, current requirements, pin functions, or accessory-output limits.
If the manufacturer does not publish enough information to establish compatibility, contact the bike or drive-system manufacturer before connecting the replacement.
Step-by-Step Safe Troubleshooting Order
- Record the exact symptom. Note which lights work, which do not, whether they flicker, and whether the display and motor continue working.
- Check the owner’s manual for the correct light command. Confirm whether your bike uses a button, long press, display menu, app, automatic mode, or another control.
- Record any error code before changing anything. Photograph the display if necessary. You can also check the E-Bike Error Code Finder, but the manufacturer’s current documentation should remain the final authority.
- Power the bike off. If your manufacturer instructs owners to remove a user-removable battery before approved connector work, follow that procedure.
- Inspect the failed light and visible wiring. Look for damage, crushing, abrasion, water intrusion, corrosion, heat marks, loose mounting hardware, or a visibly separated connector.
- Inspect the area affected by recent work. Pay special attention after handlebar adjustment, folding, transportation, rear-wheel work, rack installation, fender work, or accessory installation.
- Compare one-light failures with system-wide failures. If the display, motor, and lights all die, move upstream to main-power diagnosis.
- Verify replacement compatibility before buying parts. Use the exact manufacturer specification rather than connector appearance or a generic e-bike light description.
- Stop before advanced electrical testing unless you have the correct documentation and training. Live voltage tests, proprietary diagnostics, unidentified wiring, internal controller work, and unsupported splicing belong with qualified service when the manufacturer does not provide a safe owner procedure.
Before Replacing the Light
Before spending money on a new lamp, answer these questions:
- Have you confirmed the correct way to activate the light?
- Does the display indicate that the light command is active?
- Is only one lamp affected, or are several electrical functions failing?
- Did the problem begin after maintenance, transport, folding, rain, or washing?
- Is there visible damage to the local cable or connector?
- Is there a system error code?
- Does the manufacturer list an exact replacement part or electrical specification?
- Does the replacement need integrated brake-light or turn-signal functions?
- Could replacing the lamp affect the bike’s warranty or require dealer configuration?
A dark lamp does not, by itself, prove the lamp has failed.
Practical Tools That Can Help
You do not need an electrical bench full of equipment for the safe checks in this guide.
- Bright inspection flashlight: helps you inspect cable routing, frame-entry points, rack wiring, connectors, and damage.
- Small inspection mirror: useful behind racks, fenders, headlights, and tight frame areas.
- Metric hex-key set: useful only for brackets and fasteners the manufacturer expects the owner to adjust.
- Bicycle torque wrench: helps reinstall approved fasteners to the bike manufacturer’s specified torque rather than guessing.
- Dielectric grease: use only where the connector or bike manufacturer specifically permits it. Do not assume every waterproof connector should be filled with grease.
- Digital multimeter: appropriate only for someone trained to use it who has the correct wiring diagram and manufacturer-approved test procedure. This guide does not recommend probing unidentified live e-bike wiring.
The E-Bike Tools Hub also collects additional maintenance and diagnostic resources.
What Not to Do
A lighting problem is not a good reason to improvise on an e-bike electrical system.
- Do not connect an unidentified light directly to the main battery.
- Do not guess voltage, polarity, wire color, or connector pin functions.
- Do not probe unidentified live wiring.
- Do not bypass a fuse, controller, protection device, or safety circuit.
- Do not substitute a higher-rated fuse if your exact system uses a documented fuse.
- Do not repeatedly replace a fuse that keeps failing.
- Do not install an unsupported voltage converter.
- Do not splice into the main harness without manufacturer documentation approving the procedure.
- Do not open a lithium-ion battery.
- Do not open a sealed controller, display, or drive unit merely to look for the lighting fault.
- Do not force waterproof connectors together.
- Do not keep testing a replacement lamp that causes the display or bike to shut down.
What About an E-Bike Light Fuse?
Some systems may use a documented fuse that affects a lighting or accessory circuit. Others do not have a user-serviceable lighting fuse at all.
Only check or replace a fuse if documentation for your exact bike or electrical system identifies its location, rating, and owner-service procedure. Never assume a fuse location from another model, bypass the fuse, or install a different rating.
If the documented fuse fails again after the correct replacement is installed, stop. Repeated fuse failure indicates a fault that deserves proper diagnosis rather than progressively larger fuses or repeated trial-and-error replacement.
When to Stop Riding
Do not ride after dark or in low visibility without the legally required and safely functioning lights and reflectors for your location.
Stop riding – and, where electrical or battery damage is involved, stop using or charging the bike – if you notice:
- Smoke
- Sparks
- A burning or strong chemical odor
- Melted connectors or wiring
- Unusual electrical heat
- Exposed or shorted wiring
- Battery swelling, leaking, deformation, or physical damage
- Electrical failure after submersion or significant water intrusion
- A replacement light causing the display or entire bike to shut down
- A documented fuse that repeatedly fails
- An electrical problem that makes the bike’s operation unpredictable
If smoke, fire, or another immediate hazard develops, move away from the hazard and contact emergency services as appropriate.
When to Contact the Manufacturer or an E-Bike Technician
Stop owner-level troubleshooting and contact the manufacturer, authorized dealer, or qualified e-bike technician when:
- The problem requires live electrical testing you are not trained to perform
- The wiring cannot be positively identified from official documentation
- The controller or drive unit would need to be opened
- The bike requires proprietary dealer diagnostic software
- The manufacturer specifies dealer-only light configuration
- Internal wiring is damaged
- A connector is melted, burned, badly corroded, or physically broken
- A compatible replacement lamp still does not operate
- A new lamp creates a system error or shutdown
- A documented fuse fails repeatedly
- The bike has significant water intrusion
- The repair would require unsupported splicing or modification of the factory harness
Before You Contact the Manufacturer or E-Bike Shop
Gather this information first:
- E-bike brand and exact model
- Approximate model year or generation
- Serial number if support asks for it
- Display or control model when visible
- Original light part number when visible
- Exact error code, if any
- Which lights still work
- Whether the display and motor still work
- Whether moving the handlebars changes the symptom
- What happened immediately before the problem began
- Clear photos of the light, mounting area, and accessible wiring
- A short video if the failure is intermittent
Photograph connectors before disconnecting anything unnecessarily. That can help support identify the correct parts and original routing.
A description such as “the rear running light works normally, but it no longer brightens when either brake lever is squeezed” gives technical support far more useful information than simply saying “the light is broken.”
How to Prevent Future Lighting Problems
- Check that the headlight and rear light work before low-light rides.
- Inspect visible cable routing when adjusting handlebars or folding the bike.
- Make sure cargo and rack straps cannot pull on taillight wiring.
- Inspect rear-light wiring after rack, fender, wheel, or tire work.
- Follow the bike manufacturer’s cleaning instructions.
- Avoid pressure washing electrical components.
- Do not hang accessories from electrical cables.
- Use only documented compatible replacement lights and accessories.
- Have damaged connectors and wiring repaired before moisture and vibration make the problem worse.
Should I Carry a Backup E-Bike Light?
A separate rechargeable headlight or rear light can be useful redundancy for riders who commute at night or in low visibility. It may help you remain visible if an integrated light unexpectedly fails away from home.
However, a backup accessory light is not a repair for a defective factory lighting system, and carrying one does not automatically mean your bike meets the lighting and reflector requirements where you ride. Equipment laws vary by location.
If an integrated light fails before a low-light ride, the safest choice is to correct the problem or use other transportation rather than assume a small backup light makes every situation safe or legal.
Like Electric Bike Explorer?
Add Electric Bike Explorer as a Preferred Source on Google to make it easier to see more of our e-bike news, guides, reviews, and troubleshooting content in Google Search.
Frequently Asked Questions
Why does my display say the e-bike light is on when the headlight stays dark?
The light icon can show that the control system accepted a light command, but that does not prove electrical power is reaching the lamp or that the lamp itself is operating. A local connector, wiring fault, failed lamp, accessory output, or system-specific issue may still be involved.
Can a blown fuse cause e-bike lights to stop working?
It can on a system that actually uses a documented fuse for the relevant circuit. Do not assume your bike has one. Check the exact service or owner’s documentation, use only the specified fuse rating, and stop troubleshooting if the correct fuse repeatedly fails.
Can I replace an e-bike headlight with another light that has the same connector?
Not safely based on the connector alone. Connector shape does not establish voltage, current requirements, polarity, pin functions, system compatibility, or brake or turn-signal behavior. Verify an approved replacement or the exact electrical specification first.
Why do my e-bike lights flicker when I turn the handlebars?
That pattern can point toward an intermittent connection, cable strain, or damaged wiring in an area that moves with the handlebars. It does not identify one particular failed wire. Power the bike off and inspect visible wiring around the bars, stem, head tube, and frame-entry points.
Why does my taillight work but the brake light does not?
If the running-light function works but the brake function does not, the brake-signal side of the system deserves attention. Depending on the bike, that can involve a brake lever or sensor input, wiring, control electronics, or the integrated lamp. Do not assume the motor cutoff sensor and brake-light signal are the same circuit.
Why did both the headlight and taillight stop working at once?
If the rest of the bike still works, look first at things the two lights may share, such as the light command, system setting, common lighting power output, wiring, or a system fault. If the display and motor also shut down, move upstream to battery and main-power troubleshooting instead.
Can rain cause an e-bike headlight or taillight to fail?
Moisture can contribute to connector, wiring, control, or lamp problems, but a failure after rain does not by itself prove water damaged the light. The timing is a useful clue. Significant water intrusion or submersion should be treated much more seriously than ordinary wet-weather exposure.
Do I need a multimeter to troubleshoot e-bike lights?
Not for the basic checks in this guide. Visual inspection, the correct owner’s manual, symptom comparison, and checking what changed before the failure can narrow many problems without live electrical testing. Use a multimeter only if you are trained to do so and have the correct wiring diagram and safe test procedure for that system.
What if the lights, motor and display all lose power?
Treat that as a broader power problem rather than three separate component failures. Check the battery and main-power diagnostic path before replacing any lights.
Save This E-Bike Light Troubleshooting Checklist
Before replacing a headlight, taillight, brake light, or turn signal, confirm:
- □ I checked the correct light-control procedure for my exact bike.
- □ I identified whether one light or several electrical systems are affected.
- □ I recorded any error code before clearing or restarting the system.
- □ I considered what changed immediately before the failure.
- □ I powered the bike off before inspecting accessible wiring and connectors.
- □ I checked the areas around recent handlebar, rack, fender, wheel, folding, or transport work.
- □ I stopped if I found exposed wiring, melting, unusual heat, severe corrosion, or other electrical damage.
- □ I did not assume flickering proves a particular wire is broken.
- □ I did not assume failure after rain proves which component got wet.
- □ I did not assume a matching connector means a replacement light is compatible.
- □ I verified the replacement part or electrical specification with the manufacturer.
- □ I did not connect an unknown lamp directly to the battery.
- □ I did not probe unidentified live wiring.
- □ I did not bypass a fuse, controller, brake-safety system, or other protective device.
- □ I know when the diagnosis has reached the point where manufacturer support or a qualified e-bike technician is the safer next step.
My Take
The most useful question with an e-bike lighting problem is usually not “Which part should I replace?” It is “What failed together, and what changed immediately before it happened?”
One dead lamp with an otherwise normal bike points in a different direction than every integrated light failing together. A light that flickers when the handlebars turn gives you a different clue than a completely dead bike. I would work from those patterns, the exact manufacturer’s documentation, and the simplest visual checks before spending money on electrical parts.
Disclosure: As an Amazon Associate, I earn from qualifying purchases. This comes at no extra cost to you and helps support the content on this site.
Related E-Bike Troubleshooting Guides
- E-Bike Troubleshooting and Maintenance Guide
- E-Bike Troubleshooting Tool
- E-Bike Display Not Working or Not Responding to Buttons
- How to Find Loose Electrical Connections on an E-Bike
- E-Bike Error Code Finder
- Controller vs Battery vs Motor: How to Tell Which E-Bike Part Is Bad
- E-Bike Battery Charges but Has No Power
- E-Bike Brake Cutoff Sensor Stuck? Causes and Fixes
External Sources
- U.S. Consumer Product Safety Commission – Micromobility Safety Information
- Shimano E-TUBE PROJECT Professional User’s Manual – Light and Accessory Output Settings
- Shimano STEPS Service Manual – Lighting System and Replacement Specifications
- Bosch eBike Systems – Lighting Electricity Consumption Error 50300B
- Bosch eBike Systems – E-Bike Maintenance and Cleaning Guidance
- Lectric eBikes – Model-Specific Light Control Guidance
- Rad Power Bikes – Lever-Actuated Taillight and Brake-Light Example

Kristina is not just an enthusiast but a true authority on electric bikes. Nestled in the coastal beauty of Virginia, Kristina has found the perfect backdrop for her passion for electric biking. As a dedicated wife and homeschooling mom, her life revolves around family, faith, and the thrill of adventure.
Originally hailing from Ohio, Kristina's journey with electric bikes began as a curiosity and quickly evolved into a deep expertise. Her blog is a testament to her love for electric biking, combining her fascination for eco-friendly transportation with her coastal lifestyle.
When she's not cruising the beach on her electric bike, you'll find Kristina indulging in her other loves: long walks along the shore, getting lost in a good book, and cherishing moments with her loved ones. With a heart as big as her love for animals, especially cats, Kristina brings a unique perspective to the electric bike world, grounded in her strong faith in God and her dedication to a sustainable lifestyle.
Through her blog, Kristina shares her extensive knowledge of electric bikes, offering valuable insights, tips, and recommendations to fellow enthusiasts. Whether you're a seasoned rider or a newcomer to the electric bike scene, Kristina's blog is your go-to source for all things electric biking, fueled by her passion, expertise, and the scenic beauty of coastal Virginia.