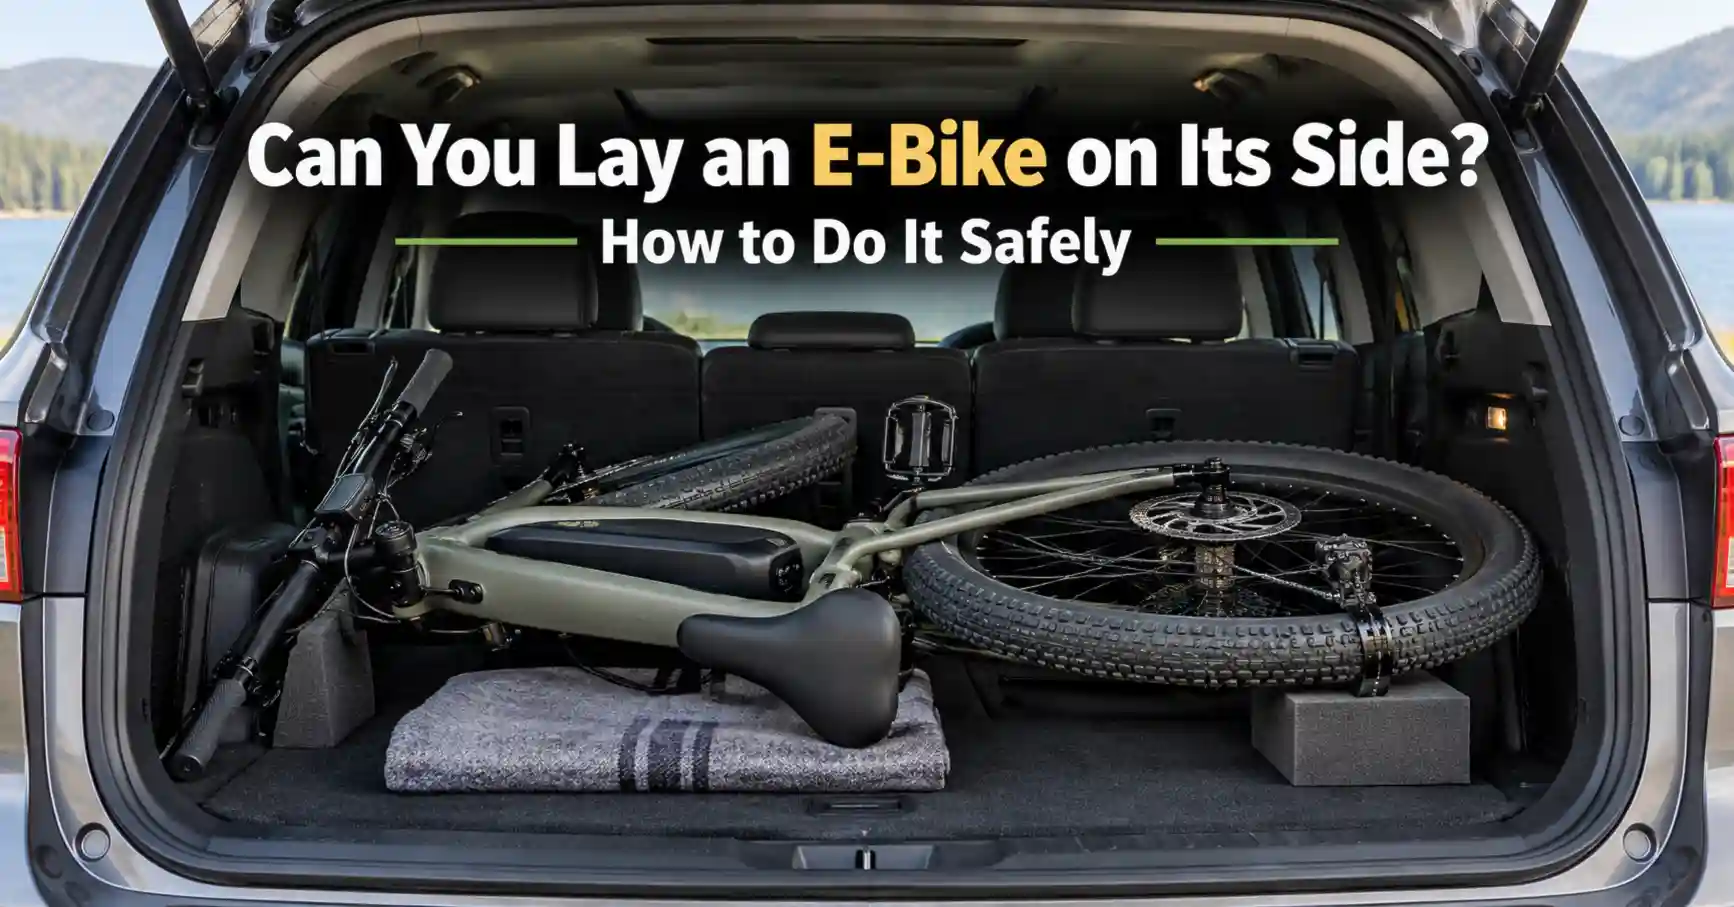
Can You Lay an E-Bike on Its Side? How to Do It Safely
Last Updated on September 21, 2026 by Kristina
Can you lay an e-bike on its side? In many cases, yes – an electric bike can be placed on its side temporarily when you need to load it into an SUV, van, RV, or truck, make a trail repair, work without a bike stand, or deal with limited garage space.
But there is no single side or method that is correct for every e-bike. The important question is not simply whether the bike is horizontal. It is what parts are supporting the bike’s weight, what can be crushed or bent, whether the bike can move, and what the bike and component manufacturers say about that position.
A rear derailleur, brake rotor, display, throttle, brake lever, fender, mirror, light, basket, battery housing, cable, or hydraulic hose can become an unintended contact point when a heavy e-bike is laid down.
If you are deciding between horizontal and vertical storage, see my guide to storing an e-bike vertically. For exterior vehicle transport, my e-bike rack safety and transport guide covers the broader rack setup.
Quick Answer: Can You Lay an E-Bike on Its Side?
Yes, many e-bikes can be laid on their side temporarily, provided the manufacturer does not prohibit it and vulnerable components are protected.
I would not choose a side by using a rule such as “always lay it on the left.” Instead, look at your actual bike and choose the position that keeps its rear derailleur, brake rotors, display, throttle, brake levers, electrical parts, battery housing, and accessories from carrying the bike’s weight.
On a conventional derailleur-equipped bike, protecting the drive-side rear derailleur and hanger is especially important. On another bike, however, the opposite side might have a vulnerable brake rotor, display, mirror, battery protrusion, or other component that changes the decision.
Hydraulic disc brakes also deserve a manufacturer-specific check. Shimano, MAGURA, TEKTRO, and other brake companies do not all describe unusual storage positions in exactly the same way.
60-Second Check Before You Lay the Bike Down
Before committing the full weight of the bike to either side, take a minute to inspect both sides.
- Rear derailleur: Will the derailleur or hanger touch the floor?
- Brake rotors: Can either rotor contact the floor, padding, another bike, or luggage?
- Display and controls: Will a display, throttle, brake lever, control pad, mirror, or phone mount become a support point?
- Battery: Will the battery case, mounting rail, lock, or release mechanism take the bike’s weight?
- Cables and hoses: Could a brake hose, electrical wire, or control cable be pinched?
- Motor and wiring: Are motor cables, axle wiring, connectors, or covers exposed to impact?
- Accessories: Check racks, baskets, fenders, lights, pedals, mirrors, panniers, and other attachments.
- Brakes: Check whether your hydraulic brake manufacturer gives specific instructions about horizontal or unusual storage positions.
If either side creates an obvious pressure point on a fragile component, do not lower the bike completely until you have changed the position or chosen another transport method.
Safety First: Before laying or loading the bike, switch the e-bike off and remove loose cargo. If the battery is damaged, swollen, unusually hot, leaking, smoking, making unusual sounds, or giving off an unusual odor after transport, stop using and charging it and follow the battery or e-bike manufacturer’s safety instructions. Do not open or attempt to repair a lithium-ion battery pack yourself.
Which Side Should You Lay an E-Bike On?
There is no universal “correct” side for every electric bike.
For a conventional bicycle with an external rear derailleur, I would normally try to avoid putting the bike’s weight directly onto the drive side. SRAM notes that even resting a conventional external-drivetrain bike on the drive side can contribute to derailleur-hanger misalignment.
That does not mean the opposite side is automatically safe. Look at the complete bike before lowering it.
For a derailleur-equipped e-bike
Keep the rear derailleur and hanger completely clear of the floor or cargo surface. A bent or misaligned hanger can cause inconsistent shifting and can allow the chain to move too far toward the spokes or frame.
For an internal-gear-hub or belt-drive e-bike
You may not have an exposed rear derailleur to protect, but you still need to inspect the brake rotor, hub hardware, belt components, cables, display, controls, battery location, fenders, and accessories before deciding which side can safely carry the bike.
For a hub-motor e-bike
The presence of a hub motor does not by itself tell you which side should face down. Inspect the axle area carefully and protect motor wiring, connectors, brake components, and anything protruding near the dropout from impact or crushing.
For a mid-drive e-bike
Use the same contact-point approach. Avoid placing the bike’s weight on exposed motor covers, wiring, connectors, chainrings, or other vulnerable components unless the bicycle manufacturer specifically identifies an area as suitable for support.
In short, choose the side based on your bike’s actual design and manufacturer instructions rather than motor location alone.
What Should Actually Touch the Floor?
There is no universal list of approved support points for every e-bike. A contact point that is harmless on one bicycle may contain a battery, cable routing, control, carbon structure, fender, or other vulnerable component on another.
A simple way to check is to lower the bike most of the way without fully releasing its weight.
- Stop just before the bike settles completely.
- Look underneath and identify the 2 or 3 points that are about to touch the surface.
- Make sure none of those points is the rear derailleur, brake rotor, display, throttle, battery case, electrical connector, brake hose, cable, or another fragile part.
- If something vulnerable is about to touch, raise the bike slightly and reposition it.
Use padding only where it supports an appropriate, robust contact area. Do not pack foam, towels, or other material tightly against brake rotors, electrical contacts, battery mounts, or controls merely to make the bike appear cushioned.
Can You Transport an E-Bike Lying Down in an SUV or Car?
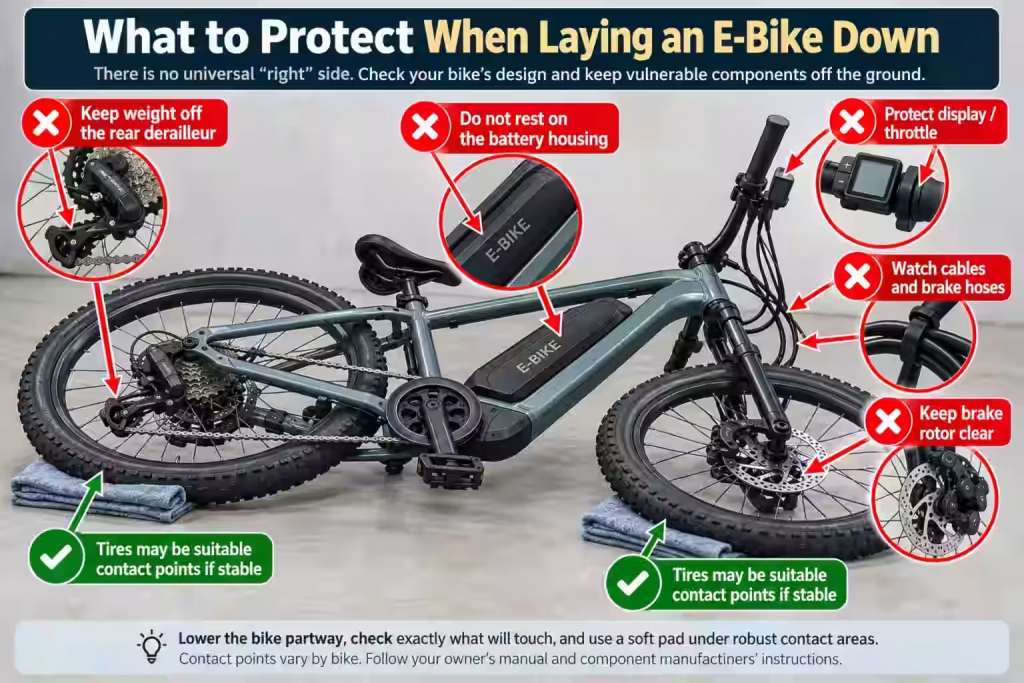
For some e-bikes and vehicles, transporting the bike lying down inside an SUV, hatchback, van, or other vehicle can be practical. Folding the rear seats may give you enough room to protect the bicycle from highway wind, rain, road grime, and some of the exposure associated with exterior transport.
But putting the bike inside the vehicle does not mean you can simply place it in the cargo area and drive away.
The bike still needs to be restrained so it cannot slide, roll, tip, or shift during sudden braking, turns, or a collision. The National Highway Traffic Safety Administration advises drivers to secure cargo against movement and specifically recommends considering what a load would do during sudden braking or when a vehicle hits a bump.
Before loading:
- Fold the seats according to the vehicle manufacturer’s instructions.
- Make sure the cargo surface is clean and free of sharp objects.
- Remove loose panniers, bottles, bags, locks, mirrors, phone mounts, and other accessories when practical.
- Switch the e-bike off.
- Remove the battery only when doing so is appropriate for your particular e-bike and its manufacturer’s instructions.
- Choose a side that leaves the derailleur, brake rotors, display, throttle, levers, battery housing, cables, and hoses clear.
- Use suitable padding beneath appropriate robust contact points if necessary.
- Use the vehicle’s suitable cargo-restraint system or another method allowed by the vehicle manufacturer to keep the bike from moving.
Do not run a tie-down around a brake hose, electrical cable, display, throttle, fender, derailleur, or other component that was never intended to carry a restraint load.
If the bike is too large or heavy to load safely into the vehicle, an exterior rack may be the better solution. My guide to loading a heavy e-bike onto a bike rack covers ramps and other lower-lift options, and the E-Bike Rack Weight Compatibility Calculator can help screen an existing rack.
Before You Tighten the Straps
A bike can look safely positioned while it is simply resting in the cargo area, then develop a new pressure point after the restraints are tightened.
Before driving, check the bike again with the restraints under their normal tension.
- Has a brake rotor been pushed against the floor, another bike, or luggage?
- Is the derailleur still completely clear?
- Has a display, throttle, brake lever, fender, or mirror become load-bearing?
- Is a brake hose or electrical cable trapped beneath a strap?
- Is the battery case or battery mount now pressed against something?
- Can the handlebars turn enough to damage a control or cable?
The goal is to restrain the bike without creating a new source of damage.
If You Remove a Wheel to Make the E-Bike Fit
Removing a wheel can make a full-size e-bike much easier to fit inside an SUV or van, but disc brakes need special attention.
Shimano recommends installing the appropriate brake-pad spacer when a wheel is removed and says not to depress the brake lever while the wheel is out. Without the rotor or spacer between the pads, the caliper pistons can move farther outward than intended.
SRAM also recommends using the correct pad spacer while traveling with a wheel removed so an accidentally operated brake lever does not close the pad gap.
If you remove a wheel, follow the instructions for your exact brake system and use the correct spacer for that caliper when required. Do not assume one spacer fits every brake.
Wheel removal can be more involved if that wheel contains a hub motor. Do not disconnect unfamiliar motor wiring or electrical connectors simply to make the bike fit. Follow the e-bike manufacturer’s wheel-removal procedure, and use a bike shop when the procedure exceeds your experience.
Transporting Two E-Bikes Lying Down
Two bikes need more planning than one because one bicycle can damage the other even when neither touches the vehicle floor incorrectly.
I would avoid simply stacking one complete e-bike directly on top of another unless the transport system is specifically designed for it.
Watch for contact such as:
- A derailleur pressing against the other bike’s wheel or frame.
- A brake rotor touching a frame, crank, pedal, or wheel.
- A pedal pressing into a battery case.
- A handlebar control or display supporting the upper bike.
- One bike’s luggage rack or basket pressing against the other bike.
- Loose handlebars or wheels moving into each other during transport.
If 2 bikes must share the same cargo area, separate vulnerable components, use appropriate padding only at robust contact areas, and restrain the bikes so they cannot slide into one another.
What about a pickup truck bed?
The same component-protection principles apply if an e-bike is lying in a pickup bed. Do not let the bike slide around on the bed floor or allow other cargo to fall or press against it.
Pay particular attention to the derailleur, rotors, battery, controls, motor wiring, pedals, fenders, and accessories. Secure the bike using a restraint method appropriate for the truck and follow the vehicle manufacturer’s cargo instructions.
Should You Remove the Battery First?
There is no universal rule saying every removable e-bike battery must come off whenever the bike is laid down or transported.
Manufacturer guidance varies. Trek’s current e-bike FAQ says removal is not required for its applicable e-bikes during car-rack transport, although Trek recommends removing an easily removable battery to reduce bike weight. Bosch eBike Systems recommends removing the battery if possible during car transport and storing it in the vehicle.
Removing an approved removable battery can sometimes help because it may:
- Reduce the weight you have to maneuver.
- Keep the battery from becoming an impact or contact point.
- Make it easier to position a heavy e-bike carefully.
- Protect the removable battery separately during loading.
But follow the transportation instructions for your specific bike and battery system. An integrated battery may not be intended for routine removal, and even a removable battery needs to be transported correctly once it is off the bike.
Do Not Forget Heat Inside a Parked Vehicle
“Store the battery in the car” does not mean a lithium-ion battery should be left indefinitely in a hot vehicle.
Bosch specifically advises against leaving its e-bike batteries exposed to strong sunlight inside a car for long periods. Trek and related brand guidance also cautions against excessive battery heat.
Follow the temperature limits in your own battery or e-bike manual, keep a removed battery secured against movement, and avoid leaving it in extreme vehicle temperatures.
For broader battery charging, storage, and safety information, see my E-Bike Battery Guide.
What About Hydraulic Disc Brakes?
This is one area where I would not rely on a generic internet rule.
Hydraulic brake manufacturers use different system designs and provide different instructions about unusual bicycle positions.
Shimano documentation warns that turning a bicycle onto its side or upside down can allow air already present in the hydraulic system to move, potentially affecting brake operation. Shimano instructs riders to operate the brake lever several times and confirm normal brake operation before riding. If operation is not normal, Shimano says to stop using the brakes and follow its service guidance.
MAGURA’s current service guidance says a correctly filled and bled MT open hydraulic disc-brake system can be horizontal without adverse effects. However, because the presence of residual air cannot be determined from outside the system, MAGURA highly recommends upright positioning during maintenance, storage, and transport unless its specified alternative transport procedure is used.
MAGURA also publishes an alternate procedure for certain systems involving its transport retainer or a mounted wheel and holding the lever in the specified position. That is MAGURA-specific guidance – do not apply it automatically to another brake brand.
TEKTRO’s current hydraulic disc-brake manual specifically warns that its hydraulic disc brake is not designed to operate with the bicycle upside down and tells the rider to operate the brake lever several times to confirm normal operation afterward. Its general wording is not identical to Shimano’s side-position warning.
Laying a hydraulic-brake e-bike on its side does not automatically mean you have damaged the brakes or introduced new air into the system. The concern documented by manufacturers such as Shimano and MAGURA is that air already present in certain systems may move to a place where it affects lever feel or brake operation.
Before riding after unusual storage or transport:
- Squeeze both brake levers and confirm the feel is normal for your bike.
- Follow your brake manufacturer’s post-storage instructions.
- Do not ride if a lever has abnormal travel, feels unusually soft, or offers little or no resistance.
- Have the brake inspected or serviced if normal operation does not return according to the manufacturer’s instructions.
There is no universal waiting period that every e-bike must sit upright before riding. Follow the instructions for your actual brake system instead.
Protect the Rear Derailleur
The rear derailleur is one of the easiest components to damage when a conventional geared bike is laid down carelessly.
SRAM’s derailleur guidance says simply resting a conventional external-drivetrain bicycle on its drive side can contribute to derailleur-hanger misalignment.
A misaligned hanger can cause inconsistent shifting, with some gears working while others do not. It can also contribute to the chain moving too far toward the spokes or frame.
If shifting is noticeably different after transport, do not assume the cable simply needs more tension. Look for signs of impact and consider hanger alignment.
SRAM also notes that hanger alignment cannot be accurately determined just by eyeballing it – a proper hanger-alignment tool is used to measure it. If the derailleur or hanger is visibly damaged, or the chain is moving dangerously toward the spokes or frame, have the bike inspected rather than repeatedly bending parts by hand.
EBE’s E-Bike Shifting Diagnostic Tool can help narrow down shifting symptoms after transport.
Protect the Brake Rotors
Disc-brake rotors should not become load-bearing contact points for a heavy e-bike.
Before lowering the bicycle, check where each rotor will sit and make sure the floor, another bicycle, luggage, padding, or a tie-down will not press against it.
After transport, spin the wheels before riding if practical. Listen and look for a new rub, scraping sound, or visible wobble.
Shimano’s brake documentation says a rotor that is cracked, deformed, or warped should not continue in normal service. If a rotor appears significantly damaged after transport, stop and have the brake inspected rather than trying to straighten it casually.
A slight rubbing sound does not by itself tell you exactly what is wrong, so avoid making unnecessary caliper or rotor adjustments until you know the cause.
Protect the Display, Throttle, Brake Levers, and Controls
Handlebar equipment often becomes the surprise contact point when an e-bike is laid down.
Before the bike reaches the ground or cargo floor, check:
- Center or side displays.
- Thumb or twist throttles.
- Brake levers.
- Control pads and buttons.
- Mirrors.
- Bells.
- Phone mounts.
- Headlights.
- Handlebar accessories.
A bike can look as though it is resting safely on the handlebar while most of the actual load is concentrated on one small display, throttle housing, mirror stem, or brake lever.
Remove detachable accessories when practical and reposition adjustable parts only when their manufacturer allows it.
What About the Motor?
Motor type alone does not determine whether an e-bike can safely lie on one side. The bike manufacturer’s transport and storage instructions should still take priority.
With a hub motor, pay particular attention to axle wiring, connectors, the dropout area, and nearby brake components. Do not let those become impact or load-bearing points.
With a mid-drive, inspect the motor housing, crank area, chainring, wiring, and connectors before lowering the bike. Avoid placing concentrated pressure on exposed electrical or drive components unless the manufacturer specifically says that area is suitable for support.
If you are unfamiliar with the difference between the 2 systems, my e-bike motor guide explains hub and mid-drive layouts.
What About the Battery?
Whether your battery is external, semi-integrated, or fully integrated, I would avoid using the battery housing as the primary support point for the bicycle unless the manufacturer specifically says the design permits it.
Look at the complete battery area, including:
- The battery case.
- Mounting rail or cradle.
- Locking mechanism.
- Electrical contacts.
- Frame opening around an integrated battery.
- Any release lever or key cylinder.
Other luggage should not be stacked against the battery in a way that can crush or impact it while the vehicle is moving.
UL Solutions’ micromobility battery safety guidance says to stop using a battery if it overheats or shows warning signs such as odor, a change in shape or color, leaking, or unusual noises. UL also recommends having a damaged battery inspected through the brand’s authorized service channel.
If a battery has significant impact damage, swelling, unusual heat, leaking, smoke, unusual sounds, or a strong chemical odor after transport, stop using and charging it and follow the manufacturer’s safety instructions.
Do not open, puncture, straighten, or attempt an internal repair on a damaged lithium-ion battery pack.
Can You Store an E-Bike on Its Side Long Term?
Temporary side positioning and long-term storage are different questions.
A bike that can safely lie down for a repair or a car trip is not automatically a good candidate for spending weeks or months in the same horizontal position.
For long-term side storage, consider:
- The bicycle manufacturer’s storage instructions.
- The hydraulic brake manufacturer’s orientation guidance.
- Whether any component remains under continuous pressure.
- Whether a wheel, rotor, fender, pedal, derailleur, display, battery housing, or accessory is carrying the bike’s weight.
- Battery storage temperature and state-of-charge recommendations for your particular battery system.
- Whether the bike can be knocked, stepped on, or covered by other stored items.
- Whether the storage position forces a wheel or rotor sideways rather than allowing the bike to rest naturally.
I did not find one universal rule from the sources reviewed saying every e-bike tire or suspension system is damaged merely because the bicycle is horizontal. The more important issue is whether your specific storage position puts sustained pressure on a component that was not intended to carry it.
If your goal is simply to save floor space, a properly rated vertical-storage system may be a better long-term solution. See my safe vertical e-bike storage guide for the separate issues involved with that setup.
How to Lay an E-Bike Down Safely
- Power the e-bike off. Do not handle a powered bike unnecessarily while loading or repositioning it.
- Remove loose cargo and accessories. Take off loaded panniers, loose bags, bottles, heavy locks, phone mounts, or other removable items that could fall, shift, or become contact points.
- Check the battery instructions. Remove a removable battery only when the bike or battery manufacturer permits or recommends it for your situation.
- Inspect both sides of the bike. Look at the derailleur, rotors, display, throttle, brake levers, wiring, hoses, motor area, battery housing, pedals, lights, mirrors, fenders, racks, and baskets.
- Check the brake manufacturer’s guidance. This is especially important for hydraulic disc brakes.
- Choose the safer side for that bike. Do not assume the non-drive side is automatically correct if something vulnerable will touch the surface there.
- Use a clean, stable surface. Remove stones, tools, metal objects, and anything else that could scratch or damage a component.
- Lower the bike partway and inspect the contact points. Confirm what will actually touch before releasing the bike’s full weight.
- Add support only where appropriate. Padding can be useful under suitable robust contact areas, but do not jam material into a rotor, battery contact, wiring harness, brake component, or control.
- Lower the bike under control. A heavy e-bike should be lowered slowly rather than tipped over or dropped onto its side.
- Prevent movement. On the ground, make sure it cannot roll or slide. In a moving vehicle, use an appropriate restraint method permitted by the vehicle manufacturer.
- Recheck after tightening restraints. Make sure the straps did not create a new pressure point.
- Inspect the bike before riding. Check the battery, brakes, wheels, drivetrain, electronics, wiring, and accessories before you set off.
What to Check Before Riding Again
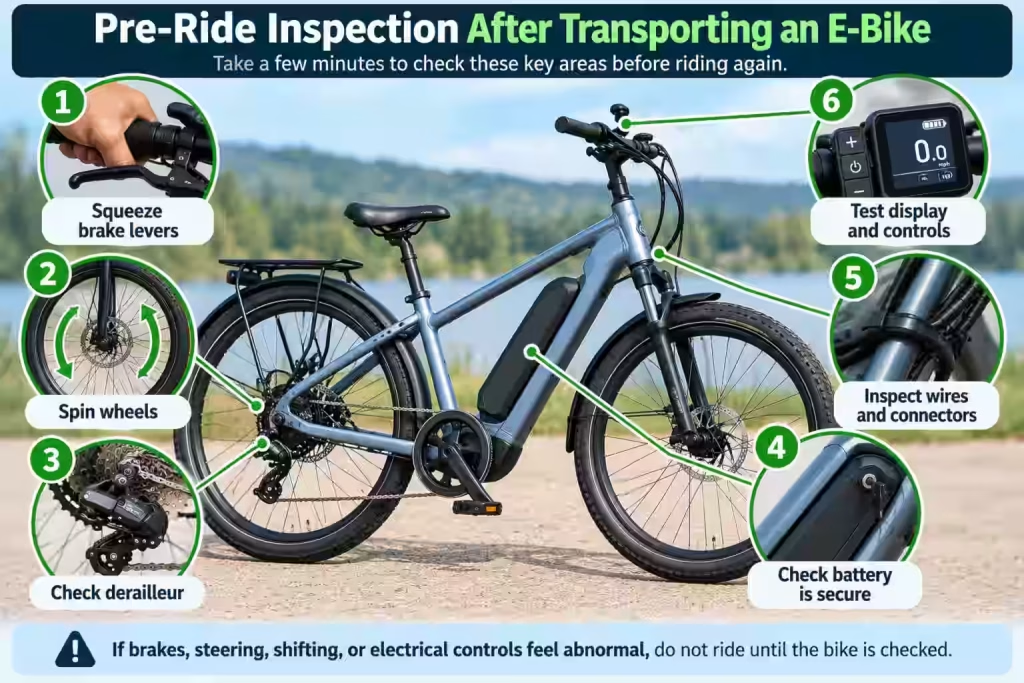
Do not go directly from unloading the bike to riding away at speed. A quick stationary and walking-speed check can reveal problems before they become riding problems.
First, inspect the bike while stationary
- The battery is properly seated and locked if it was removed.
- The battery housing and mount show no significant impact damage.
- Both brake levers feel normal for your bike.
- The brake rotors are not visibly damaged or rubbing abnormally.
- The rear derailleur has not obviously taken an impact.
- No electrical wire, connector, brake hose, or control cable has been crushed, pulled, or damaged.
- The display, throttle, lights, mirrors, fenders, racks, baskets, and other accessories remain secure.
Then roll the bike by hand
- Confirm both wheels rotate normally.
- Apply each brake separately while walking the bike and confirm it responds normally.
- Turn the handlebar through its normal range and watch for binding, pulled cables, or damaged controls.
- Listen for new scraping, rubbing, clicking, or dragging sounds.
Finally, power the e-bike on
- Confirm the display powers up normally.
- Check for unexpected error messages.
- Verify the controls respond normally.
- Confirm the throttle behaves normally where fitted and legally applicable.
- Check shifting before applying heavy pedaling or motor load.
If the bike has abnormal braking, steering, shifting, electrical behavior, visible structural damage, or meaningful battery damage, do not assume it will correct itself while riding. Have the bike inspected before returning it to normal use.
For other problems, start with the E-Bike Troubleshooting and Maintenance Guide.
Quick Guide: Is Side Positioning Reasonable?
| Situation | General approach |
|---|---|
| Trailside repair for a few minutes | Often reasonable if the manufacturer allows it and vulnerable parts remain off the ground. |
| Transport inside an SUV, van, or car | Protect contact points, check brake guidance, and restrain the bike against movement. |
| Transport with a wheel removed | Follow wheel-removal instructions and use the correct disc-brake pad spacer when required. |
| Side storage overnight | Check the bike and hydraulic brake manufacturer’s storage guidance and make sure no vulnerable component carries the load. |
| Routine long-term side storage | Review manufacturer instructions and consider a purpose-designed storage system instead. |
| Manufacturer prohibits the position | Follow the manufacturer’s instructions rather than this general guide. |
| Battery, frame, brake, wheel, or electrical component is already damaged | Inspect or service the bike before treating side transport as a workaround. |
Common Mistakes When Laying an E-Bike on Its Side
- Resting the bike directly on the rear derailleur. This can affect the derailleur or hanger alignment.
- Putting the bike’s weight on a brake rotor. Keep the rotor free from inappropriate side loads and impacts.
- Letting the display or throttle hold up the handlebar. Small control housings are not bike stands.
- Leaving loaded panniers or heavy cargo attached. Extra weight makes positioning harder and can change the bike’s contact points.
- Failing to restrain a bike inside a vehicle. A bike on the cargo floor can still move during braking or a collision.
- Tightening restraints without rechecking the contact points. Straps can push a previously clear component against the floor.
- Removing a disc-brake wheel without considering the caliper. Use the correct brake-system procedure and pad spacer where required.
- Stacking 2 complete e-bikes without protecting them from each other. One bike can damage the other’s rotor, derailleur, battery, display, or frame.
- Leaving a removed battery in excessive vehicle heat. Follow the battery manufacturer’s temperature and transport guidance.
- Stacking luggage against the battery. Keep heavy or sharp cargo from pressing into the battery case or mount.
- Assuming every hydraulic brake has the same storage instructions. Check the actual brake manufacturer.
- Ignoring new brake or shifting symptoms. A change immediately after transport deserves inspection.
- Dragging the bike while it is lying down. Lift and reposition it instead of scraping controls, pedals, the frame, motor components, or accessories across the ground.
When Should You Not Lay an E-Bike on Its Side?
Choose another storage or transport method when:
- The e-bike manufacturer specifically advises against side positioning.
- The brake manufacturer gives storage or transport instructions that your setup cannot meet.
- You cannot keep the derailleur, brake rotors, battery, display, controls, or electrical components from carrying the load.
- The battery, frame, fork, wheel, brake, or another important component is already damaged.
- A cargo e-bike, trike, long-tail bike, or unusually heavy model is unstable and difficult to lower safely.
- Large racks, child seats, baskets, fairings, mirrors, or other accessories create unsafe contact points and cannot be removed.
- You cannot adequately restrain the bike inside the vehicle.
- The bicycle is simply too heavy for you to lower and raise again under control.
For RV travelers in particular, bike weight and available storage space can change the best solution. My e-bike guide for RV travel discusses storage and transport considerations for RV owners.
Frequently Asked Questions
Is it bad to lay an e-bike on its side?
Not automatically. Many e-bikes can be laid on their side temporarily when vulnerable components are kept clear and the bike and component manufacturers do not prohibit that position. Problems are more likely to come from inappropriate contact points, impact, movement, or system-specific instructions than from the bicycle simply being horizontal.
Which side should an e-bike be laid on?
There is no universal side for every e-bike. On a conventional derailleur bike, avoid resting the bike’s weight on the rear derailleur and hanger. Then check the opposite side for the brake rotor, display, throttle, battery, motor wiring, and accessories before lowering the bike.
Can I put an e-bike on its side in an SUV?
Often, yes, if it physically fits and your bike manufacturer allows the position. Protect vulnerable components and secure the bicycle so it cannot move during sudden braking, turns, or bumps.
Can I transport an e-bike lying flat?
Some e-bikes can be transported horizontally, but the correct method depends on the bicycle, battery, brake system, accessories, and vehicle. The bike should not be free to slide around, and delicate components should not support its weight.
Can hydraulic brakes be damaged by laying a bike on its side?
Do not treat all hydraulic brakes alike. Shimano warns that side or upside-down positioning can move air already present in certain systems and affect brake operation. MAGURA highly recommends upright positioning for its open MT systems unless its specified alternate procedure is followed. TEKTRO’s current general manual specifically addresses upside-down positioning. Follow your brake manufacturer’s instructions and check brake operation before riding.
Should I remove the battery before laying an e-bike down?
Not universally. Removing an approved removable battery can reduce weight and eliminate a potential contact point, but manufacturer instructions differ. Trek describes removal as recommended rather than required for its applicable rack transport, while Bosch recommends removal if possible.
Can I remove the front wheel to fit an e-bike in my SUV?
Often, if the bike manufacturer permits normal wheel removal. With hydraulic disc brakes, check the brake manufacturer’s instructions and install the correct pad spacer when required. Avoid squeezing the brake lever with the rotor removed unless the manufacturer specifically instructs you otherwise.
Can I lay a fat-tire e-bike on its side?
Fat tires do not create a blanket prohibition against side positioning. These bikes are often heavy, however, so pay close attention to the derailleur, rotors, hub-motor wiring, fenders, battery, pedals, and accessories while lowering and restraining the bike.
Can a hub-motor e-bike be laid on its side?
Possibly. Motor type alone does not determine the correct position. Protect axle wiring, connectors, the brake system, and other exposed components, and follow the specific bike manufacturer’s transport instructions.
Can a mid-drive e-bike be laid on its side?
Potentially, yes. Avoid using the motor housing, electrical connections, chainring, display, derailleur, or other vulnerable components as load-bearing contact points unless the manufacturer specifically allows it.
Can you store an e-bike on its side overnight?
That depends on the bike and its components. A position that is acceptable for temporary transport is not automatically the manufacturer’s preferred storage orientation. Hydraulic brake guidance is especially worth checking. If side storage will become routine, use the bike and component manuals to choose a sustainable setup.
What should I check after transporting an e-bike on its side?
Check the battery and mount, brake-lever feel, brake rotors, wheel rotation, rear derailleur and shifting, display, throttle if fitted, wiring, connectors, lights, fenders, racks, and other accessories. Roll the bike by hand and test both brakes before riding. Do not ride through a significant brake, electrical, steering, or drivetrain problem hoping it will disappear.
Why You Can Trust Electric Bike Explorer
This guide was researched using current bicycle, e-bike, brake, drivetrain, battery, and transportation guidance from manufacturers and established safety organizations. Important recommendations were checked against documentation from Shimano, MAGURA, TEKTRO, SRAM, Bosch, Trek, NHTSA, and UL Solutions.
Where manufacturers give different instructions – particularly for hydraulic brakes and removable batteries – I have kept those differences instead of applying one company’s rule to every e-bike. This is a research-based guide and does not claim hands-on testing of every bike or component discussed.
Like Electric Bike Explorer?
Add Electric Bike Explorer as a Preferred Source on Google to make it easier to see more of our e-bike news, guides, reviews, and troubleshooting content in Google Search.
Sources
- Shimano – Hydraulic Disc Brake Dealer’s Manual
- MAGURA – Transport and Storage of Bicycles With Hydraulic Brakes
- TEKTRO – Hydraulic Disc Brake Owner’s Manual
- SRAM – Rear Gear Adjustment and Derailleur Hanger Guidance
- SRAM – Disc Brake Pad Spacer Guidance
- Bosch eBike Systems – Transporting the eBike
- Trek – Electric Bike FAQ and Transport Guidance
- NHTSA – Secure Your Load
- UL Solutions – E-Bike and Micromobility Battery Safety

Kristina is not just an enthusiast but a true authority on electric bikes. Nestled in the coastal beauty of Virginia, Kristina has found the perfect backdrop for her passion for electric biking. As a dedicated wife and homeschooling mom, her life revolves around family, faith, and the thrill of adventure.
Originally hailing from Ohio, Kristina's journey with electric bikes began as a curiosity and quickly evolved into a deep expertise. Her blog is a testament to her love for electric biking, combining her fascination for eco-friendly transportation with her coastal lifestyle.
When she's not cruising the beach on her electric bike, you'll find Kristina indulging in her other loves: long walks along the shore, getting lost in a good book, and cherishing moments with her loved ones. With a heart as big as her love for animals, especially cats, Kristina brings a unique perspective to the electric bike world, grounded in her strong faith in God and her dedication to a sustainable lifestyle.
Through her blog, Kristina shares her extensive knowledge of electric bikes, offering valuable insights, tips, and recommendations to fellow enthusiasts. Whether you're a seasoned rider or a newcomer to the electric bike scene, Kristina's blog is your go-to source for all things electric biking, fueled by her passion, expertise, and the scenic beauty of coastal Virginia.