How to Load a Heavy E-Bike Onto a Bike Rack Without Struggling to Lift It
Last Updated on September 20, 2026 by Kristina
If your e-bike weighs 60, 70, 80 lb or more, getting it onto a hitch rack can be harder than transporting it once it is secured. Trying to dead-lift the entire bike into a platform tray is not the only option – and for many riders, it should not be the first option.
The easier approach is usually to reduce removable weight, lower the loading height, or roll the bike onto the rack with a compatible loading ramp. If lifting still is not realistic, a second person or a powered or lowering rack can reduce or eliminate the full-bike lift.
Before deciding how to load the bike, make sure the bike and rack actually belong together. The E-Bike Rack Weight Compatibility Calculator is a useful starting point for checking bike weight, rack capacity, tire width, and wheelbase. For the bigger picture after the bike is loaded, see my complete e-bike rack safety and transportation guide.
Quick Answer: The Easiest Ways to Load a Heavy E-Bike
If a heavy e-bike is difficult for you to control at rack height, look for a way to reduce or eliminate the full lift instead of simply trying harder to lift it.
- Remove the battery when the e-bike manufacturer permits or recommends it.
- Remove panniers, baskets, cargo, locks, and other removable accessories.
- Use a rack with an integrated loading ramp.
- Use a manufacturer-approved add-on ramp when one is available for your exact rack.
- Roll and walk the bike up the ramp rather than lifting the complete bike into the tray.
- Use a coordinated two-person method if the rack still requires some lifting and both people can safely control the bike.
- Consider a powered or lowering rack when lifting the bike is not realistic.
Changing your loading technique cannot fix an incompatible rack. An 80 lb bike still cannot go on a rack with a 60 lb per-bike limit, even if you can physically get it into the tray.
60-Second Check Before You Lift or Roll the Bike
Before moving the bike toward the rack, take a minute to confirm the basics:
- The bike’s actual transport weight is within the rack’s per-bike limit.
- The combined bikes are within the rack’s total bike capacity.
- The loaded rack is within the vehicle and receiver manufacturer’s applicable limits.
- The tires and wheelbase fit the rack.
- The frame, fenders, and bike shape work with the rack’s securing system.
- The ramp is approved for that rack and attached exactly as instructed.
- The vehicle is on level, stable ground with the parking brake set.
- Wheel straps, clamps, and rack arms are ready and out of the wheel path.
- Loose cargo and removable accessories are off the bike.
If one of those checks fails, solve that problem before trying to load the bike.
Why You Can Trust Electric Bike Explorer
This guide is based on current rack specifications, manufacturer loading instructions, e-bike manufacturer guidance, vehicle and hitch limits, and practical transportation considerations. I compare the limits that apply to the entire setup instead of assuming that a rack marketed for e-bikes automatically fits every electric bike.
Where Electric Bike Explorer has genuine hands-on experience, such as the EZ Lift Caddy discussed below, I identify it clearly. I do not treat manufacturer marketing claims as universal compatibility instructions. You can learn more about how I research, evaluate, and separate verified facts from manufacturer claims in How Electric Bike Explorer Reviews and Ranks E-Bikes.
Why Heavy E-Bikes Are So Difficult to Load
Weight is only part of the problem. A bicycle is long, has wheels that want to roll, a front wheel that can turn, handlebars that can swing, and weight spread across a large shape. That can make a 70 lb bicycle feel considerably more awkward to control than a compact object of the same weight.
Motor and battery placement can also change how the bike feels when you are controlling it by hand. A rear-hub bike may carry more mass toward the rear wheel, while many mid-drive bikes concentrate more motor weight near the crank area. Battery location, cargo racks, baskets, and accessories can change the balance again.
Other factors that can make loading harder include:
- Fat tires that require wider trays, straps, and ramps
- Long-wheelbase bikes
- Cargo bikes and long-tail designs
- A high hitch receiver or tall vehicle
- Step-through frames without a conventional top tube to grab
- Heavy rear racks, baskets, or child-seat hardware
- Awkward frame shapes or integrated battery housings
The goal is not simply to find a rack strong enough to carry the bike. You need a combination you can load, secure, unload, and use consistently.
Step 1: Reduce the Bike’s Weight Before Loading
Before lifting anything, remove weight that the bike manufacturer says can safely be removed.
The battery can make a meaningful difference, but battery removal is not a universal rule. Trek currently says removing an easily removable battery is not required for its e-bikes on a car rack but recommends doing so because it reduces bike weight. Bosch recommends removing the battery if possible for vehicle transport.
Follow the instructions for your own e-bike and battery system rather than assuming another brand’s guidance applies to your bike.
Other removable items may include:
- Panniers
- Rear or front baskets
- Loose cargo
- Child seats when the bike and accessory manufacturers permit removal
- Heavy locks and chains
- Water bottles
- Detachable accessories
Do not remove structural parts merely to make the bike lighter. If you remove the battery, transport and store it according to the battery and e-bike manufacturer’s instructions and protect it from impact, movement, and inappropriate temperatures.
Also check what the manufacturer’s published bike weight actually includes. Do not assume the stated number includes the battery, pedals, rack, fenders, accessories, or optional equipment. What matters to the bike rack is the actual weight you place in the tray.
Step 2: Check the Rack, Hitch, and Vehicle Before Loading
Rack compatibility is about much more than whether you can force the wheels into the trays.
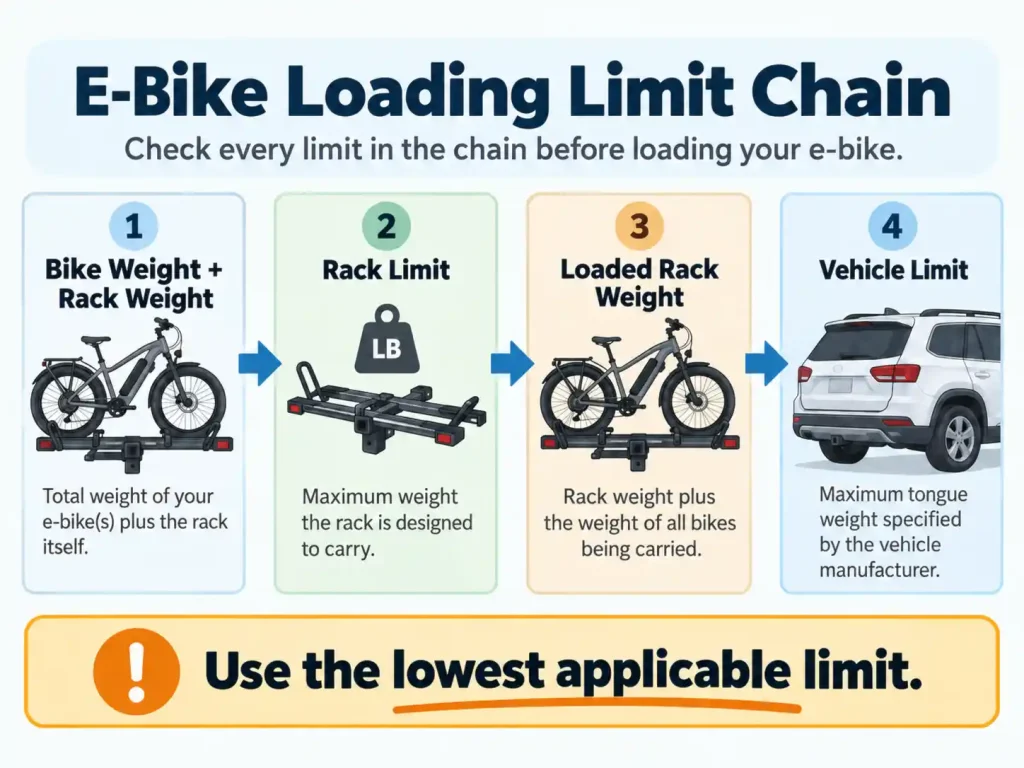
Before loading, verify all of the following:
- Actual transport weight of the bike: Use the weight of the bike as it will actually sit on the rack.
- Per-bike rack limit: This still applies when the rack’s combined capacity is higher.
- Total rack bike capacity: Important when carrying two or more bikes.
- Weight of the rack itself: The rack also places load on the receiver and vehicle.
- Receiver size and compatibility: Confirm whether the rack requires a 1.25-in. or 2-in. receiver and whether adapters or extenders are allowed.
- Receiver and vehicle load limits: Check the hitch or towbar documentation and the vehicle owner’s manual rather than relying only on hitch class.
- Tire width and wheel diameter: Fat tires may require wider trays, longer straps, or a manufacturer-specific adapter.
- Wheelbase: Long-tail, cargo, and large-frame bikes can exceed ordinary tray dimensions.
- Fenders: Some wheel-contact racks have restrictions or require a fender-specific solution.
- Frame style: Check step-through, carbon, unusual frame, and seatpost requirements.
- Ramp compatibility: A ramp needs to attach to the rack in the way its manufacturer intended.
You can use my rack compatibility calculator to organize some of these checks, but always finish by reading the rack, hitch, vehicle, and e-bike documentation.
Use the lowest applicable limit. A rack with a high bike capacity does not increase a lower limit published for the vehicle or receiver.
Also be cautious with hitch extenders, rise/drop adapters, and receiver-size adapters. Some rack manufacturers prohibit them entirely, while other equipment manufacturers allow only specific combinations. An adapter can also change the allowable load for the hitch system. Do not add one unless the rack, hitch, and vehicle instructions permit it.
Step 3: Use a Loading Ramp Whenever Possible
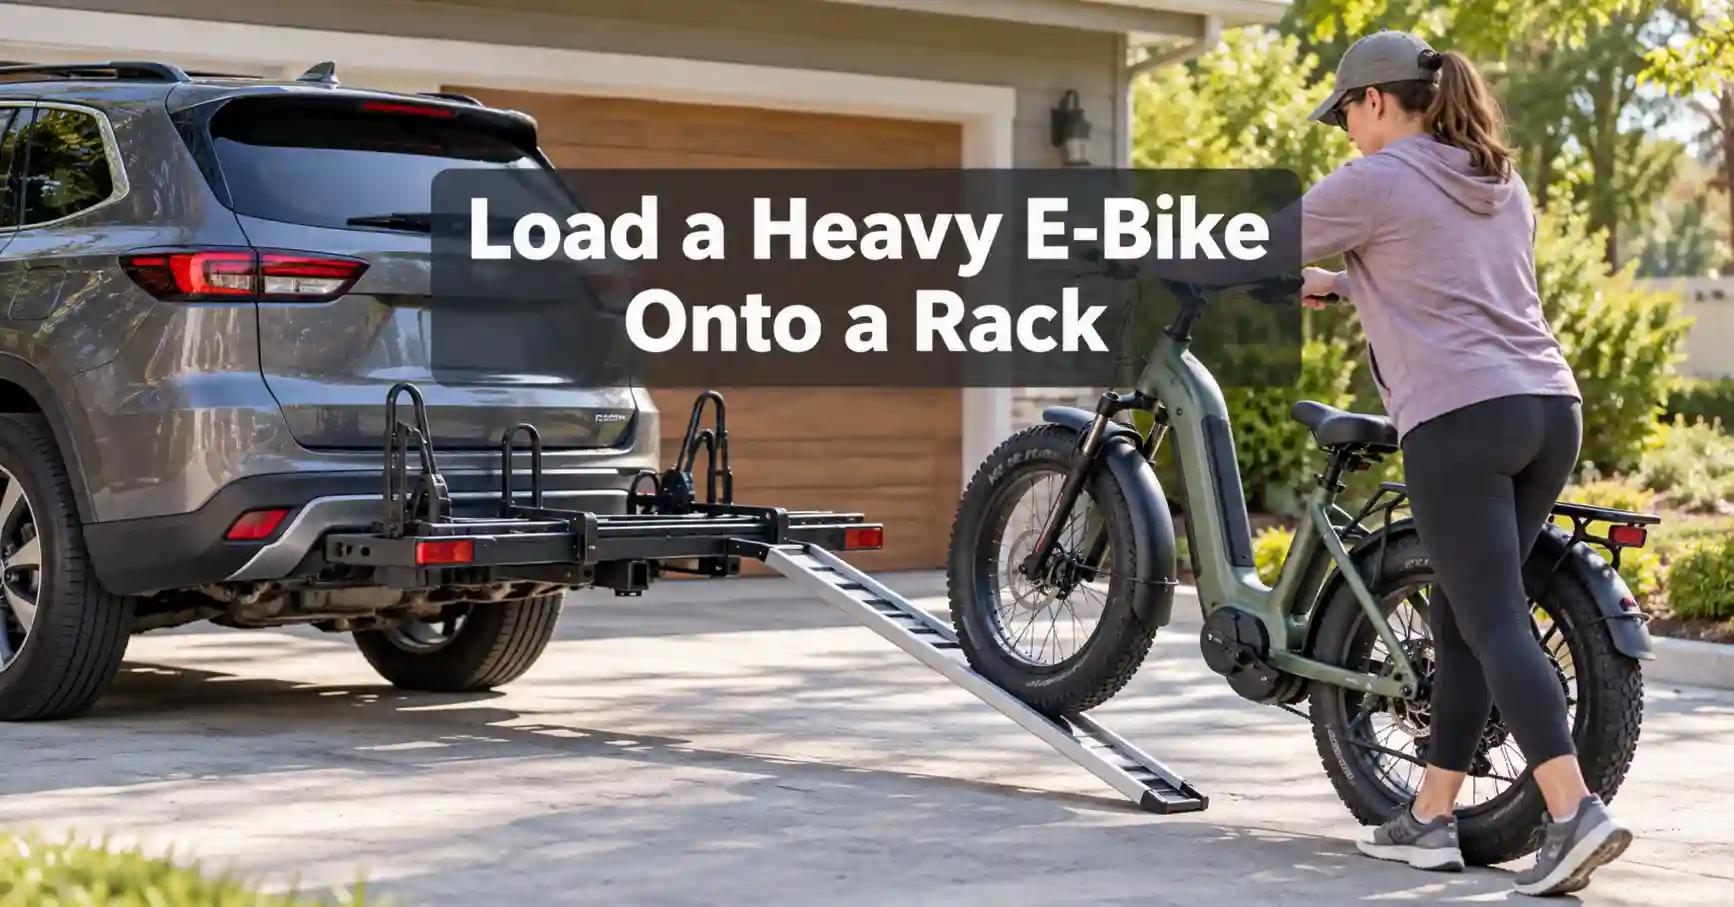
For a rider who struggles to lift a heavy e-bike, a properly designed loading ramp is one of the most useful rack features. Instead of raising the entire bike to tray height, you control it while its wheels roll from the ground to the rack.
There are built-in ramps, removable ramps, folding ramps, and telescoping ramps. Some store directly on the rack while others need to be stored separately.
Before using one, check:
- That the ramp is designed or approved for your exact rack
- How it locks, hooks, or bolts into the rack
- Whether it must be fully extended before use
- Its usable width
- Whether your tire width fits
- Any stated load restrictions
- Whether the resulting angle is manageable with your vehicle’s rack height
- Whether the ground is level, firm, and stable
Do not assume that a loading ramp from one brand or rack model can safely be attached to another. For example, Thule’s current foldable loading ramp is specified for particular Thule racks, while Hollywood Racks says its Destination E ramp is only for the Destination E.
I also would not substitute a loose board, improvised plank, or homemade ramp unless the rack manufacturer specifically provides instructions approving that setup. A ramp must stay securely connected throughout loading and unloading.
Ramp Length and Vehicle Height Matter
A ramp is not automatically easy to use just because a rack includes one. For the same general loading height, a longer ramp can create a more gradual approach. A taller vehicle or higher receiver can make a short ramp feel considerably steeper.
That is worth checking before buying a rack for an SUV, truck, van, or motorhome. Thule, for example, currently describes its 53-in. loading ramp as suitable for easier loading on taller vehicles. Hollywood Racks specifies that the expandable Destination E ramp must be used fully extended.
If possible, compare the actual tray height and ramp length rather than shopping by the word “ramp” alone.
How to Roll a Heavy E-Bike Up a Rack Ramp
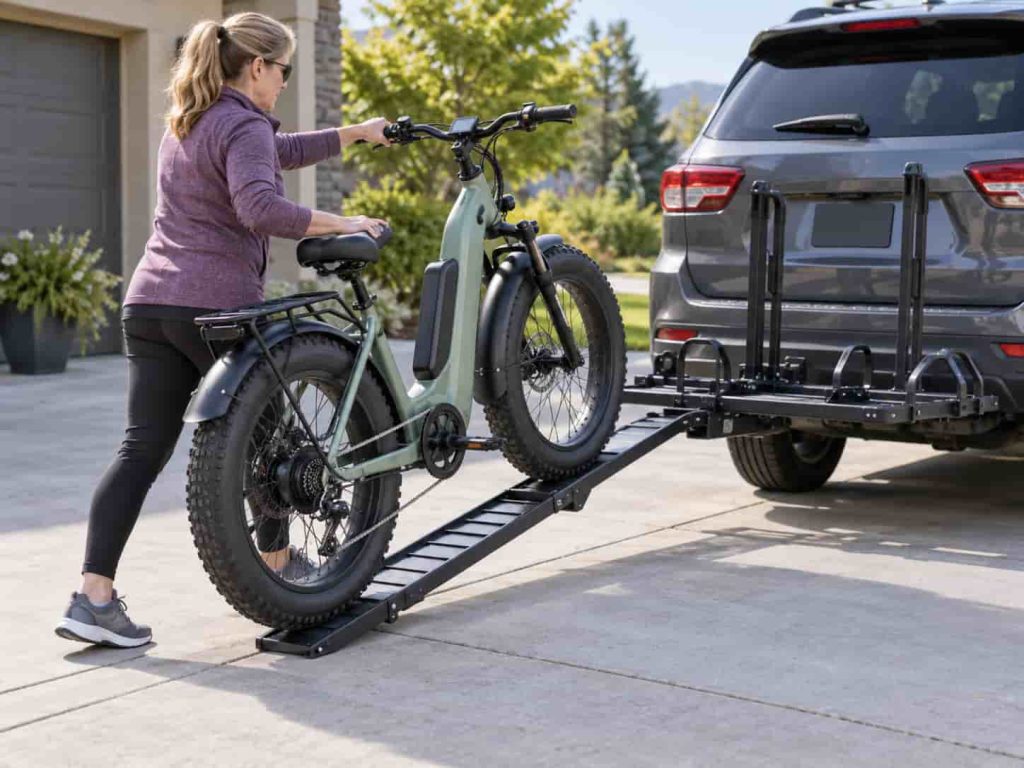
Your rack manual takes priority, but this is a useful general sequence for a ramp-equipped platform rack:
- Park the vehicle on level, stable ground.
- Set the parking brake.
- Install and secure the bike rack according to its instructions.
- Attach the loading ramp exactly as the rack manufacturer specifies.
- Fully extend the ramp when its instructions require it.
- Remove the battery and other removable weight when appropriate for your bike.
- Move loose straps, hooks, and rack arms out of the wheel path.
- Line the bike up straight with the ramp rather than approaching at an angle.
- Keep both hands controlling the bike and walk it slowly up the ramp. Do not ride the e-bike up the ramp unless the rack manufacturer specifically instructs you to do so.
- Guide the tires into the correct wheel trays or cradles.
- Keep control of the bike until it is stable enough to begin securing it.
- Attach the rack’s wheel straps, arms, clamps, or other restraints in the sequence required by the manufacturer.
- Remove, fold, or store the ramp if the rack instructions require that before driving.
- Recheck the bike restraints, hitch connection, rack mechanism, and bike movement before leaving.
If you reach a point where you cannot keep the bike under control, bring it back down rather than trying to rescue a bad angle with one hand.
Do a First-Time Test Load Before a Road Trip
The first time you use a new bike-and-rack combination should not be when you are already packed for a trip and running late.
Do a practice load at home on level ground in daylight. Work out:
- Which tray the first bike goes into
- The loading order required by the rack manufacturer
- Where each clamp or arm should contact the bike
- Whether the handlebars, pedals, baskets, or saddles interfere with another bike
- Where loose wheel straps should sit before you begin rolling
- Whether the ramp angle is manageable
- Whether the bike remains balanced while you reach for the first restraint
- Where the ramp will be stored after loading
Do not assume every two-bike rack uses the same loading order. Some manufacturers specify which tray should be loaded first.
What If Your Bike Rack Doesn’t Have a Ramp?
Start by checking whether the rack manufacturer sells an approved ramp for your exact model. Do not assume that the existence of an accessory ramp means it works on every rack from that brand.
If there is no compatible ramp, realistic options include:
- Replacing the rack with a model that includes a loading ramp
- Choosing a lower-loading platform rack
- Using two people to load the bike
- Moving to a powered or lowering rack system
- Using professional assistance when the setup cannot be loaded safely at home
If loading the bike is a problem every time you ride, changing the equipment is usually a better long-term solution than repeatedly attempting a lift that is at the edge of what you can control.
How to Load a Heavy E-Bike With Two People
Two people can make a rack that requires some lifting more manageable, but it is not risk-free.
Before lifting, agree on where each person will stand, which suitable structural areas each person will control, and what command you will use to start and stop. Keep your footing stable and keep fingers away from rack hinges, trays, clamps, and other pinch points.
One person may control the front portion of the bike while the other supports the rear, but the correct hand positions depend on the bicycle. Lift together rather than one person suddenly taking the full weight, avoid turning your body while carrying the bike if you can reposition your feet instead, and lower the bike back to the ground if either person starts losing control.
Do not let either person become trapped between the bicycle and the vehicle while trying to stop a tipping bike.
Should You Lift an E-Bike by the Frame?
There is no universal lifting point that is correct for every e-bike.
A frame tube that is suitable to hold on one bicycle may contain a battery, cable routing, carbon construction, or other components on another. Check the bicycle manufacturer’s instructions and use structural areas that are appropriate for that particular design.
Unless the manufacturer specifically says otherwise, do not treat these parts as lifting handles:
- Displays and control units
- Brake hoses
- Electrical cables
- Fenders
- Rear derailleurs
- Lights
- Accessory racks or baskets that are not designed as lifting points
- A battery handle unless the manufacturer says it is designed to support that load
Also remember that a rack manufacturer approving a particular frame or seatpost location for a stabilizing clamp does not necessarily mean that location is intended for lifting the entire bicycle.
Loading Step-Through E-Bikes
A step-through frame may be easier to mount while riding but harder to grab when lifting because there is no conventional high top tube.
Some platform racks support step-through bikes without a separate frame adapter, while others use a frame-contact system or require a compatible adapter. The correct setup depends on the exact rack.
Do not automatically buy a top-tube adapter simply because the bike is step-through. Some rack manufacturers specifically instruct step-through owners to secure the bike another way and say an adapter should not be used.
If an adapter is required, check its own bike-weight limit and frame requirements as well as the rack’s limit.
Loading Fat-Tire E-Bikes
With a fat-tire bike, check the entire loading path rather than only the rack tray. A rack may have trays wide enough for the tire while its wheel straps, ramp, or other restraints have different limitations.
Verify:
- Tire width
- Wheel diameter
- Ramp width
- Wheel-strap length
- Whether a fat-tire kit or strap extension is required
- Bike weight
- Wheelbase
If a product page and manual disagree about a fit dimension, confirm the current limit with the manufacturer before relying on it.
Loading Cargo and Long-Wheelbase E-Bikes
Cargo e-bikes can exceed an ordinary rack’s limits in several ways at once. The problem may be total weight, wheelbase, tire dimensions, frame shape, or a combination of them.
Remove panniers, cargo, child seats, and other detachable loads when the bike and accessory manufacturers permit it. Then compare the stripped bike’s actual dimensions and weight with the rack specifications.
Do not assume that a rack can carry a cargo bike simply because its weight rating is high enough. The wheels, restraints, and frame-contact points must all fit as the rack manufacturer intended.
Best Bike Rack Features If You Cannot Lift a Heavy E-Bike
If loading difficulty is already a major concern, put loading features near the top of the shopping list instead of treating them as an afterthought.
Useful features include:
- An integrated loading ramp
- A long enough ramp for your vehicle’s loading height
- A low tray or low loading height
- A high enough per-bike weight rating for your actual bike
- A total capacity appropriate for all bikes being carried
- Wide enough trays and ramp for your tires
- Long-wheelbase support where needed
- Step-through-frame compatibility
- Clear fender compatibility
- A stable hitch connection
- An easy-to-operate tilt or vehicle-access mechanism
- A ramp that stores conveniently on or with the rack
- Replacement or add-on ramp availability
- A lowering or powered lift mechanism when rolling up a ramp is still too difficult
A rack advertised as an “e-bike rack” can still be wrong for your bike. The exact specifications matter more than the marketing label.
Bike Racks That Can Make Heavy E-Bikes Easier to Load
If lifting your e-bike onto a rack is the main problem, a rack with a purpose-built loading ramp can make much more sense than trying to muscle the bike into the trays. These are two examples worth considering, but always verify your bike’s actual weight, wheelbase, tire width, hitch size, and vehicle limits before ordering.
Young Electric 2-Bike E-Bike Rack With Ramp – Up to 100 lb Per Bike
The Young Electric 2-bike hitch rack is especially relevant for heavier e-bikes because it supports up to 200 lb total, with up to 100 lb per bike. It includes a loading ramp, fits a 2-in. receiver, accommodates tires up to 5 in. wide, and supports bikes with wheelbases up to 50 in.
That combination makes it worth considering for riders whose 70, 80, or even heavier e-bike exceeds the capacity of many conventional racks. Remember that the rack’s capacity does not override your vehicle or receiver limits.
CRAVOT CyberRack E2 – Another 200 lb Ramp Option
The CRAVOT CyberRack E2 is another ramp-equipped 2-bike rack with a 200 lb total capacity. The manufacturer lists a 2-in. hitch requirement, tires up to 5 in., a maximum 50-in. wheelbase, and an included loading ramp.
Like the Young Electric rack, it is a relatively heavy rack itself, so include the rack’s weight when checking the vehicle and receiver load limits.
Already have a bike rack? Check whether its manufacturer sells a compatible loading ramp before replacing the whole rack. Loading ramps are often rack-specific, so do not assume that an aftermarket ramp will safely attach to your rack.
Before ordering, use the E-Bike Rack Weight Compatibility Calculator and then confirm every limit against the current rack, hitch, and vehicle documentation.
Don’t Forget That the Bike Rack Itself Can Be Heavy
A ramp may solve the problem of lifting your e-bike while creating a different question: can you comfortably install and remove the rack itself?
Heavy-duty e-bike racks are often substantial pieces of equipment. As current examples, Hollywood Racks lists the Destination E at 46 lb assembled, while Yakima lists the 2-in. OnRamp LX at 53.5 lb.
If lifting the rack into the receiver is also difficult, consider that before buying. Depending on the rack and your storage situation, useful options may include leaving the rack installed when appropriate, using its built-in wheels or handles if provided, using a rack-storage cart or dolly designed for that purpose, getting help with installation, or choosing a lowering system that better matches your needs.
If you are buying a rack specifically because you cannot lift your e-bike, consider the entire loading process – including installing and storing the rack itself – rather than choosing solely by the rack’s bike-weight rating.
What About Powered or Lowering E-Bike Racks?
Powered and ground-level loading systems can be useful when you cannot safely raise a heavy bike to hitch height. Depending on the design, the bike is loaded at or near ground level and the mechanism raises the platform afterward.
Powered does not mean unlimited capacity. For example, the current Saris Door County uses an electric raising and lowering system, but Saris lists its bike capacity at 60 lb per bike. That means the powered feature alone does not make it suitable for every 70, 80, or 100 lb e-bike.
Another approach is a separate lifting device that carries a compatible bike rack. Electric Bike Explorer has a hands-on EZ Lift Caddy review. My husband and I personally tested that system on our 2013 Toyota RAV4, including the vehicle-power connection issue we encountered during installation.
The Lift Caddy manufacturer’s current specifications list a 200 lb lifting capacity for the rack and bikes combined, and the Lift Caddy itself weighs 42 lb. It does not include the bike rack. Those details matter because a lift’s rating does not override the limits of the bike rack, receiver, hitch, or vehicle.
If you are transporting bikes behind an RV, trailer, or motorhome, check compatibility separately. Different rack manufacturers approve very different vehicle types. My guide to e-bikes for RV travel explains why bike weight and RV-rated transport equipment deserve extra attention.
How to Unload a Heavy E-Bike Safely
Unloading deserves the same planning as loading because gravity is now helping the bike move down the ramp.
Follow the rack manufacturer’s instructions and reverse its securing sequence only in the way the manual allows. A useful general approach is:
- Park on level, stable ground and set the parking brake.
- Attach and secure the ramp before releasing the bike.
- Make sure the ramp is fully extended when its manufacturer requires it.
- Remove only the restraints necessary to unload that bike while keeping control of the bike with your hands.
- Keep the bike balanced before releasing the final clamp or strap.
- Line the wheels up with the ramp.
- Walk the bike slowly down the ramp while controlling its speed.
- Keep your feet clear of the wheel path and avoid putting yourself directly where a rolling bike could pin you against the vehicle.
- Move the unloaded bike completely clear before unloading another bike.
Do not simply release the last clamp and expect the rack to hold the bicycle while you reposition yourself. Keep positive control of the bike before the final restraint is released.
How to Secure the Bike After Loading
Once the wheels are in the rack, do not let go until the bike is stable enough to begin the manufacturer’s securing sequence.
Depending on the rack, that may include:
- Wheel straps
- Tire or wheel arms
- Frame or seatpost stabilizers
- Secondary retention or safety straps specified by the manufacturer
Make sure loose accessories have been removed or secured, check that straps and arms contact the bike where intended, and confirm that the bike cannot shift excessively in the rack.
This article focuses on getting a heavy bike onto and off the rack, so I am keeping road-transport securing advice brief. The E-Bike Rack Safety and Transport Guide covers the wider transportation process.
Common Heavy E-Bike Loading Mistakes
- Looking only at total rack capacity: A two-bike rack can have a combined rating that is higher than its permitted weight for one bike.
- Ignoring rack weight: The rack itself also uses part of the available receiver and vehicle load capacity.
- Checking the rack but not the vehicle or receiver: The highest rating in the system does not override a lower one.
- Assuming hitch class tells you everything: Check the actual vehicle and hitch documentation.
- Leaving unnecessary cargo attached: Panniers, locks, baskets, and other removable items can make a heavy bike harder to control.
- Forcing a lift you cannot control: A loading problem is often better solved with different equipment.
- Using an unapproved ramp: A ramp needs the correct connection and compatibility for the rack.
- Using a telescoping ramp partly collapsed: Some manufacturers require the ramp to be fully extended during use.
- Loading on a slope: A heavy bike is harder to control when gravity is also pulling it downhill.
- Standing on loose or unstable ground: Both the rider and ramp need a stable surface.
- Grabbing fragile components: Cables, fenders, displays, and accessories are not universal lifting handles.
- Forgetting tire width or wheelbase: Weight capacity alone does not establish compatibility.
- Using an adapter without checking instructions: Some racks prohibit receiver adapters or hitch extenders.
- Letting go before securing the bike: Keep the bike controlled until the rack is supporting and retaining it as designed.
- Assuming “e-bike compatible” means every e-bike: A conventional commuter, heavy fat-tire bike, and long-tail cargo bike can have very different requirements.
When You Shouldn’t Try to Lift the E-Bike Yourself
If you cannot comfortably control the bike through the entire movement from the ground into the rack, there is no reason to force a solo lift.
A ramp, a second person, a lowering rack, a powered lift, professional assistance, or another transportation setup is the better option when the bike’s weight, loading height, balance, or your own mobility makes the process unreliable.
The same applies if you have a health or mobility limitation that makes lifting inappropriate for you. This article is not medical advice. The important point is that your transportation equipment should work for the person who actually has to load and unload the bike.
Equipment That Can Actually Solve the Loading Problem
If loading is the problem you are trying to solve, look first at rack systems with an integrated ramp, manufacturer-approved add-on ramps, low-loading platforms, and powered or ground-level loading systems. Wheel straps and frame adapters can solve specific fit problems, but only when the rack and accessory manufacturers approve them for your bike.
Before buying anything, run the bike and rack numbers through the E-Bike Rack Weight Compatibility Calculator and then confirm the result against the manufacturer’s documentation.
Heavy E-Bike Rack Loading FAQs
How do you put a 70 lb e-bike on a bike rack?
First confirm that the rack has a per-bike rating of at least the bike’s actual transport weight and that the vehicle, receiver, tire, wheelbase, and frame requirements also work. If the bike manufacturer permits it, remove the battery and other removable weight. A compatible ramp-equipped rack is usually much easier to manage than lifting the complete 70 lb bike into a tray.
Can one person load a heavy e-bike onto a hitch rack?
Sometimes, especially with a properly designed ramp or lowering system. Whether one person can safely control the bike depends on the bike, rack height, ramp, ground conditions, and individual rider. If you start losing control during loading, use a different method rather than forcing the lift.
Should I remove the battery before loading my e-bike?
Removing a detachable battery can reduce loading weight, and some manufacturers recommend it for vehicle transport. It is not a universal instruction for every e-bike. Follow the guidance for your exact bicycle and battery system.
Can I use a ramp with any hitch bike rack?
No. Accessory ramps are commonly designed for particular rack models or rack families. Verify the approved rack models, attachment method, dimensions, and instructions before using one.
Can I use walk assist to push my e-bike up the rack ramp?
Walk-assist systems are designed to help move an e-bike while you are walking beside it, but that does not automatically mean a bike-rack manufacturer approves powered assistance on its loading ramp.
I would not make walk assist the default rack-loading method unless the e-bike and rack instructions clearly permit that use and you can immediately stop and control the bike. If the manuals are silent, manually rolling the bike up the ramp is the more conservative approach.
Are there bike racks that lower to the ground?
Yes. Some powered racks and lifting systems lower the loading platform so the bike can be rolled on near ground level. Check the per-bike and system limits carefully because a powered mechanism does not automatically mean the equipment can carry a 70, 80, or 100 lb bike.
What is the easiest bike rack for a heavy e-bike?
There is no single rack that is easiest for every heavy e-bike. For a rider who wants to minimize lifting, useful features include an integrated ramp or ground-level loading, sufficient per-bike capacity, a manageable rack weight, a low tray, and correct tire, wheelbase, fender, and frame compatibility.
Can I load an e-bike with the battery installed?
That depends on the bike manufacturer’s transport instructions and the resulting bike weight. If the battery stays installed, include its weight when determining the actual loaded-bike weight.
How heavy is too heavy for a hitch bike rack?
There is no single universal number. The answer depends on the lowest applicable limit in your setup, including the rack’s per-bike and total ratings, rack weight, receiver or hitch rating, vehicle limit, and any restrictions introduced by adapters or extensions.
Can a step-through e-bike go on a hitch rack?
Yes, when the rack manufacturer supports the bike’s frame style, weight, dimensions, and required contact points. Some platform racks accommodate step-through bikes directly, while other systems may require a specific adapter or securing method.
Are fat-tire e-bikes harder to load onto racks?
They can be because many fat-tire e-bikes are heavy and their wide tires need compatible trays, straps, and ramps. Measure the actual tire width and verify every part of the loading and securing system rather than checking only the rack’s weight rating.
Do I need to consider the weight of the bike rack itself?
Yes. The rack’s own weight matters when checking how much load the vehicle and receiver can support. A heavy-duty rack plus two heavy e-bikes can add substantially more load than the bike weights alone suggest.
Disclosure: As an Amazon Associate, I earn from qualifying purchases. This comes at no extra cost to you and helps support the content on this site.

Kristina is not just an enthusiast but a true authority on electric bikes. Nestled in the coastal beauty of Virginia, Kristina has found the perfect backdrop for her passion for electric biking. As a dedicated wife and homeschooling mom, her life revolves around family, faith, and the thrill of adventure.
Originally hailing from Ohio, Kristina's journey with electric bikes began as a curiosity and quickly evolved into a deep expertise. Her blog is a testament to her love for electric biking, combining her fascination for eco-friendly transportation with her coastal lifestyle.
When she's not cruising the beach on her electric bike, you'll find Kristina indulging in her other loves: long walks along the shore, getting lost in a good book, and cherishing moments with her loved ones. With a heart as big as her love for animals, especially cats, Kristina brings a unique perspective to the electric bike world, grounded in her strong faith in God and her dedication to a sustainable lifestyle.
Through her blog, Kristina shares her extensive knowledge of electric bikes, offering valuable insights, tips, and recommendations to fellow enthusiasts. Whether you're a seasoned rider or a newcomer to the electric bike scene, Kristina's blog is your go-to source for all things electric biking, fueled by her passion, expertise, and the scenic beauty of coastal Virginia.