How to Test an E-Bike Charger With a Multimeter Safely
Last Updated on September 24, 2026 by Kristina
Introduction
If your e-bike battery will not charge, a digital multimeter can help you check whether the charger is producing DC voltage at its output. The safest beginner test is a simple no-load voltage check – not an amperage test, not a battery-opening procedure, and not a household mains-voltage test.
This guide shows you how to check an e-bike charger with a multimeter, how to compare the reading with the charger label, and what different results may mean. If your bike has a broader charging problem, start with why an e-bike will not charge or use the E-Bike Troubleshooting and Maintenance Guide to narrow down other possible causes.
How to Test an E-Bike Charger With a Multimeter
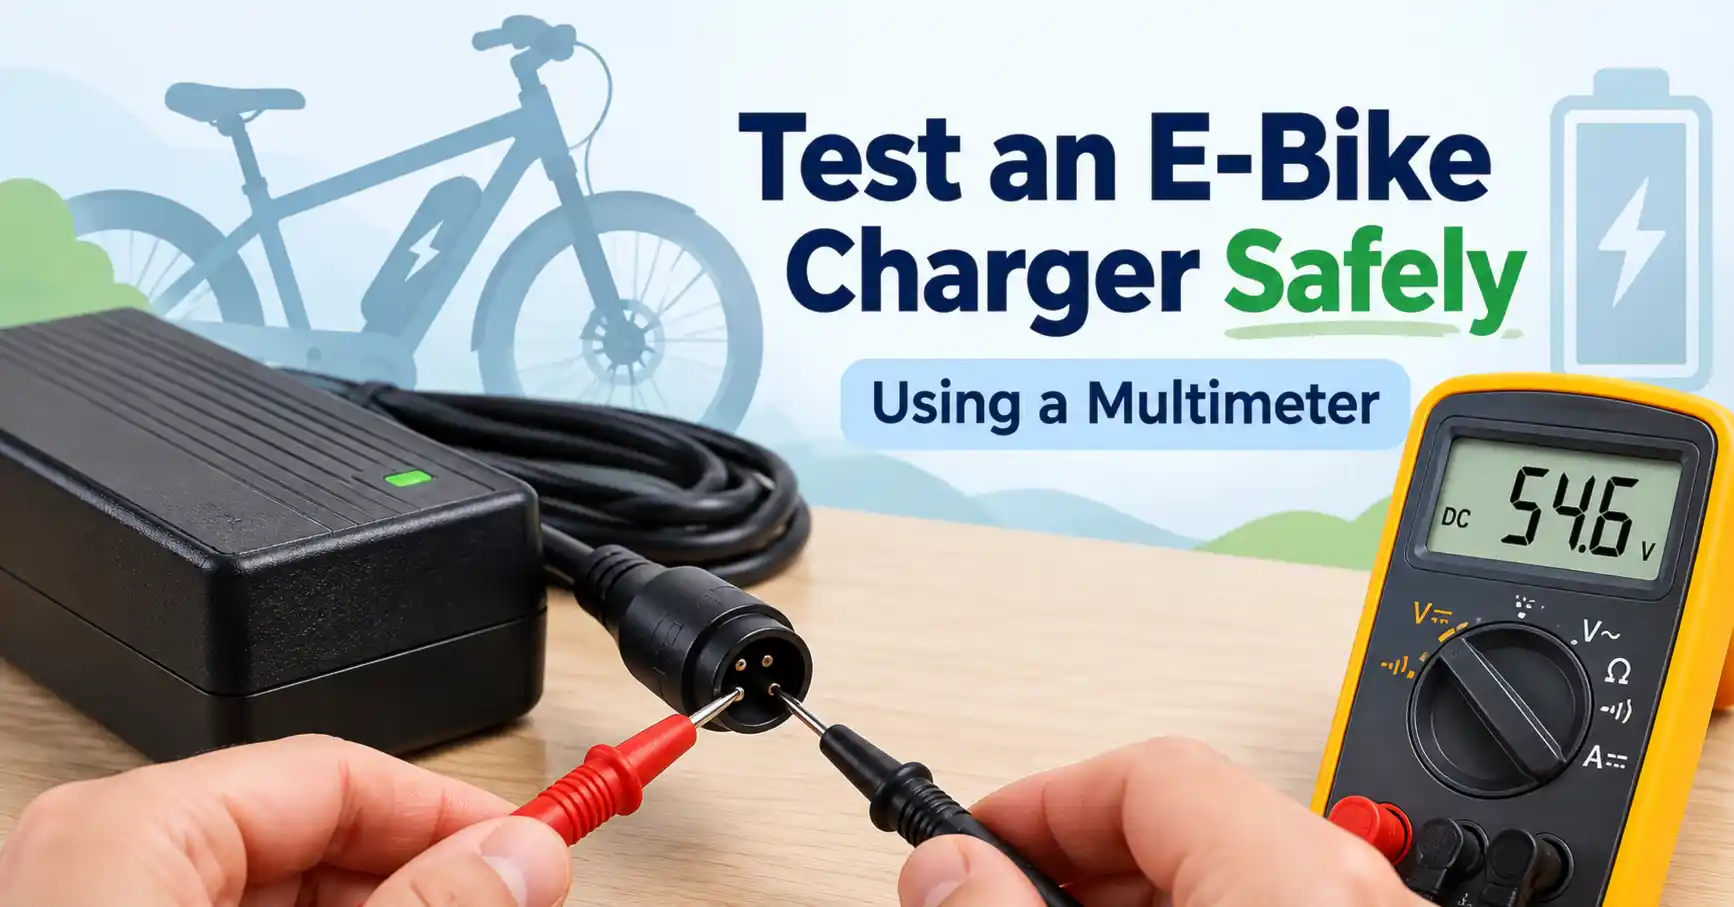
To test an e-bike charger with a multimeter, first read the charger’s OUTPUT specification so you know the expected DC voltage. Put the black probe in the COM jack, put the red probe in the V/Ω voltage jack, and set the meter to DC volts. With the charger disconnected from the battery, plug the charger into a known-good wall outlet. Only probe the output connector if its positive and negative contacts are clearly identified by the charger label, manual, or manufacturer.
Compare the meter reading with the charger’s labeled output. A stable reading near the labeled value means the charger is producing voltage with no battery connected, but it does not prove the charger can deliver its rated current under load or that the battery itself is healthy.
📖 Read Next
How to Choose the Best eBike Battery for Your Commute (With Top Picks)
Understanding E-Bike Battery Capacity: Amp Hours (Ah) Explained
5 Signs It’s Time to Replace Your E-Bike Battery
The Ultimate Guide to Electric Bike Chargers: Types, Features, and Recommendations
Why Your E-Bike Battery Loses Charge Overnight — and How to Fix It
How Long Do E-Bike Batteries Last?
E-Bike Battery Charging Mistakes
E-Bike Battery Health Checker
Safety First
Stop using or charging the e-bike if you notice smoke, swelling, unusual heat, melted plastic, damaged wiring, sparks, leaking, water damage, or a strong chemical or burning odor. Do not open a lithium-ion battery pack or charger case. Do not bypass battery-management protection. If the charger connector or battery looks damaged, contact the manufacturer or a qualified e-bike technician instead of continuing this test.
This article covers the charger’s low-voltage DC output only. It does not instruct you to probe a household outlet or the AC input side of the charger.
🔧 How This Guide Was Researched
This guide is based on manufacturer instructions, established safety guidance, technical references, and common rider experiences. Stop using or charging the bike if you notice smoke, swelling, unusual heat, damaged wiring, sparks, or a strong chemical odor.
You can read more about how I research troubleshooting, safety, reviews, and buying guides in my E-Bike Research, Review, and Editorial Process.
What This Multimeter Test Can – and Cannot – Tell You
A basic voltage test can answer one useful question: Is the charger presenting DC voltage at its output, and is that reading reasonably consistent with the output specification printed on the charger or listed by the manufacturer?
It cannot prove that the charger is completely healthy. A charger may show normal voltage with no battery connected yet still fail when asked to supply current. It also cannot tell you whether a battery-management system, charging port, connector, internal battery fault, or temperature protection is preventing charging.
Some proprietary or smart charging systems may also use communication, activation, or load-detection behavior. If the manufacturer does not document a simple no-load output test for your connector, treat the multimeter result as inconclusive rather than assuming the charger is defective.
Before You Touch the Multimeter
- Confirm you have the correct charger. Use the charger supplied with the e-bike or a replacement specifically approved for that bike and battery system.
- Inspect the charger and cable. Stop if you see crushed insulation, exposed conductors, bent or burned pins, melted plastic, corrosion, or obvious impact damage.
- Inspect the battery charging port. Do not insert a charger into a damaged, wet, dirty, loose, or burned port.
- Read the charger’s label. Find the line marked OUTPUT. You need the DC output voltage – not just the battery’s nominal voltage.
- Find the connector polarity or pinout. Use only the label, manual, or manufacturer documentation. Never guess.
- Check your multimeter and probes. Damaged test leads or exposed metal beyond the probe tips are a reason to stop.
- Use a known-good wall outlet. If you are unsure whether the outlet works, verify it with another normal appliance rather than probing household mains voltage for this e-bike test.
Find the Correct Charger Output Voltage First
The battery’s advertised voltage and the charger’s output voltage are not necessarily the same number. The battery may be described by a nominal system voltage, while the charger label lists the DC voltage it is designed to supply during charging.
For this test, the OUTPUT value printed on your exact charger – or the official manufacturer specification for that exact charger – is your reference. For example, if your charger label says OUTPUT: 54.6 V DC, compare the meter reading with 54.6 V. Do not assume that every charger for a similarly labeled battery should produce the same voltage.
If the charger’s label is missing or unreadable, identify the exact charger model and obtain the specification from the bike or charger manufacturer before testing.
A Good Multimeter for E-Bike Charger Testing
You do not need an expensive professional meter for this test, but I recommend buying one from an established electrical-tool manufacturer rather than choosing the cheapest meter you can find.
For most e-bike owners, the Klein Tools MM420 Digital Multimeter is a good choice. It is auto-ranging, which means you do not have to manually choose the correct voltage range before measuring. It can measure up to 600V AC/DC and includes a backlit display and a Lead Alert feature that helps identify proper test-lead placement.
For testing an e-bike charger, the main feature you need is reliable DC voltage measurement. The MM420 has far more measuring range than a typical e-bike charger requires, while still being straightforward enough for occasional home troubleshooting.
One important reminder: owning a more capable multimeter does not mean you should perform every measurement it supports. For the charger test in this guide, keep the black probe in COM, the red probe in the V/Ω jack, and measure DC voltage only. Do not move the red lead into the amperage jack and probe across the charger output.
How to Set Up the Multimeter
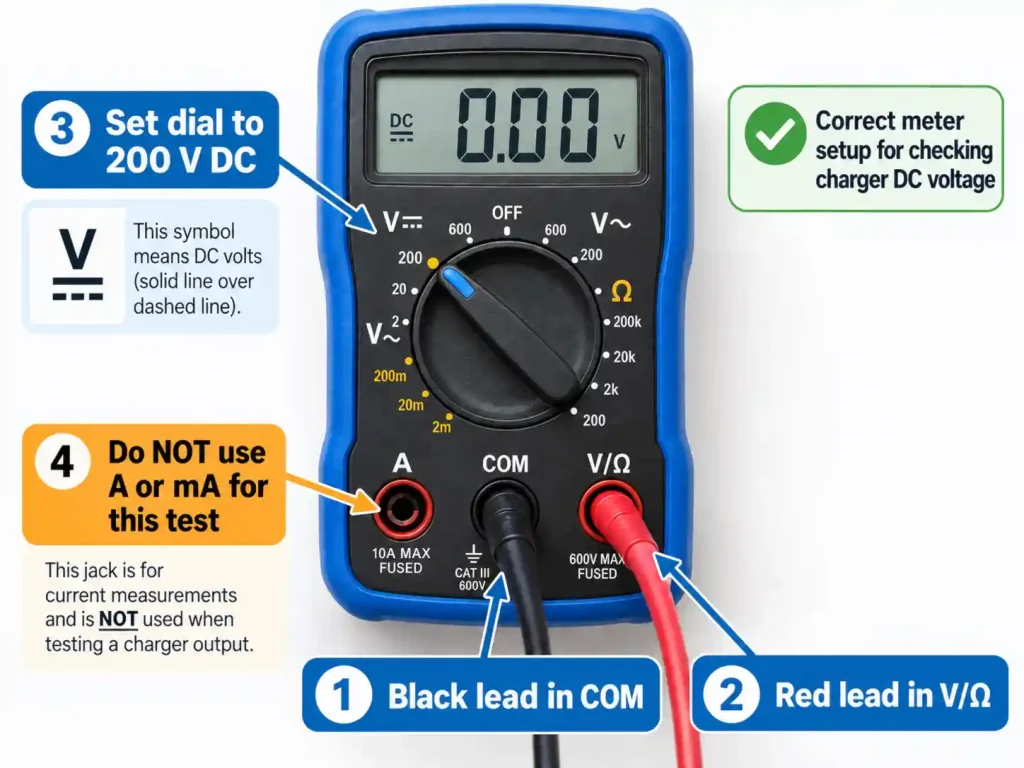
- Insert the black probe into COM.
- Insert the red probe into the V/Ω voltage jack.
- Turn the dial to DC volts. The DC-voltage symbol is usually a V with a solid line above a dashed line.
- If your meter is not auto-ranging, choose a DC-voltage range higher than the expected charger output.
Important: Do not put the red lead in the A or mA current jack for this voltage test. Fluke warns that placing the probes in a current input and then measuring voltage can create a short circuit. For this procedure, the red probe belongs in the voltage jack.
How to Test an E-Bike Charger With a Multimeter
1. Disconnect the charger from the e-bike battery
Do this test with the charger output disconnected from the battery. You are checking its no-load DC output.
2. Read the output label
Write down the charger’s stated OUTPUT voltage and confirm whether the connector polarity or pin assignment is documented.
3. Set the multimeter to DC voltage
Confirm one more time that the black lead is in COM and the red lead is in V/Ω, not A or mA.
4. Plug the charger into a known-good wall outlet
Watch the charger’s indicator light if it has one. The meaning of the light varies by manufacturer, so do not assume that a particular color always means the same thing.
5. Probe only clearly identified output contacts
If the charger uses a simple barrel connector and the manufacturer clearly identifies positive and negative, carefully touch the probes to the appropriate contacts without allowing the probe tips to touch each other.
Do not assume that every barrel connector is center-positive. And if the charger uses a multi-pin or proprietary connector, do not guess which pins carry charging voltage. Stop and use the manufacturer’s documented test procedure instead.
6. Read the display
Give the reading a moment to stabilize. Compare it with the charger’s labeled OUTPUT voltage. Do not use an arbitrary tolerance such as “within 0.5 V is always good.” The acceptable range depends on the charger and manufacturer specification.
7. Disconnect safely
Remove the probes from the charger connector before changing meter settings or moving the red lead to another jack. Unplug the charger when you are finished.
What Your Multimeter Reading May Mean
| Multimeter result | What it may mean | What to do next |
|---|---|---|
| Stable reading close to the labeled output | The charger is producing approximately the expected no-load DC voltage. | Do not assume the charger is completely good. If the battery still will not charge, inspect the charging connection and continue with battery/BMS or manufacturer diagnostics. |
| Negative reading with the expected magnitude | On a digital meter, the probes are usually reversed relative to the measured polarity. | If the connector polarity is documented, swap the probe positions and recheck. Do not guess polarity on an undocumented connector. |
| 0 V | Possible causes include no AC power, poor probe contact, a charger fault, or a charger/system that does not present normal output without activation, communication, or load. | Confirm the outlet, meter setup, connector documentation, charger indicator, and manufacturer procedure. Do not automatically condemn the charger based on 0 V alone. |
| Clearly below the labeled voltage | Could indicate a charger problem, poor contact, incorrect meter setup, or system-specific behavior. | Recheck the meter setup and official charger instructions. If the reading remains outside the manufacturer’s specification, stop using the charger and contact support. |
| Clearly above the labeled voltage | The charger may not be operating as specified, or the wrong charger may be in use. | Do not connect it to the battery until the manufacturer confirms the reading is acceptable. |
| Reading jumps or will not stabilize | Probe contact may be poor, or the output may be unstable or system-controlled. | Remove the probes, verify the test points and procedure, and stop if instability persists. |
What a Negative Multimeter Reading Means
If you expected a positive DC reading but see something like -54.6 V, a digital multimeter will commonly show the minus sign when the probes are connected opposite the measured polarity. That does not mean the charger is creating a mysterious “negative battery voltage.”
Only reverse the probes if the connector contacts are already identified by reliable documentation. If you are guessing which pin is positive, stop.
Can a Charger Show the Right Voltage and Still Be Bad?
Yes. A no-load voltage measurement checks for voltage, but the charger must also regulate properly and supply current when connected to the correct battery. A charger can sometimes look normal with no load and then fail when charging begins.
That is why this beginner procedure intentionally stops at the no-load voltage test. I do not recommend moving the meter lead into the amp jack and attempting an inline current test unless you have the correct equipment, circuit knowledge, and manufacturer procedure. A current measurement requires a different connection method and creates additional risk of shorts and equipment damage.
How to Interpret the Charger LED
Use the charger’s manual for the exact LED meaning. Colors and flashing patterns are not standardized across e-bike brands.
| Indicator behavior | Possible meaning | Best next step |
|---|---|---|
| No light | No input power, failed charger, damaged cable, or simply a charger design without that indicator behavior. | Confirm a known-good outlet and check the manual. |
| Standby light changes after connection | May indicate the charger recognized the battery and entered a charging mode. | Compare the behavior with the manufacturer manual. |
| “Full” or standby indication with a depleted battery | Possible poor connection, battery/BMS issue, or failure to enter the proper charging state. | Inspect connectors and continue with battery-side troubleshooting. |
| Flashing or error pattern | Often model-specific fault information. | Look up that exact pattern in the charger or bike manual. |
Charger Tests Good – What Should You Check Next?
If the no-load voltage appears consistent with the charger’s specification but the battery still will not charge, move to the rest of the charging system rather than repeatedly probing the charger.
- Inspect the charging port and connector. Look for looseness, bent pins, dirt, corrosion, heat damage, or poor seating.
- Check battery temperature. Some battery systems restrict charging when the pack is too hot or too cold. Follow your manufacturer’s temperature guidance.
- Check whether the battery powers the bike. This can provide another clue, although it does not prove the battery is healthy.
- Follow manufacturer reset or diagnostic instructions. Do not open the battery to access internal cells or the BMS.
- Use the broader troubleshooting path. My guide to why an e-bike battery will not charge walks through the charger, battery, charging port, temperature, and connection possibilities.
If the charger itself becomes unusually hot, read why an e-bike charger gets hot and when heat may signal a problem.
Do Not Buy a Replacement Charger Based on Plug Shape Alone
A connector that physically fits does not prove electrical compatibility. The correct charger must match the battery system’s approved charging requirements, including voltage, current, polarity or pinout, and any system-specific communication requirements.
The U.S. Consumer Product Safety Commission has warned consumers not to use chargers marketed as “universal” for micromobility products unless they have been tested and approved to work safely with the specific device. CPSC recommends using the charger provided with the e-bike or a replacement approved for that device.
If you need a replacement, identify the exact bike and battery model and confirm compatibility with the manufacturer rather than shopping by connector appearance alone.
Common Mistakes to Avoid
- Putting the red probe in the A or mA jack while trying to measure charger voltage.
- Setting the meter to AC volts instead of DC volts.
- Letting the two probe tips touch each other while they are contacting the live charger output.
- Assuming a 48 V battery means the charger output must measure exactly 48 V.
- Assuming every barrel connector is center-positive.
- Guessing pins on a proprietary or multi-pin charging connector.
- Calling a charger “good” based only on a normal no-load voltage.
- Calling a charger “bad” based only on 0 V when the system may use activation or communication.
- Opening the charger or battery case to keep troubleshooting.
- Buying a replacement because the plug fits.
60-Second E-Bike Charger Diagnostic
- Inspect: Stop for swelling, burning odor, melted parts, exposed wiring, sparks, or unusual heat.
- Read: Find the charger’s exact OUTPUT voltage and documented connector polarity or pinout.
- Set: Black lead to COM, red lead to V/Ω, dial to DC volts.
- Power: Plug the charger into a known-good outlet while it remains disconnected from the battery.
- Measure: Probe only contacts whose polarity is clearly documented.
- Compare: Compare the reading with the charger’s label or manufacturer specification.
- Interpret: A normal no-load voltage is only one piece of the diagnosis. Zero, low, high, unstable, or system-controlled readings require the manufacturer’s procedure or further troubleshooting.
- Decide: If anything is damaged, outside specification, undocumented, or confusing, stop and contact the manufacturer or a qualified e-bike technician.
Frequently Asked Questions
What voltage should my e-bike charger read on a multimeter?
Use the DC OUTPUT voltage printed on your exact charger or listed in its official documentation. Do not use the battery’s nominal voltage as your test target unless the manufacturer specifically says to.
Should e-bike charger voltage be higher than battery voltage?
The charger’s labeled output may be higher than the battery’s nominal system voltage because nominal voltage is not necessarily the battery’s full-charge voltage. The correct comparison is still the exact charger specification for your battery system.
Why does my charger show the right voltage but not charge the battery?
A correct no-load voltage does not prove the charger can supply current under load. The problem could also be the battery-management system, charging port, connector, battery temperature, wiring, or another battery-side fault.
Can an e-bike charger have voltage and still be bad?
Yes. This test confirms the presence and approximate level of no-load DC output only. It is not a complete load or current-performance test.
What does a negative charger voltage reading mean?
On a digital multimeter, a negative sign usually means the probes are reversed relative to the measured polarity. Only swap them when you know the connector polarity from reliable documentation.
Does 0 V mean my e-bike charger is dead?
Not necessarily. It can indicate a failed charger, no input power, poor contact, or a charger/system that does not present normal output without activation, communication, or load. Check the manufacturer’s testing procedure before making the diagnosis.
Can I test a 48 V e-bike charger with any multimeter?
Use a digital multimeter that is in good condition, has intact probes, and is rated to measure DC voltage above the charger’s labeled output. Follow the meter manufacturer’s instructions. “48 V” on the battery does not tell you the exact charger output you should expect.
Can I test the charger while it is connected to the battery?
That is not the method in this guide. Back-probing or testing a live charging circuit under load requires additional knowledge and may create short-circuit or connector-damage risks. This beginner procedure tests only the disconnected charger output.
Should I test the wall outlet with my multimeter too?
No. Household mains voltage introduces a substantially different hazard. For this e-bike troubleshooting procedure, use a known-good outlet or verify the outlet with an ordinary appliance instead.
When to Stop Troubleshooting
Stop and contact the bike or battery manufacturer, charger manufacturer, or a qualified e-bike technician if the connector pinout is undocumented, the charger output is outside the manufacturer’s specification, the reading is persistently unstable, the battery or charger has physical damage, or you would need to open the battery or charger to continue.
For other electrical symptoms, the E-Bike Troubleshooting and Maintenance Guide can help you choose a safer next step without jumping straight into internal battery work.
Disclosure: As an Amazon Associate, I earn from qualifying purchases. This comes at no extra cost to you and helps support the content on this site.
Sources
- Fluke – How to Measure DC Voltage with a Digital Multimeter
- Fluke – Digital Multimeter Jacks, Symbols, and Inputs
- U.S. Consumer Product Safety Commission – Universal Micromobility Charger Warning
- U.S. Consumer Product Safety Commission – Micromobility Safety Guidance
Prices, specifications, charging behavior, connector designs, and manufacturer procedures can change. Confirm the current information for your exact charger, battery, and e-bike before testing or replacing components.

Kristina is not just an enthusiast but a true authority on electric bikes. Nestled in the coastal beauty of Virginia, Kristina has found the perfect backdrop for her passion for electric biking. As a dedicated wife and homeschooling mom, her life revolves around family, faith, and the thrill of adventure.
Originally hailing from Ohio, Kristina's journey with electric bikes began as a curiosity and quickly evolved into a deep expertise. Her blog is a testament to her love for electric biking, combining her fascination for eco-friendly transportation with her coastal lifestyle.
When she's not cruising the beach on her electric bike, you'll find Kristina indulging in her other loves: long walks along the shore, getting lost in a good book, and cherishing moments with her loved ones. With a heart as big as her love for animals, especially cats, Kristina brings a unique perspective to the electric bike world, grounded in her strong faith in God and her dedication to a sustainable lifestyle.
Through her blog, Kristina shares her extensive knowledge of electric bikes, offering valuable insights, tips, and recommendations to fellow enthusiasts. Whether you're a seasoned rider or a newcomer to the electric bike scene, Kristina's blog is your go-to source for all things electric biking, fueled by her passion, expertise, and the scenic beauty of coastal Virginia.